Diy 3 In 1 Wood Plyo Box Weight,Parallel Wood Clamps Quiz,Woodworking Plans Outdoor Side Table Uts - Try Out
We've been super into fitness the past year or so, so this was such a fitting client project for us! Yup, client project! Client builds is how we got started with our woodworking business back in , so this was nice getting to make something for someone else's space for a change. This project is how we built a DIY 3 in 1 plyo box plyometric box for a local personal trainer.
We added in his logo for a nice customization touch! If you are interested in how to start your own woodworking business, we have some blog posts and videos sharing some advice and exactly how we got started. Total Boat Epoxy optional. Total Boat Lust Varnish. Finish Head Screws.
Ryobi Circular Saw. SawStop Table Saw you definitely do not need a table saw to complete this project. You can use a Circular Saw for everything. Ryobi Drill and Driver. Ridgid Jigsaw. Inventables X-Carve optional. Starting off with our sheet of plywood on top of our work tables with a 4x8 sheet of foam underneath, we cut our plywood down to a more manageable size.
These cuts are just over the dimensions we need so we can make them straighter on the table saw. You can use a circular saw for all the cuts, but since we have a table saw, we figured we would use it.
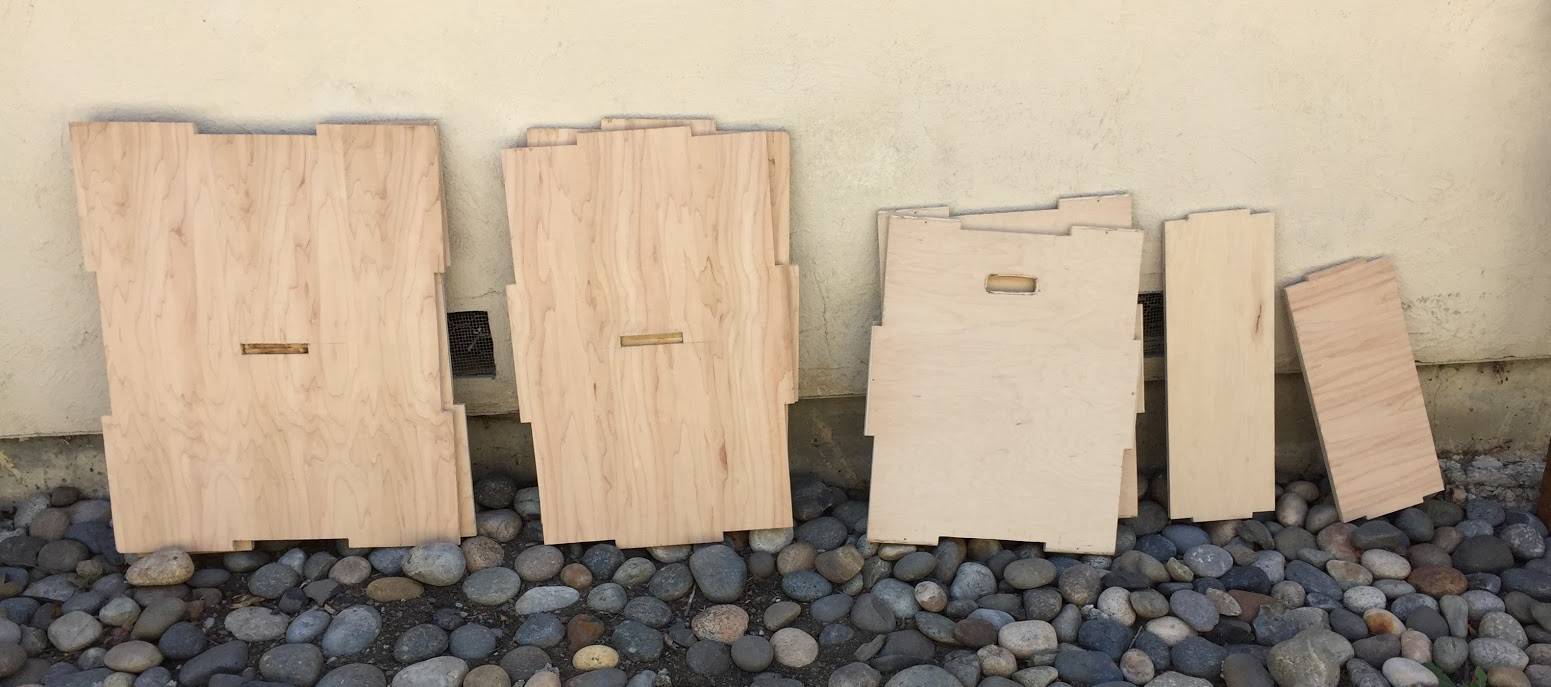
We will need 6 sides. Top and bottom are 30" x 20", front and back are 30" x 24", and the sides are 24" x 20". Each side is going to be put together by tabs, this kind of reminds me of Tetris, lol.
Then alternating each side from having a tab to not having a tab. We used the table saw to cut out each tab and gap and then used the jigsaw to complete the cut. Again, can totally do this with a circular saw and not a table saw, but you'll still need a jigsaw or flush trim saw to complete the cut, since a saw blade is round. You can watch the video above to get a more visual explanation for both using a table saw and a circular saw. We want to customize this box with our clients logo, so we brought the front piece over to the X-Carve and carved in the logo and the heights of each side.
That way when you are using the plyo box, you can know what height you are using. Seriously, these are the best bits we've used. This is going to be a pretty big box and nothing is more awkward than carrying something like this. We added in some handles in the side pieces to make it easier to carry. We used a forstner bit to make the rounded corners and then a jigsaw to cut out the rest. Follow the picture of the three different sized pieces to get your pattern and an idea of what each piece needs to look like.
Disclaimer: this is the hardest part so take your time with the measurements and the cutting. Following the pattern from the picture and it will work. Once the pieces are cut and notches are ready you can now assemble. Then apply some glue along the edges where the other pieces will join. Now start putting the puzzle together by starting with the sides then finishing with the top.
I would put only 1 or 2 nails in each section until I have all the pieces together. Once your satisfied you can then finish nailing the box together.
Once my box was finished I took my router to all the edges to give a nice rounded edge. One convenience I put on the boxes were openings on the side for you hands. To do these I drew out the size I wanted, drilled a hole for the jig saw blade to fit in and then cut out the section. You can do this step at any time. I then sanded out the inside of the hand holds and sanded all the edges one more time to ensure they were rounded and smooth! That just calls from some serious shin injuries!
Email me for any questions [email protected]. It's here! My brand new APP! Get the app.

|
Belt And Disc Sander Malaysia Data Wood Burning Stamp Logo Us |

dddd
19.08.2020 at 20:43:55
BAKULOVE
19.08.2020 at 11:36:35
PrinceSSka_OF_Tears
19.08.2020 at 20:28:26