Build A Wooden Workout Bench Journal,1967 Jet Planes Up,Diy Wood Projects On Youtube 4k,The Woodworker Magazine Video - Plans On 2021

It can be perfect outdoors to provide a focal point but is equally at home indoors where it can be used to fill a space. Best of all it is very affordable and made easy to build as the tutorial will show. Read the rest of the detailed tutorial for this bench on TheIdeaRoom. The farmhouse bench is becoming increasingly popular both indoors and outdoors, and the benches shown in this tutorial become even more impressive when paired with a farmhouse table.
Discarded pallets are easy to find , making this pallet bench very affordable. It is also quite distinctive, with a herringbone pattern, although other designs are possible.
With a few discard pallets, some 2x4s, and a few tools you too can have one of these unique pieces of furniture. It seems great for when the weather turns colder and would go great for animal lovers or just those who appreciate the furrier things in life.
This project is very similar to other ideas that involve upholstery, so you will need much of the same materials and tools:. This bench will add pizzazz and luxe to any room. The faux fur design looks a lot more expensive than it actually is. We pick this bench as the best idea and tutorial on our list. If you need a simple, functional bench look no further.
And there you have it — your new modern wooden bench that will serve as an excellent seat and decor accent. You can also make this sturdy, familiar bench out of very ordinary materials, even things you have lying around or can find in scrap heaps. That can be easily made a very earth-friendly option for those who are into repurposing old materials.
A great example of how much markup is found on even the simplest of mass-produced items. How about building a tremendous antique design creation that is sturdy enough to carry any load but looks like it came out of Amish country?
Of course, benches are made out of other materials than just wood. Why not update a perfectly functional, yet dull, item you already own and turn it into something uniquely made?
One of the best ways to beat the high cost of retro furniture is to do your own retro-ing. This fabulous 50s Mid-century modern bench is such a perfect match for the era, and it will make all of your other period pieces look even better.
It is, however, more about upholstery than it is about making of the bench. Finally, someone who understands that mistakes can happen and provides solid advice on how to avoid making them yourself.
Looking for something a little more avant-garde and creative than your classic wooden bench? Why not try out this daring departure that features some charmingly bold artwork on the fabric? The great thing about hairpin legs on benches is that they are made so easy to install and look so great.
Plus, of course, you can paint them to match practically anything. Many spaces, particularly in older homes, are best suited for very natural-looking benches. This woven topped jute bench is simply perfect for those instances where glass and chrome are not going to cut it. One of the most significant advantages of DIY furniture is that you can adjust the dimensions of the benches to perfectly suit your specific requirements.
Unlike factory benches, which tend to come in standardized sizes, you can produce the perfect fit for your own imperfect spaces. Who needs old junky coffee tables? Anyone who wants to add fabulously made stylish new benches to their homes.
The best part is that virtually all of the woodworking is already done for you. Just add style and away you go. Some of the best and most simple DIY benches come from people who are not typically involved in building such things.
Here is an excellent and straightforward project that looks great and even beginners can do it. The thing about benches is that so much of the project is built around the legs that go underneath that big slab of wood which otherwise comprises the piece of furniture. So check out the variation of the bench in the prevalent Mid-century modern design. Looking for an idea that is whimsical and just plain fun?
This is the one made for you. Making this bench project is a real piece of cake. Costs are low, creativity is the prime ingredient, and you end up with something that nobody else will ever be able to match if they tried for a thousand years. Build this pallet bench for your unique accent piece. People seldom realize the value of excellent directions until they stumble across one of the projects that features them.
For those who are just starting on DIY bench building, this is the perfect place to start your quest. Build one of these easy benches by following the tutorial. For those who are better endowed with woodworking skills and equipment, this is one of the best projects that will produce a fantastic replica of a modern classic piece of furniture that has never gone out of production since its introduction in the s.
Nelson benches are popular for their unique look and you can build one of them by following a tutorial. Some DIYers love the slat wood design but lack the expertise to tackle a Nelson Bench knockoff; this is a great compromise that is much easier to construct and still retains much of its panache.
When it comes to turning old items into new ones, it is good to keep in mind that the old items and the new items do not have to belong to the same kind of things. Here, a couple of castoff dorm stools are turned into a classy, yet easy to make, bench. Read more. Last updated on March 14, Source: www. We always have new deals for your favorite home products Tutorial: overthebigmoon. Tutorial: www.
Tutorial: buildsomething. Tutorial: thevintagerugshop. Tutorial: thethriftycouple. Tutorial: ruggydiy. Tutorial: lovegrowswild. Tutorial: biggerthanthethreeofus. Do the same with the vinyl on top of the foam. Pull the vinyl firmly around the bottom of the plate on all four sides. Fold the vinyl edge before stapling. Staple the vinyl to the joint with a construction stapler. Use a stack of staples placed at 1-inch intervals.
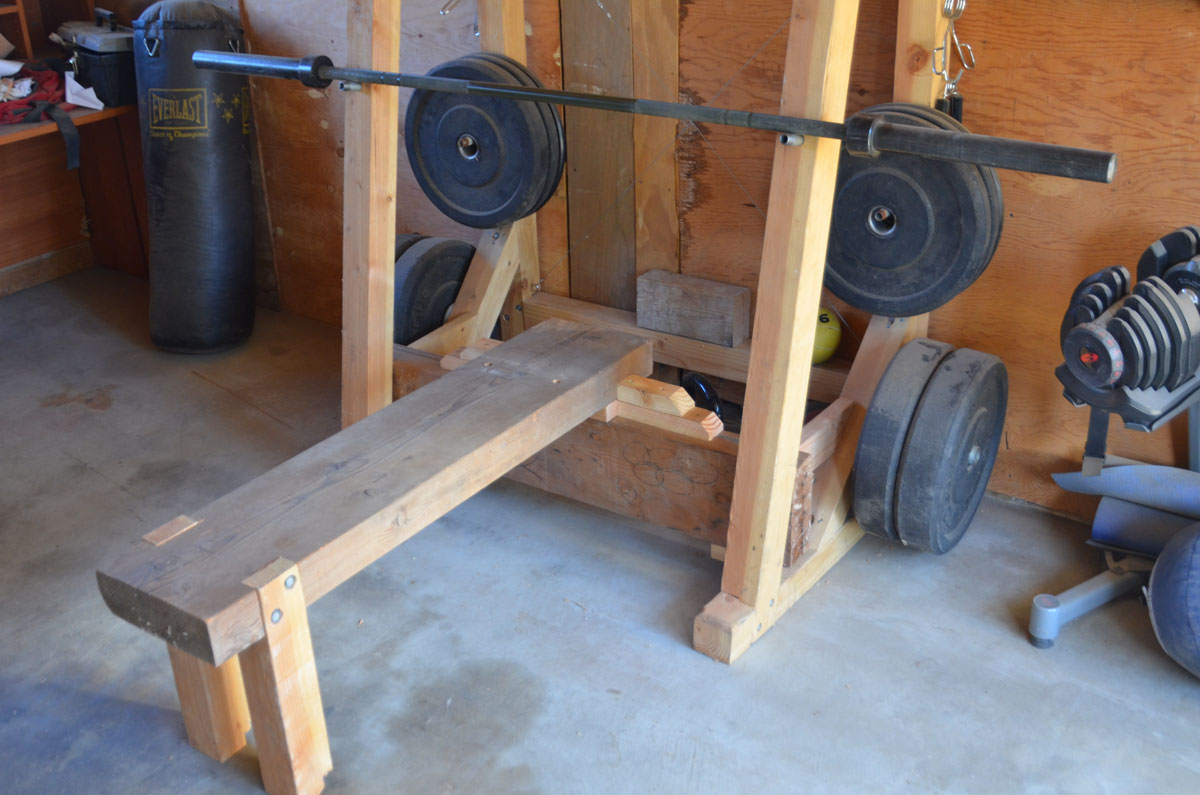
Fold down the corners and staple them too. Release the pressure on the foam once the staples are in place. This is the workbench completed. The long way must be parallel to the ground when making the bench not perpendicular in horizontally welded pieces.
The wall thickness of the pipe has to be higher for some weightlifters, but most people will be able to get away with the standard stock bar that is used in making a car chassis available online see resources after reading this article.
Cut lengths that are 3 feet for the length that is screwed to the work table , 18 inches each for two pieces that go from the bench to the floor , and 3 feet each for two bars which stabilize the bench and support the floor.
Make holes in the bar that corresponds to the hole of the bolts being glued off the work table bottom. Measurements of the necessary holes in the action of the support bar below the bench are drilled 2. Mark these measurements with a Sharpie and use the screws that leave the bench to confirm the measurements are correct. Drill the holes with a cobalt bit. Add a few drops of oil to lubricate the drill bit and drill while moving at slower speeds.
Use a thick, stable piece of wood as a backing when drilled to prevent the drill bit from damaging the surface underneath or drill.
Weld the bar that has just been drilled to the inch bars. These inch bars are the vertical supports legs and when getting bigger, taller or more depending on the needs of the weightlifter. Weld the inch bars with their ends against the bottom of the drill bar at degree angles. Weld these two support rods, 2 inches from each end of the center bar drilled to support the cushioned seat when installed. When the first welds cool down, weld the two support bars to the center of the two legs to form the base, stabilizing the bench.
Place the screws on the bottom of the work table through the holes drilled in the bench and screw them into their nuts securely. Weld a very small point on the nuts so it does not come loose. Do not weld too well in the case if needed later. Underneath the nut, cut the short bolt and file the sharp edges. Although this is a traditional weight bench, the vinyl can be any color or pattern that is desired by the vinyl builder.
Choose it is with fabric backing for durability. Make sure that the bench and welds are thoroughly tested before use. If you use heavier than normal weight while lifting, try the bench again.


|
Everbilt Full Extension Drawer Slides Uk Free Woodworking Jewelry Box Plans Carving Kit Party City World Best Countersink Bit Set For Wood |

Sanoy
25.01.2021 at 23:54:15
Sindibad
25.01.2021 at 12:46:37
Killer_girl
25.01.2021 at 13:22:10
FASHION_GIRL
25.01.2021 at 20:32:28