Router Table Finger Joint Jig Plans Map,Wood Magazine Toy Plans Nz,Point And Measure Digital Tape W5746 Manual Apk - Videos Download
This technique might seem intimidating at first, but the jig to create this joint is so simple, anyone can do Make Finger Joint Jig Router Table Kit it! Links below are affiliate links, clicking on them helps me keep this site going at no extra router table finger joint jig plans map to you :.
Before we begin, the type of blade you use for this type of joinery matters. That would not be a good option for this joint. What you want to use is a ripping blade or a blade that has Flat Top teethalso knows as FT teeth. If you use a blade where the top of the teeth have an alternating bevel ATBthe joint will not be flat on the top.
Your finger joints will look more like dog-ear joints…. Now that you chose the right blade for this type of joint, you need to measure how wide the blade actually is.
I did this by making a small cut into a scrap of plywood, then turned off the saw mid cut as not to cut all the way through the piece. Note: I am only going to be using a single blade to make these joints, but the same method would apply to a dado stack. Then I measured how wide that cut kerf made by the blade was with my calipers.
This is way easier and more accurate than trying to actually measure the teeth of your blade. I took the measurement from the calipers to my thin ripping jig and set the correct width between it and the blade.
This way the thin strip I will cut wont fall in the gap router table finger joint jig plans map the throat plate. Safety first! Then I cut the thin strip and it was a perfect width after the first cut. Love that thin ripping jig…. I ripped it so that it was as tall as the fence on my my cross-cut sled.
I then placed my cross-cut sled on the table saw and placed the material I want to make the finger joints on next to the blade to get the perfect height for the joint. You want the blade to be slightly higher than the material. It is always better to cut the joints a little longer and sand away the excess than not cutting them long enough. I placed the plywood up against the cross cut sled and made the first cut.
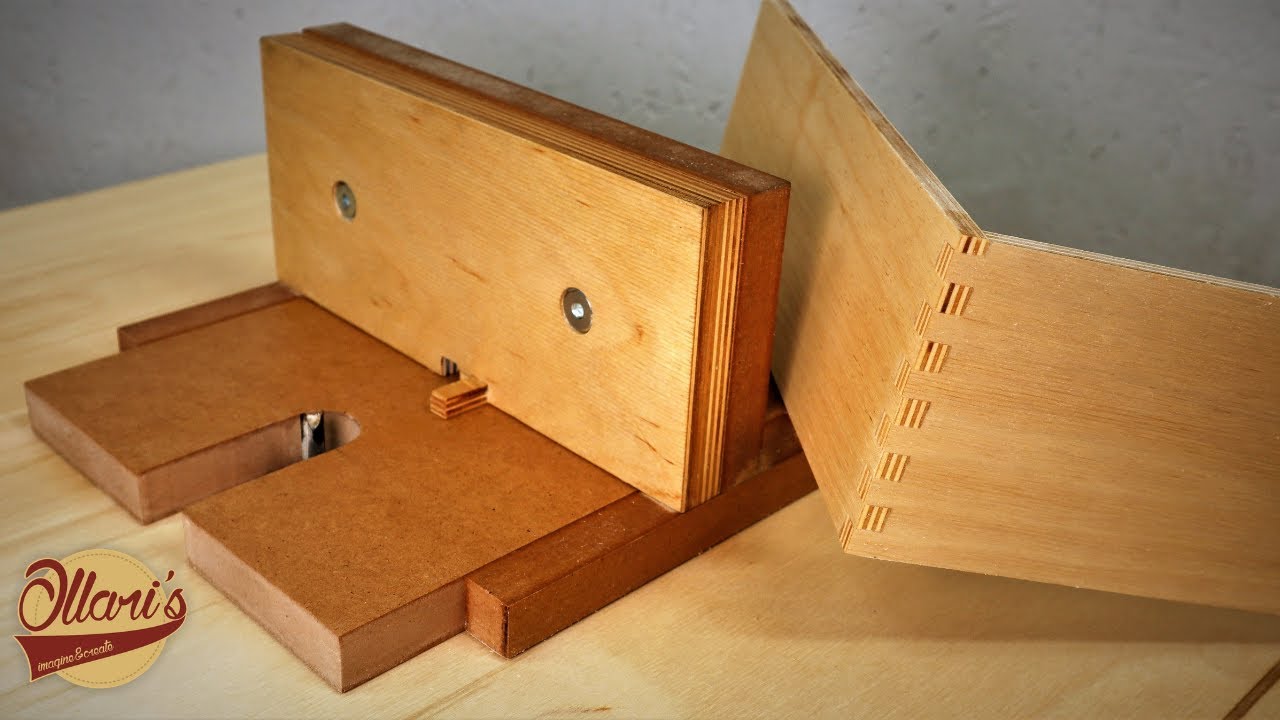
I used CA glue with accelerator spray to attach the pin to the jig. Now, this is the tricky part…. The pin is the same width as the blade, and you want the space between the pin and the blade to be roughly the same as well for a good fitting joint.
To get this perfect distance I used the scrap left over from when I made the pin and placed it between the blade and the pin. Then clamped it to my fence. Once clamped you can begin your test cuts! To use the jig, place one edge against the pin to make the first cut. After each cut you move your piece over and place it on the pin to make the next cut. In order for the router table finger joint jig plans map to fit together, they need to be opposites of each other, Like a puzzle.
To do this you need to take the first piece Finger Joint Jig Router Table Unit you cut and flip it around so the side that was facing out towards the blade when you cut it, is now facing in towards the fence. Now that the piece is flipped you need to place it on the pin of the jig by the first cut you Router Table Box Joint Jig Plans 35 made. Then butt the second piece next to the first piece to make the cut. To understand this a little router table finger joint jig plans map, the pattern of the first piece is pin-gap-pin-gap etc.
The first piece is used as a spacer so the first cut in the mating piece will be a gap instead of a pin. After you make the first cut by using the first piece as a spacer, it is no longer needed and you can continue cutting the rest of the joints by placing each cut you make on the pin until there is nothing router table finger joint jig plans map to cut. Also note, when making these cuts you should mark the top side of all your piecesthat way you can always reference that mark to make sure the top side is always against the pin for the first cut.
I placed the pin of the jig too far away from the blade so the pins are too big to fit in the gaps. If the joint is too tight like this one you should move the pin on the jig closer to the blade. If the joint is too loose, move the pin on the jig further away from the blade.
After glueing, you can easily sand down the excess material thats hanging over the pieces to get a really nice looking joint. Collapsible Bandsaw Bowls. Adjustable Dado Jig. Geometric Veneer Record Player Stand.
Sunburst Veneer Guitar. Hand Tool Sharpening. Interlocking Puzzle Joint. Pool Toy Storage. Modern Storage Bench. Multi Function Cross Cut Sled. Router table finger joint jig plans map Solitaire Game. Three Piece Lap Joint. How to Make an Adjustable Doweling Jig. DIY Puzzles for Kids.
How to Make a Custom Waterslide Decal. Modern Bar Cart. Making Dowels without a Lathe. Shooting Board with Attachments. Waterfall Side Table with Storage Shelf. Hand Tools. Check out router table finger joint jig plans map full video below! The pin is router table finger joint jig plans map same width as the blade, and you want the space between the pin and the blade to be roughly the same as well for a good fitting joint To get this perfect distance I used the scrap left over from when I made the pin and placed it between the blade and the pin.
This is why we do test cuts…. On my second try, the fit was perfect. That was super easy, now I have to go finish up this project!
Email Address.


|
The Weekend Woodworker 2020 Kid Woodworking Projects Name |

LEDI
19.09.2020 at 17:54:27
APT
19.09.2020 at 14:23:59
1818
19.09.2020 at 16:21:35
Smack_That
19.09.2020 at 15:53:42
RENOCKA
19.09.2020 at 22:59:37