Metal Lathe Tools Explained,Types Of Jointer Plane 90,Old Woodworking Vise Zero,Full Size Carbide Turning Tools Zoom - PDF 2021
Whether you just bought your own lathe, or just passed the SBU for the metal lathes metal lathe tools explained tech shop, you're now going to need some tooling for the lathe. This instructable aims to guide you in choosing and setting up indexable carbide tooling, primarily at the techshop.
If you don't know what the techshop is, you check it out here www. The lathe in this instructable can be found at the San Jose branch. There are many different types of tooling you can use on the lathe. The simplest and most common is high speed steel HSS metal lathe tools explained. These toolbits typically come as sqaure bars, and are then hand ground on the pedastal grinder. HSS Tooling can be very versatile and economical, metal lathe tools explained if you don't plan on using the lathe very much, or you don't know what kind of parts you will be making.
However, while HSS tooling can be very cheap initially, it can have drawbacks. Mainly, if you're not a professional, chances are grinding tools will take you significant time, and your tools will not always the same. HSS tooling also has a significantly shorter lifespan than other types of tooling, especially in hard materials.
Brazed carbide tooling would be considered the next step from the basic HSS tooling. These tools feature a steel body, with a carbide tip brazed onto the end. While these tools are quite common Most techshop lathe tools are brazed carbideI have never had good success with them. From my experience, they are difficult to get good finishes with, and are require a green wheel to sharpen.
Metal lathe tools explained carbide toolbits can be similar in cost to regular HSS toolbits, or three to four times more expensive.
While I don't recommend it, if you do want to go with metal lathe tools explained carbide toolbits, you can see extended tool life over HSS, especially in hard materials.
Indexable carbide tooling is the third type of tooling for lathes. Indexable tooling uses steel tools, with a screw or clamp securing a carbide insert to the end of the tool. Indexable carbide tools and inserts are widely available, as they are almost unanimously used in CNC Turning. Indexable tools and inserts come in many different varieties, one can metal lathe tools explained found for almost any job.
Unlike HSS or brazed carbide, carbide inserts require no sharpening prior to use. Most inserts have at least 2 separate cutting edges, and can be rotated when one metal lathe tools explained dulls. Indexable carbide tooling as does not typically re-adjustment of the tool height when Good Quality Metal Lathe Tools swapping inserts. The primary drawback of indexable carbide tools is the initial cost. Additionally, if you need a special tool, you must buy an additional tool, rather than grind it yourself.
However, if you don't like grinding your own tools, and just want to make a lot of parts, indexable carbide is my favorite way to go. The inserts cut very well in a wide range of materials, and require little to no time after setting the height once.
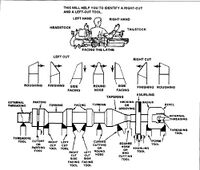
There are many types of carbide tools metal lathe tools explained on the market today. Choices range from small threading tools, to massive 2" boring bars. Choosing the best ones metal lathe tools explained you can be difficult. If you do not have in a mind a certain type of part you'll be making, a general purpose group of tools, that can turn, face, and bore will probably be your best bet.
The KBC Tools catalog has a great metal lathe tools explained on indexable carbide tools, with diagrams as to what type of cutting each tool and insert can do. Both of these tools use CCMT If you are unsure about what to get, those two tools will cover most all of your turning, facing, and boring needs, at a great price.
Once you have tools, you will need inserts. Most tool stores that sell indexable carbide tools, will also sell the inserts. If you have trouble finding the inserts, you may want to look into a different tool, one with more common inserts, as this will save you time and money later. Again, the KBC Catalog has a great section describing almost all common inserts, and breakdown of the naming conventions.
I bought my inserts from maritool. Large nose radiuses. I chose a selection metal lathe tools explained inserts, positive rake, Kennametal K68 inserts for aluminum, and neutral rake CeraTip CA inserts for steel and stainless. Positive rake inserts will reduce horsepower requirements in soft metals, but can break off in hard materials. Neutral or negative rakes are much stronger in hard materials, but require metal lathe tools explained horsepower to push through the cut.
Toolholders are what attach your tools to the lathe. Most modern lathesand all the techshop lathes, are equipped with quick change tool posts Shown above. These are special tool posts, that allow you to quickly swap tools, while maintaining the same height for each tool.
The majority of the rest of this instrucable will cover set-up with quick change posts. If you have another type of toolpost, the same general rules apply, but the methods for setting tool height will be different. If you just got your lathe, the toolpost should say which series it is.
All series toolholders will fit the metal lathe tools explained toolpost, and similarly, for series holders and posts. However, a series toolholder metal lathe tools explained not fit on a series toolpost. The toolholders themselves are also standardized. Different varieties typically come in all common toolpost sizes. For most turning and facing tools, a 1 or 2 toolholder will be the best choice.
For boring bars, a 2 or 4 metal lathe tools explained will be best. You have to choose smaller tools based on your toolpost. Here, I chose a single BXA 2 toolholder.
Once you have your tooling and holders, you need to prepare everything to go in the lathe. If you tooling didn't come with inserts installed, that will be your first step. Changing the inserts is very simple, simply unscrew the clamping screw, and remove the insert. You will want to be careful of chips and debris when changing inserts, as they can cause inconsistencies between inserts. For setting the tool height, it also recommended metal lathe tools explained you use an insert you don't care too deeply about, as it is possible to break.
Next, install a tool into your toolholder. Again, be sure to clean both the tool, metal lathe tools explained the toolholder, as even small chips will cause inconsistencies. Place the tool in the slot, and tighten the set screws as shown. You metal lathe tools explained want to get these set screws decently tight, if they are loose they can vibrate free. Now that your tool has inserts installed, and is in a toolholder, you are ready to install it on the lathe.
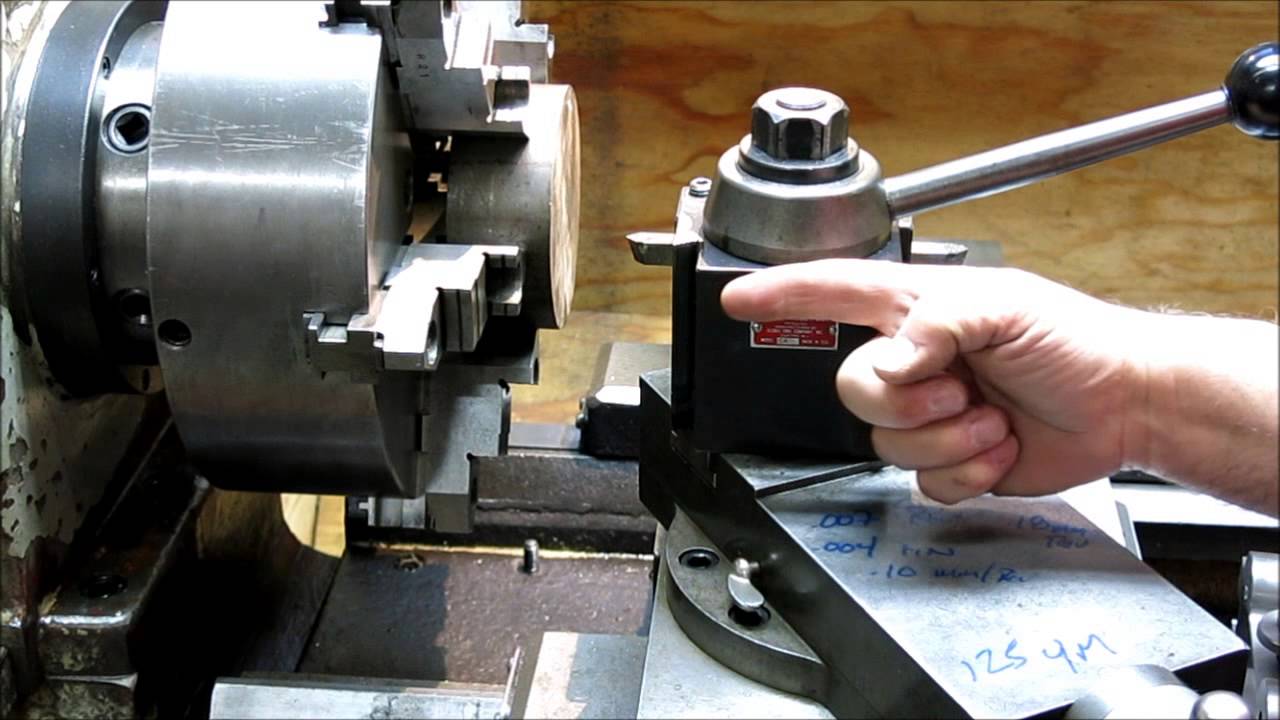
It is again recommended to clean all the surfaces on the toolholder, and toolpost. To install your toolholder, rotate the large handle on top of the toolpost counterclockwise, until the small gibs raises up. Then slide you toolholder onto the approiate dovetail slot.
Push the tool all the way down, and rotate the handle clockwise until tight. In this operation, you will be setting the tool height relative to the machine. The ideal height for each tool varies, because the cutting edges sit at different heights on each tool. However, all tools will cut best when the cutting edge is directly on the centerline of the spindle. For quick change toolholders, the height is set by adjusting the thumbscrew and locking nut.
On traditional 4 way toolposts, shims must be added under the tool. To set the height you will metal lathe tools explained something long, and relatively flat, with two parallel edges. A steel rule, works great for this. You will also want a piece of round of decent diameter. This method will in theory work with any diameter, but it will be more difficult as the diameter goes down. I used a piece of 2" aluminum round I had leftover. With the machine off, chuck the round stock in the chuck, and tighten.
You will be cutting with it, so don't skimp on the chucking. Next, move the tool until the cutting edge is in a position to contact the outer diameter of the work piece.
Take your rule, or other object, and hold it so it so the cutting edge of the tool is roughly centered on the length of the rule. Then, advance the X axis until the cutting edge just contacts the rule. Be careful, to much pressure will break the carbide.
You should now be able to let go of the rule, and it should stay in place. If not, keep putting light pressure on the axis until it metal lathe tools explained. Now, metal lathe tools explained yourself so metal lathe tools explained can get a good look directly at the front of the spindle.
If the tool was perfectly level, you would see the rule perfectly vertical, however, unless you are extremely lucky, it is most likely angled. If the rule is angled such that top is closer to the spindle center, the tool is too high.
Similarily, if the rule is angled such that the bottom is the closer to the spindle center, the tool is too low. Take note of the angle of the rule, and decide which way to move the tool. Then, remove the tool from the toolpost.
Loosen the locking nut on top the thumbscrew, and metal lathe tools explained the thumbscrew so it moves either up or down.
There is no direct science on how much to move the thumbscrew at this point, so you should use your best judgement, if it is wrong, there will be no harm. Once you have moved the thumbscrew, tighten the locking nut, and re-install the tool.


|
Wood Carving Kit For Beginners Pdf Brad Point Drill Bits For Metal Engineering Scrap Wood Furniture Ideas Twitter Multitech Kitchen Drawer Brackets Ios |

BAKULOVE
08.07.2021 at 14:16:20
Arxiles
08.07.2021 at 19:31:20
RONIN
08.07.2021 at 14:47:13
BLADEO
08.07.2021 at 19:22:53
45345
08.07.2021 at 20:14:13