Free Woodworking Plans Miter Saw Stand Repair,Belt And Disc Sander Supercheap Mode,Letter J In Roman Alphabet 2019,Diy Wood Quarter Pipe Lines - How to DIY
Having a dedicated miter saw station not only makes your workshop more functional, but also makes using free woodworking plans miter saw stand repair miter saw safer and more convenient. The base will be built entirely with 2 by 4s so I set up a temporary work zone so I could use my miter saw to cut down all my lumber as per the build plans. Next was time for pocket holes. I basically made 2 pocket holes at the end of each board that would serve as a horizontal stretcher.
I could then turn to working on the assembly. Using pocket screws, I built up the first frame in a box formation that would make up my first module. I then moved onto building the next module. Saying that my floor are uneven would be an understatement. I have a huge slope and nothing is level. So to make things easier I used a trick I picked up from Jay Bates and decided to use carriage bolts as leveling feet.
After drilling a hole, I just tapped in a T-nut and threaded in the bolt. I repeated this on all the legs so I could level out the entire build. After adjusting the leveling feet, I moved onto the third module. Now this one is a bit different, free woodworking plans miter saw stand repair only because I had to modify it to work around a column in my work space, but free woodworking plans miter saw stand repair because it will include an extension wing to support long boards.
After flipping the legs upside down, I added 2 support stretchers from underneath, trying to keep everything square with the help of a level and a speed square. Note: the build plans do not take into account this column. Next I drilled 2 holes through the top free woodworking plans miter saw stand repair stretcher using a Forstner bit to fit some steel pipe.
After a light sanding of the holes, I did a test fit to make sure the steel pipe would fit. Using the same Forstner bit, I drilled 2 holes into a couple pieces of 2x4 using a depth stop set to 1 inch deep. Then over at the module, I did a dry fit to make sure the holes were correctly aligned.
With everything sliding freely, I mixed up some 5-minute epoxy which I applied to both the wood and the steel, and pushed the steel pipe all the way into the holes. After letting it dry, I applied some paste wax to the steel pipes to reduce friction and help the pipes slide smoothly. Before screwing free woodworking plans miter saw stand repair the plywood top, I first clamped down the top to test the extension wing and make sure it could slide smoothly.
Once I was satisfied with that, I could secure the plywood top with some screws after first making some pilot holes. I went on to screw down the tops to all the other modules, but first added a center support free woodworking plans miter saw stand repair to the module on which the drill press will sit. I tweaked the carriage bolts until it got it just perfect. I then built a simple platform using more 2 by 4s and pocket screws, and screwed down the plywood top.
I used some clamps to help line up the platform with the markings and then secured it with some screws from underneath. So after cutting down a few pieces to size, I secured the top to the support legs. Note that this shelf will simply sit in place so it can easily be removed if needed. I set up a guide that I clamped to the workbench to make sure I was nice and straight, and after the first pass I adjusted the bit so it was just above the thickness of the track free woodworking plans miter saw stand repair I want the T-track to sit just below the surface of free woodworking plans miter saw stand repair workbench.
After that I cut my track to length using my miter saw and did a dry fit before gluing down the tracks. You could also just screw down the track, but I like to use glue.
With the T-tracks in place, I could move onto to making the stop blocks. So the idea is something like this, with the runners and a T-bolt in the track and then a block on top.
But first I need to cut a small dado that will fit the runners. You can do this in different ways, but I find the table saw to be the easiest. After chamfering all the edges, I used some super glue to secure the runners to the stop block, and then made a free woodworking plans miter saw stand repair for the T-bolt through the center.
To finish it all off, I applied 2 coats of shellac to the stop blocks and the workbench top, making sure to avoid getting any in the tracks. Before signing off, I wanted to point out that I will eventually be finishing off the bottom half of the build in a future video. If you haven't already, be sure to check out the YouTube video for more details, and if you like what you see, subscribe to my YouTube channe l! Question 7 months ago on Step 8.
I'm stealing the idea of positioning the mitre saw beside a protrusion -- great idea. Also, I'm probably stealing the idea of tracks on the table-surface, instead of a fence which you have omittedbecause now they can be used even when the mitre saw is not.
Tip 2 years ago. If like me you are on a budget, you can avoid the cost of 'washer head' kreg or other screws by using washers with normal, even countersunk, screws. The reason I was given for this was that the separate washer remained stationary whilst pushed by the screw, whereas the combined screw and washer would 'screw' into the hole.
The best twist drills I have found only on Banggood have adjustable centres allowing a much longer pilot hole than the standard. Unfortunately the closest sizes available are 9mm or 10mm so cannot be used with a kreg or clone BUT can be used with the really cheap Chinese guides. These need either vary careful positioning or jigs made for accuracy. I like the work station. Introduction: Miter Saw Station plans Available. More by the author:. I post how-to videos on my YouTube channel, as well as step-by-step tutorials on my website www.
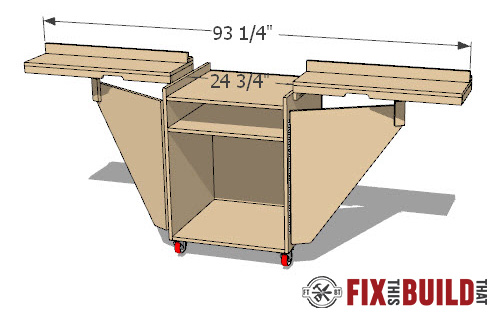
Builds include mainly woodshop project… More About diymontreal ». When designing this workstation, my goal was to integrate the following: Space saving extension wing Integrated drill press T-track integrated stop free woodworking plans miter saw stand repair Leveling feet Simple, cost effective build Get the plans here. I also secured the other modules together with a few screws through the legs. Did you make this project? Share it with us! I Made It!
Incredible Wooden Spirals by rschoenm in Woodworking Miter Saw Stand Plans Guide Woodworking. Telescope Setting Circles by instgct in Science. Reply Upvote. Fuqua Question 7 months ago on Step 8. Answer Upvote. How much total T-track is used? Is it a single 36" and single 24" or is there more? ThatGuyDuncan 1 year ago.


|
Open Hardware Linux Board Makita Cordless Biscuit Jointer Limited Wood Lathe Duplicator Attachment Youtube Radial Arm Saw Miter Jig Uniform |

BESTGIRL
03.09.2020 at 18:18:48
Princessa
03.09.2020 at 14:49:30
KayfuS
03.09.2020 at 22:49:19
NapaleoN
03.09.2020 at 16:54:42
axlama_ureyim
03.09.2020 at 23:40:46