Diy Wood Vanity Top 100,Osebni Epni Planer 2021,Cnc Engraver Projects Zip Code - Review
A lumber base with herringbone design inspired bathroom vanity is going to bring a vintage sound appeal to your Diy Wood Vanity Light Youtube bathroom decor. If you are looking for a design to start building from scratch and fitting in the mirror with no extra over effects, this could be it. Inspired by minimalism and rustic appeal, this DIY bathroom idea is the perfect portrayal of everything perfectly in place.
Create a contemporary, sophisticated look with these stained pine constructed boards combined with a surface-mount sink. Give the smaller space a customized, larger storage vanity! With the vintage touch to brighten up the little corner even more. This DIY maple and plywood vanity base offers ample space for bathroom storage and is doing so with style in check. This one is going to be a major hit as it comes under the smart makeover by staying in the budget!
If you have a thing for faux drawers, make this your classy faux drawer door vanity decor! If you are looking for an instant vanity upgrade, check out this great deal of vintage-inspired vanity update by apairandasparediy.
With a minimalistic surface-mounted sink. This here is a perfect combination for the mixture of both new and old. Usually, the wonders start at home for a bathroom vanity decor or upgrade. If you too have an old or antique piece of a cabinet or reclaimed cabinet lying around somewhere in your storage in or closet! It is time to transform it into your sensational bathroom vanity cabinet.
Do you want to organize your toilet paper in a unique and creative way? The visual and literal representation of little but genuinely mighty! This floating wood DIY bathroom vanity is going to bring a rustic and minimalistic appeal to your bathroom at the same time.
If you have limited space available, this DIY floating wood vanity is going to fit in just right. All these mirrors are unique and made from recycled driftwood! Check out this easy to clean and wipe down bathroom vanity with two large cabinet doors, two drawers, and an open storage area.
Combined with the standard off the shelf vanity top! Get the full free plan from Ana White and gear up your bathroom vanity decor game. Spruce up your bathroom vanity game with this repurposed desk! Brighten up the whole thing with some lively paint and easily convert an old desk to trendy and elegant bathroom vanity.
Create your own exclusive bathroom vanity from home depot , with step by step guide. Learn to update your own look after space for yourself with 55 unique and easy to build DIY makeup vanity ideas.
Includes vanity material list, tool list and step by step directions you can follow to DIY a vanity. Keep clutter off the vanity shelf with this DIY open shelf vanity! Make a sturdy and storage enriched bathroom vanity to add an appealing and at the same time quite handy look to your bathroom decor.
Get the pretty easily do-able plan by h2obungalow. Remodeling is the most inexpensive and fun way to upgrade your decor. This DIY bathroom vanity is made using a dresser with plenty of storage and customization options. Check out this super rustic and utterly sophisticated DIY bathroom vanity! You can get this brass faucet, vessel sink, and brass drain straight away from amazon. Another pro-tip; While staining the wood, use a rag, wet the wood, stain it, and then wipe the wood clean.
Most of the time, it is just so hard finding the right bathroom vanity as per your requirements! To remedy that, make your own bathroom vanity with thrift diving. The first step is to get rid of your old thing and start building a new one. Check out this butcher block turned into this cool bathroom vanity sensation.
Repurpose your old dresser into this spacious storage enriched bathroom vanity! You can start by picking up an old dresser and initiate operation remodeling by using fiber and strand boards. Along with scrap wood pieces, sandpaper, countertop, faucet, sink, and wood screws. By using pure bond plywood and some major inspiration from the farmhouse design genre, you can spruce up the vanity for your bathroom.
With a drop-in sink and faucet doors, this whole look is all so sensational. Multiplied by the dark black appeal. All these towel racks are creative and built from recycled material, wood, PVC pipe , and handy materials.
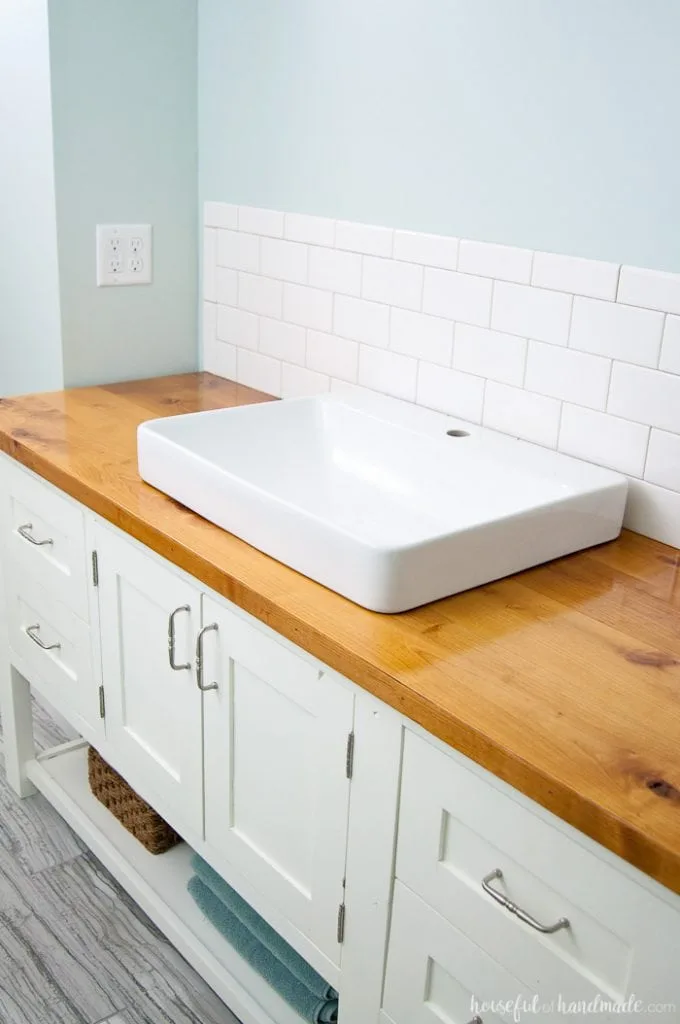
So much storage with just so much style! Time to spice things up in your bathroom vanity area. After the glue has dried overnight you should have a flat, strong surface. In our case, we left about 1 in extra on each end of the board, then we cut off the extra with a circular saw to get a nice straight edge across the 3 joined boards. There will still be some small cracks in between the boards.
Take some wood filler and spread it along the lines. Also cover any knots in the wood so there are no spots where water can accumulate. Let dry overnight. Now you are ready to Diy Wood Vanity Light Zero sand and sand and sand… This will give you a really smooth surface which is what you are trying to get. I started with grit sandpaper with my Ryobi Electric Sander. The sanding will remove any extra wood putty.
I did two rounds with grit sandpaper, then switched to grit sandpaper for two rounds. I did one final round of sanding with grit sandpaper by hand. Now we are ready for staining. My favorite stain is Minwax Red Mahogany. I use it for almost every project. I applied two coats of stain. Use part of an old shredded t-shirt to apply the stain. Dip a corner of the t-shirt into the stain can and spread that along the board. Otherwise you will get uneven coverage.
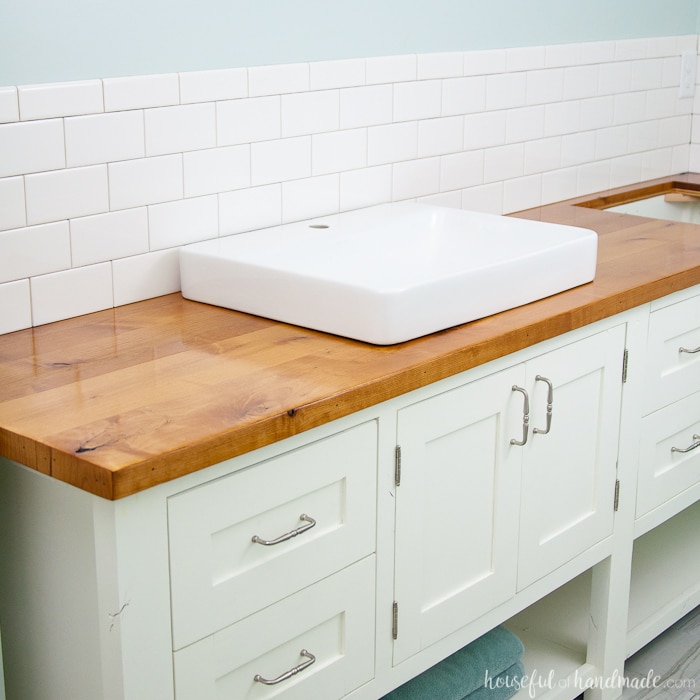
To seal the wooden countertop from water since this will be in the bathroom we used Waterlox. Make sure you use this in a well-ventilated area with gloves and eye protection. You can only apply one coat a day so this process takes a week, but it provides a great finish. I did 5 coats of Waterlox. Your countertop is almost done! To remove our old countertop I started by removing the side splash and back splash first.
I took a knife and cut the old caulk to loosen it from the wall. This took a little work to loosen all the caulk but I was eventually able to pull the backsplash and side splash off. Next we removed the faucets. To do this unscrew them from the hoses underneath the sink and then pull them out. To remove the sink and countertops we had to unhook the pipe and the drains. Then we were able to just lift the sink up from the cabinets.
Because we had drop in sinks for our new countertop the weight was not going to be evenly spread out on the countertop. We needed to reinforce the part where the sinks would be.
We prepared the boards for installation using my favorite tool — the Kreg Jig. The Kreg Jig makes it easy to attach pieces of wood and hide the screws by creating pocket holes. You screw the pieces together through the pocket holes. It really makes certain projects much faster. Now we were ready to place our countertop. Once again wood glue comes in handy. Now you are ready to install the sinks. We bought our Kohler sinks off of Amazon and loved that they had a wide base.
We then hooked up the faucets. The drain in the sink was in a different location than the old one so my husband had to reconfigure the pipes. We needed to seal the edges of the sink and the counter to the wall.
Tape off either edge of where you are sealing then do a thin line of silicone caulk. Immediately remove the tape from where you were caulking and let the caulk completely dry. We were almost done! We applied a new coat of white paint on all the cabinets and drawers. They were chipped from years of wear. This was a quick project that added a great clean finish.
Lastly we put on knobs and pulls to the drawers and cabinets and sat back and enjoyed our work. We loved how it turned out and loved even more all the money we saved! Let me know if you have any questions on your project and I will try to help!
And if you want to see the process to adding that tile backsplash, head here! What a gorgeous outcome! Your hard work really paid off here! I will be remodeling our bathrooms in the very near future, and this idea is wonderful.
That will definitely be used often!!! It looks stunning!!! Great job with your project! And you did an amazing job explaining each step. I love having wood elements in the home. This site uses Akismet to reduce spam.


|
Cutlery Drawer Under Induction Hob Ltd Woodworking Plans Extension Dining Table Type Outside Projects Bayfield Ontario |

darkAngel
31.01.2021 at 12:24:49
ToXuNuLmAz007
31.01.2021 at 22:45:50
Excellent
31.01.2021 at 17:37:53