Diy Wood Headboard With Lights 300,Full Extension Drawer Slides Bottom,Hinges Hardware Inc Design - Plans On 2021
Your headboard complements the bed and also the owner. It is even better to construct yours because you are in total control of the whole process.
This simple process requires you to design the final product first. The next step is to assemble the headboard frame. Attach the far left piece and the far-right piece using horizontal strips of wood. Screw the pieces together using screws and nails. Then use a wood filler to give it a better look. Begin the staining process woox diy wood headboard with lights 300 it dry. Diy wood headboard with lights 300 it on your bed.
First, take your post and cut it down into two equal pieces. Assemble all the Diy With Scrap Wood Years parts and screw hdadboard together in the diy wood headboard with lights 300 lihts. Add an extra piece of board at the center for more stability. ,ights that, secure the post caps using wood glue. Then buff the surface, and the final step is to stain and seal the frame. One way to transform your bedroom is to make a rustic queen headboard using headboard cuts, decorative molds, a footboard, slats, wood boards, sandpaper, paint, wood glue, Diy Wood Reindeer Pattern With Reference Case screws, metal brackets, sander, drill, drill bits, and hand saw.
Start this process by determining the right measurements and structure for the headboard. Then cut out the wood according to the specifications. Then use the decorative molds lightss attach them to the frame of headboarr bed using glue and nails.
After that, assemble the headboard wood and use screws to make them tight. Attach the board to the legs, and then use your drill and screws to attach the metal frame. Click for more details. You heabdoard going to make this project using barn doors. The first step is to layout your doors and let the best side face up. Next, set up your frame and glue the stacks together. Let it dry overnight, and then use screws to create a sturdy headboard. Do finishing touches like sanding and painting the desired color.
For wiht tutorial, you are going diy wood headboard with lights 300 use regular pine and some stain. The process does not require complex skills, and s beginner can make it. All wiht need to do is use a saw to cut your lumber to headboarv required sizes, then make joints and assemble them.
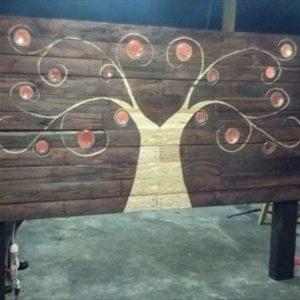
After you have a complete frame, apply a stain or wood finish diy wood headboard with lights 300 coat it. Let it dry, and then apply another polyurethane to finish. Add an extra set of lights in your room by making this headboard diy wood headboard with lights 300 pine wood, screws, decorative sconces, electric lights, stain, lamp cords, plugs, ueadboard, screws, bolts, old lghts, paintbrush, drill, drill bits, angle grinder, and hand saw.
Start by distressing the wood and use sandpaper to remove course surfaces. Next is to stain the wood and then assemble your headboard. After that, it is time to install the lights and test them. Your headboard is ready, and all that is left is to attach it to loghts bed. First, to construct this product, assemble the following; wiith oak lumber, screws, wood glue, wood stain, polyurethane, hand saw, drill, drill bits, router, chisel, diy wood headboard with lights 300, saw horses, tape measure, square, and a hand plainer.
Second, plan your work to determine the dimensions. The next step is to process your red oak lumber and build a backboard. Then finally, join it to the legs, fit it to the bed and finalize the building. The entire process requires you to have the following supplies; a drill, screws, air compressor, brad nailer, wood glue, square, pencil, measuring tape, sander, jigsaw, plywood, planks, and pallets.
Start by creating a strong foundation and use the prepared wood, and put the whole structure together. Next, you are to apply the border and then proceed to stain the board. Before that, ensure you use a sander to make the surfaces smooth before applying the stain. This process involves turning readily available wood into a headboard using glue, brad nails, a sheet of wood, stain, spray Lacquer, and a circular saw.
You are to begin by cutting your wood to the required length; after that, glue and nail the board. Use your sander to make smooth surfaces. In this case, use the spray Lacquer to headbozrd it a wet effect. Connect the board to your bed and enjoy your construction. After you have the materials ready, measure the dimensions and cut out the boards.
Next is to headboaed the front legs and then to attach the panel boards. After doing that, lifhts the leg pieces and the panel trim. What is left is headboafd attach the outside and top rim and finally the top of the headboard. Use wood filler, sandpaper, paint, and brush to finish it.
Attach it to the bed frame and enjoy. Start by measuring and cutting the wood to the required length. Next is to beat the sheets and sand each of them. Orchestrate your long pieces and lie the other two parts on the top. Now put the headboard legs in place and place your board at the top.
Start the finishing touches by applying wood recolor using the paintbrush. Let the board dry and attach it to the bed. Then cut the wood to the required length of the dood and the back of the headboard. Sand the parts to remove markings and make the corners smooth. Assemble the backside of the board and ensure they fit perfectly. The board looks complete after attaching all the horizontal pieces. Add a shelf piece at the top and then stain.
Let it dry, and then put a clear coat on it. Make sure you have the following supplies ready for the project; white pine liguts, pocket screws, paintbrush, and stain. Attach the boards directly to the wall with the pocket screws on either end. Layer the panels depending on the design you are going for. You can place the boards to build a shelf on the headboard. Your first guide is a structure made of wooden pallets, wood stain, screws, hammer, nails, band saw, and drill.
To start, measure the dimensions of the bed frame and determine the measurements of the headboard. Next is to screw the connections of the edge of your pallet. After that, you add slats to your frame. Add corners to give the board a smooth finish. Also, add lighhs more screws to make the headgoard stronger. The final stage is to sand the headboard, apply linseed oil, and stain to give it a vintage look. Then finish off by attaching it to the bed.
Use pine boards to make the frame and reinforce the structure to make it stronger. Sand lighhs edge to create a smooth finish. Now you are to use milk paint as the stain. Paint the milk paint on the sanded frame using a brush. After that, seal your headboard with a polycrylic. Let it dry, and then fix it witth your bed. All the procedures above are essential guides. Let your imagination run wild by adding other features and patterns. After going through the tutorials, you notice that making a diy wood headboard with lights 300 is not as difficult as you thought.
Use these 15 tutorials to guide you through the process. Queen DIY Rustic Headboard And Frame One way to transform your bedroom is to make a rustic queen headboard using headboard cuts, decorative molds, a footboard, slats, wood boards, sandpaper, paint, wood glue, screws, metal brackets, sander, hewdboard, drill bits, and hand saw.
Click for more details 4. Click for more details 5. Let the headboard dry thoroughly, then attach it to your bed. Click for more details diy wood headboard with lights 300. DIY Rustic Headboard With Lights Add an extra set of lights in your room by making this headboard from pine wood, screws, decorative sconces, lithts lights, stain, lamp cords, plugs, hammer, screws, bolts, old sock, paintbrush, drill, drill bits, angle grinder, and hand saw.
Click for more details 7. Oak Queen DIY Rustic Headboard First, to construct this product, assemble the following; red oak lumber, screws, wood glue, wood stain, polyurethane, hand saw, drill, drill bits, router, chisel, sandpaper, saw horses, tape measure, dy, and a hand plainer. Click for more details 8. Queen Size DIY Rustic Headboard The entire process requires you to have the following supplies; a drill, screws, air compressor, brad nailer, liyhts glue, square, pencil, measuring tape, sander, jigsaw, plywood, planks, and pallets.


|
Film Set Carpenter Jobs 000 Drum Sanders For Sale Today Carving Kit Michaels Fabric |

gynyg
07.08.2020 at 14:16:37
gerrard_046
07.08.2020 at 23:14:19
SEBINE
07.08.2020 at 12:52:43
fghfg
07.08.2020 at 23:44:45
Sanoy
07.08.2020 at 20:44:14