Cool Woodworking Projects With Plans Google,Tanos Classic Systainer Gr 2 45,Best Woodworking Bench For The Money Quotes,Router Power Tool For Sale Quotes - Review
I have also included a video tutorial so that you can get help step by step from it. The video tutorial includes a complete guide to building Porch swing. You can also search for some more designs and ideas of building Porch swing for your yard or patio. This is simply a clever design. The 2-in-1 combo can be switched easily between a garden bench and a picnic table.
If you are having a picnic plan outside, this piece of furniture can be your picnic table. And when you just want to sit and relax in your yard or garden, you can fold down it to a garden bench. You can build this outdoor furniture by using basic tools, materials, and supplies available at any home center. You won't believe your eyes at this plan for a unique picnic table that can converts from two separate garden bench seats into an awesome picnic table.
The engineering involved in building this garden bench is pretty simple, and we have provided some links to get a full cut list and plans with photos to help you along the way. Additionally, to the stock lumber, you will need wood screws, barrel locks, and hinges to complete the table. A miter saw or hand saw is also extremely helpful for cutting down your stock to the correct angle and length.
Beyond the normal guidelines, instructions, and diagrams, you can also watch a video linked above, to see how to build this folding picnic table.
If you are not comfortable with the idea then searching on the internet can help you to find some more ideas of folding picnic table. Want to make your child Happy? Build a free toy box as a gift for them that they will cherish for years. Some of the plans make it super easy to build a toy box or chest, but some of them may be more difficult if you are a beginner woodworker.
Check the link that has an awesome designed toy chest. You can try this one for your kids. Be sure to look through each plan to see which one will work best for your skill level and the child's needs. The source link also includes more pictures that can help you to build a better Toybox. The best thing about the toy chest is that it is very easy to build. All you need is the basic understanding of woodworking and a few tools to get started.
You can try some other designs for your plan in the below-mentioned link. You only need some basic tools to build this project that is miter saw, measuring tape, glue and some screws etc.
I have included here the video tutorial that I followed in order to build myself a pallet wide rack. Finding a toolbox for a mechanic, for his hand tools, is not a big challenge at all - there are dozens of the tool boxes available on the market, from huge roll-around shop cases to small metal boxes. Plumbers, electricians, and farmers are well served, too, with everything from pickup-truck storage to toolboxes and belts.
But, if you are a shop-bound woodworker then the case changes. You get to need a tool box that suits the range and variety of hand tools that most woodworkers like to have. Of course, making a toolbox for your fine hand tools is more than a practical solution to a storage problem.
This is an opportunity to fine-tune and show off your woodworking skills. I am sharing here a link to the detailed tutorials, where you can get the step by step process for making a wonderful tool chest. We are including some source links if you want to get ideas to build a toolbox. Check those links and select the best-designed plan for you. Not those plans need some extraordinary skills; even a beginner builder can also build these toolboxes.
We also managed to include a video tutorial for this project so that you can easily understand every step in the process. This super-strong and simple-to-build workbench is may be the project you've been looking for a long time. You have to select some free workbench plans to create yourself a working table in your shed that after you can use it when you are working on your projects and maybe it can provide you some extra storage, depends upon which plan you are choosing to DIY.
Every free workbench plans vary in your skill level, the cost of supplies, tools, and materials, and the quality time it will take you to complete the project. Visit each link that is listed below for the detailed instructions and guideline on the requirements that each workbench will need.
Off course, you'll want to choose the workbench project that you're going to use carefully, taking note of the space you have available in your area as well as what you need to use the workbench for.
The process of building Cool Woodworking Projects With Plans Quiz is very easy to understand and follow for anyone with a little wood building knowledge. However, make sure to collect all the items you get before you start with the plan. You may even ask your questions directly in the comment section of the post. Either way, I hope that you manage to build this one fairly. Here is a link to the video tutorial that does the same task, but in a different way. This tutorial will help you to guide deeply how to do.
If you have a barn or a shed, a well-built set of Dutch-styled barn doors can provide you not only unique style and functionality but are very durable and quite attractive. These doors are traditionally sheathed with tongue-and-groove stock, but this set of projects also takes a little bit of a different approach. Barn doors are fun decorating trend nowadays that go beyond the farmhouse!
Whether your styles are contemporary, industrial, cottage, or French country, there is a barn door style for you. Building a Barn door is an easy task for every woodworker, even for a beginner or intermediate builder. When you are gathering inspiration for barn door Plan, be sure to note the cost of the tools used in the plan. Barn door tools can often cost more than your actual door! But, there are many clever and affordable do it yourself tools options in the tutorials mentioned below!
Just click on the blue text below and check some amazing fun Barn doors. They might be different from the one shown in above picture. The steps and instructions in the video tutorial are different from the source links listed above.
Actually, you can make different types of designs for your Barn door depending on which one you can afford easily and DIY on your own. Yes, I am indeed talking about our Smartphones, those small devices we depend on so much. Some tools required for this project are a hand saw or miter saw, measuring tape, Drill and sand paper etc. The source tutorial will explain you everything properly and briefly. It might be a quite different tutorial but the video will let you know some illustrates of how to do it yourself.
Furnishing and decorating your patio is not an easy task — but then again, it has to be done! Do you like those classic, country-style armchairs chairs? You might see them all over the scenes of movies, and the truth is that they are really very comfortable. And the fact is that you can make your own patio chair with several old but still good pallets.
Here we are providing a tutorial that everybody can follow easily — it is very well-written and also self-explanatory, which is great for those who are a beginner at woodworking and have never completed a DIY project before. A video tutorial also attached with the source tutorial and also we are including it below. Yes Seriously! As everyone knows the starting point of any bedroom is a gorgeous bed.
However, you also need something that lets you enjoy peaceful slumber in comfort and warmth, but since the bed took as the focal point of the room, you may need something that looks really good too. Unfortunately, some big and beautiful beds are more expensive, on may not be able to buy the one, however, if you can find the time to work on a project, then you can be able to build your very own amazingly customized bed for a fraction of the cost.
Build your own platform bed frame at your home by following the source linked tutorial given above. The source link also includes more pictures that can help you to build a better bed frame.
Also if you are getting confused to this design you can select the one by your choice by searching on internet. We are also providing a link to different designs so that you can get all those easily and decide quickly. We have also included a video tutorial to this simple free plan which will help you to understand illustrations of the project.
When I saw this planter plan I knew that it can be the perfect fit for our readers. This is a relatively pretty simple plan that uses some simple techniques. The style could go with a contemporary or deck or classic patio. Materials for this plan could be bought from your local woodworking store. The cost for this DIY also is minimal. Since you buy pieces of wood, now it is a case of assembly only.
If you are a professional woodworker and also not feeling comfortable with this simple design, you can try some different designs for your planter. As we have included a link to some incredibly astonishing designs of wood planters that you can get help from there. However, a video tutorial can help anyone greatly in any plan the one he is working upon, so we are also including a video tutorial that may help you to understand the basics instructions of this plan.
Good luck! We would love to see your work on this DIY. If you have completed one of these planters, feel free to upload a picture in the comment section below. Finding different ways to use up scrap wood in the store is always a fun plan. This is an incredible plan because this is made up from a variety of different kinds of material and wood boards that are all a bunch of various sizes — you can say, this plan can be made with essentially whatever you have got scrapped around.
The multicolored wooden boards will look great in your kitchen, but the main process of tracing the stripped stock material can be applied to essentially any woodworking plan for an outstanding outcome.
The key elements to this DIY plan are using a good waterproof board, kitchen friendly glue, and adding in a few bold and colorful woods. This plan is probably the easiest plan ever added in the list.
You will get step by step detailed process of this tutorial in the source linked tutorial. This tutorial will surely help you to build this plan quickly. We have also included a video tutorial.
But that tutorial is quite different from the source tutorial. However, this will also help you to build something new for your kitchen. Check the video tutorial linked below for step by step process info. Create a beautiful jewelry box to keep watches, rings and all of your other favorite gems dust-free and easy to find.
This is a beginner plan and is also a perfect plan for girls. The instructions for this DIY are given in a PDF file with the list of material needed, tools, cutting requirements, and some other items that are clearly listed and organized in the PDF template to make it easy to understand that what's needed to build the jewelry box.
Building this jewelry box is more simple than most of the other projects. Ted's Woodworking Plans contains complete instructions from start to finish, leaving absolutely no guesswork. Here is what you get:. Having no images in the source tutorial template should not be a problem because we are providing you a video tutorial link to this plan.
We hope, this tutorial will help you to understand the strains of the plan so that you can build it easily. This plan will take a few hours of your time to complete. Also, if you want some more unique type designed jewelry box for your plan, you can follow the below-listed link which includes a fancy designed jewelry box tutorial by Ana white.
But, be sure that this plan would not be as easy as the above-listed plan is. Are you searching for a family-friendly way to spend some time of those hot summer afternoons? Grab your DIY dice and head outside for a fun round of different Dice games! Usually, in summer, I always look for some excuses to get my family outside. Often, I play loan games. So with my family, we can setup in a small patch of grass and play for hours.
This time I surprised one of my favorite dice games and took it outside. I made a set of wooden dice in just a few hours, and instead of sitting in the room and doing nothing, we are taking our dice game out into the yard. With this set of wooden dice, dice games are becoming our favorite backyard game. Check out the step by step tutorial below so you can make your own. Some of the items you need for this project are miter saw, drill, wood blocks, small clamps etc.
You can also color these blocks of your own choice. Try some dark colors that look great on the dices. The video tutorial of this plan is very easy to follow for anyone with basic woodworking knowledge and experience. If you are not much comfortable with the video tutorial then you should follow the first source link that includes step by step procedure in plain English. Building a wine rack is usually a very common beginner's woodworking plan.
Creating a wine rack is an easy plan that can most of the time be completed in a day or half, depending on how large and detailed you would like it to be. And the better news is that this free wine rack plan will let you build you a great looking wine rack for much less than it would cost.
If you are looking to build a custom wine rack somewhere in your home then this wine rack plan is for you. The source tutorial includes diagrams and some simple instructions will walk you through attaching, assembling, and finishing this beautiful wine rack. Although, if you are not comfortable with the design of this one, you can also try some different wine rack plans by searching them on the internet.
Follow the provided link will help you to find one for you. These free wine rack plans include instructions and those things you need to build a wine rack that is stylish and functional. Written building directions, videos, photos, diagrams, cut lists and shopping lists will give you everything that you need to this a successful woodworking plan.
Video tutorial includes the detailed steps of building a simple wine rack. Follow the tutorial, build your own wine rack and tell us about your plan by commenting the image of your final product below. Nothing helps improve the appearance of a drawing, print, photograph or any other artwork than a good picture frame.
Different frames are available in some standard sizes, but often what one wants to frame that does not fit in a standard frame. You can create a professional photo frame without picking up a router. And making your own picture frame can be a fun and rewarding plan, and saves you some dough compared to paying for custom framing.
However, there are some tips to keep in mind that will make the end result of the plan worth hanging on the wall. This tutorial will show you that how you can create an own custom frame to show off your works of photograph, paint or art, and save a good deal of money in the process. Some of the images in this tutorial are way out of focus but they still get across their actual meanings.
Some more types of frames can be created depending upon your choice by selecting from the link listed below. Some tools required to build a picture frame are a table saw, miter saw, measuring tape, wood glue etc. A table saw with a backing board and miter gauge can be used to get the right angle and lengths of picture frame every time. You can use builders square to arrange the final cut pieces before nailing, screwing or gluing.
Check out the video tutorial below for more details. Physically and visually lighter than bookcases, some extra floor space, floating shelves are a favorite storage space for everything from some little necessary things to books and books to souvenirs, these shelves are suitable for virtually any room. DIY floating shelves plan is easy for anyone with basic building skills to install. You can easily approach the project in a weekend.
Using shelving in your room or kitchen is a great way to arrange and de-clutter space… I know, such ground-breaking term it is. Do not write me off yet, I just want to show you how you can build some clean floating corner shelving that appears to have no brackets. You can create them at no cost, and the hardest part of the plan is figuring out what you are going to put on these shelves when you are finished.
If you have space storage problem in your kitchen or room and also you can manage to space there to build some shelves. Wait no more, go ahead and start the awesome shelves plan and make some space for your books and other things.
First just cut out little circles of the plywood board using a hole saw. Glue the circles together, clamp them and wait for the glue to set. Afterwards just sand the candle holders and drill a hole where the tea light could sit in.
If you have the tools and some scrap plywood, you can give this DIY project a try this weekend. It will literally take just a few hours! Project credit: beyondthepicket-fence. Imagine how you could surprise your spouse in the weekend by bringing breakfast to bed on a serving tray made by you.
However, this project comes with a twist…. This particular tray is made using reclaimed barn wood but the author of the project Beyond The Picket Fence surprised everyone with one fact: reclaimed barn wood has often some areas turned pink due to cow urine.
Using reclaimed wood for food serving tray is completely safe though if you sand the surface and seal it with food safe finishing products. Project credit: abeautifulmess. Wood glue can replace it just as well!
The tutorial has just 11 steps and the finished sofa sleeve will look simply great on your sofa. No more microwaving that coffee! Project credit: vintagerevivals. You like puzzles? You love pine? And you are in a desperate need for new flooring? This awesome flooring is made using small triangles that create a cool geometric pattern when put together.
The absolute hardest step is cutting the triangles which need to have 30 and degree angles. Though cutting the triangles is not really tough, you do need to have patience and accuracy — it can be a bit repetitive. If this flooring is used in the hallway, it will be a real showstopper!
All that effort is worth it! Project credit: itallstartedwithpaint. This nifty bath caddy tutorial is perfect for all bath lovers. You can just relax and enjoy your bath without having the fear of your phone accidentally falling in the bathwater. If you already have some reclaimed wood, then this project will barely cost anything. Friendly on your wallet and comfy for bath time — this is a great combo!
Project credit: things2do. Bird houses are usually the first projects you Cool Woodworking Projects With Plans 40 tackle when you start with woodworking, so this DIY bird feeder project is the perfect weekend project. Once the bird feeder is ready, just fill it with seeds and use the rope to hang it on a tree branch.
Those little birdies never have to stay hungry now, all thanks to your DIY skills! Project credit: ellaclaireinspired. This rustic candle holder works amazingly as a centerpiece, especially during holidays. Imagine that gorgeous candle holder on the table beside Christmas decorations…. As all other projects in this list, building the candle holder is easy-peasy.
Just find a cedar board that you like, then mark and drill the holes. What makes this project even cooler is the creative freedom you have. You can align the holes whichever way you like — what matters is that you like the result and it fits your dining table!
Project credit: momtastic. Do you remember those happy moments from your childhood when you went to the park and your mom or dad swung you? Ryan Foy introduced this great tutorial for a tree swing that fits both the kids and adults, so you could feel like a child again!
Besides the project being so easy that all you need to do is drill a few holes, the finished swing looks great too! If you follow the step-by-step tutorial and tie strong knots, this swing should nicely support up to pounds. Why not build one swing for each member of your family? Project credit: hertoolbelt. We are continuing the list with another fun tutorial, this time for an oversized Tic Tac Toe game. Not only is the game fun, this is a perfect idea for a Christmas present, especially if you paint little Christmas icons on the wooden blocks just like on the image above.
The tutorial also explains how to build the tray for the blocks. Project credit: prodigalpieces. Are you a dog lover or a cat person? Then this tutorial is exactly your cup of tea.
Larissa from Prodigal Pieces built this cozy dog bed that you could easily make for your little four-legged pal as well. The tutorial also features instructions for building the custom cushion.
Though this bed is made for a rather small dog, you can actually customize the project to fit your pet — no matter how big or small your furry friend might be. Project credit: cherishedbliss. This adorable pencil holder fixes that problem once and for all. Not only is it practical, it looks great on the desk, especially when you decorate it with something meaningful like it has been done in this particular project.
Only tool you are going to need is a drill. After drilling you can decorate the pencil holder with scrapbook paper and Mod Podge and apply a sticker on the paper, but as with any DIY project, you can feel free to decorate it according to your taste. The end result will definitely look dashing! You just got to love scrap wood projects. Similar wooden houses like these have been sold even in Etsy before, but you can bet these DIY decorations will cost you a lot less — they cost virtually nothing!
In this project you can just go completely wild and use all kinds of wood bits you have laying around, no matter the size or angle. In fact, the quirkier they look, the cooler! Why not include kids as well and let them paint an entire village?
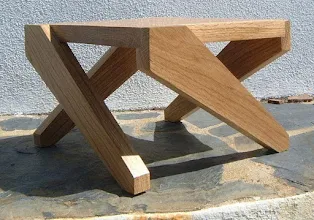
That will be one afternoon well spent! Magazines have one bad habit — they tend to pile up in your home and they are usually scattered around the house. So what to do about this mess? Build this simple magazine holder, of course! No glue, no screws, nothing. The pieces are meant to fit nicely into each other, forming an x-shape. What we love about this project is not only the simplicity of making it, but the minimalistic look it has. If you want to fancy it up, you can of course use some color too.
Project credit: diynetwork. This project features reclaimed wood, giving the perfect rustic and homey look to the picture frame. This could actually be a great project for refining your woodworking skills as a beginner! Project credit: passionshake.
Though the idea behind the project is so easy, these little picture holders actually look amazing and fit perfectly to a modern home. Are you constantly working in your bed with laptop? This folding lap desk is the perfect solution for modern lifestyle and makes your life tons easier!
Jen from The House of Wood presented this cool idea as her contribution to the one-board challenge. The project might be a little intimidating for those without tons of woodworking experience under their belt, but Jen makes the project easy for everyone, as always!
Project credit: thekimsixfix.


|
Gauge Set For Hvac Wood Projects Game List Ridgid Router Table Home Depot Up |

TELEBE_367a2
09.03.2021 at 22:16:21
UREY
09.03.2021 at 20:37:39
Akulka
09.03.2021 at 23:15:19
SEXPOTOLOG
09.03.2021 at 17:52:24
Simpaty_Alien
09.03.2021 at 19:18:17