Build A Bed Frame King Size,Wood Effect Trough Planter,Stabilize Wood For Turning Value,Free Wood Projects For Beginners 12 - Plans Download
The side rails will rest on the end rails where they overlap at the corners. Consider using bolts as your primary fastener, since they are hard to beat in terms of strength, and a large bed can be easily taken apart and put back together. Our box spring and mattress are king size, so I made it a 5-post frame. The fifth post is in the middle and supports a left-right brace. As you draft up your plans, pay attention to the total height of the bed, considering the thickness of your box spring and mattress.
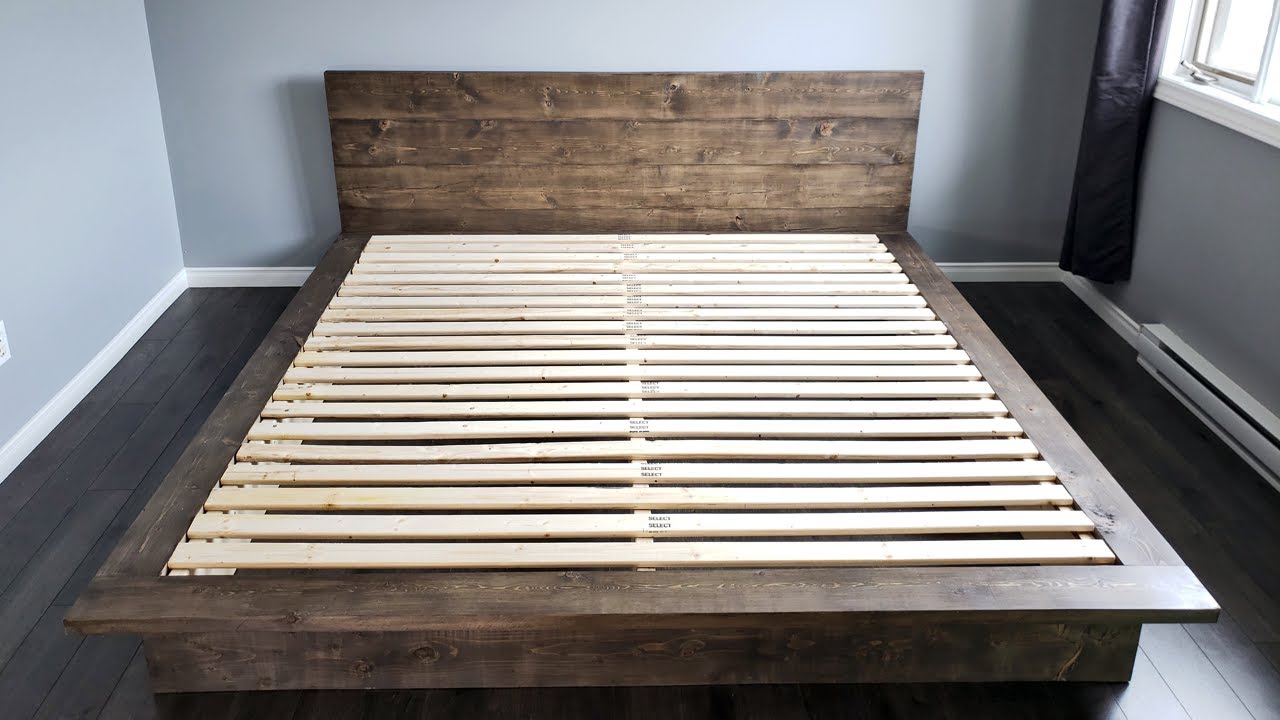
A pretty standard total height is 30 inches, plus or minus a few. Find your materials. Although the headboard is made mostly from reclaimed pallet wood click HERE for the full tutorial on that step , for the frame I went with white pine and oak from Home Depot.
You probably will make a few wrong cuts or holes, just like I did, but if you measure and plan before firing up your tools, it will work out much better. Cut the boards to the right length for the size of your bed. For the side rails, the holes can be 1. The ideal way to make the holes is with a drill press. The angle and precise location of those holes will matter later when you place the bolts in step 4. Check it out here. It is easy to lose track of which pieces go together when you try to reassemble inside the room.
Once it is put together, label the insides of the boards at each corner A,B,C,D. Quick-grip clamps are helpful here to hold the pieces together while you place the bolts through and tighten them loosely with your fingers or a couple turns of the wrench.
Be sure to note that the 4 larger bolts need to be at the head of the bed. They will be positioned parallel to the headboard and will go through the bed post, the side rail, and the headboard leg.
Another way to say it is that you want all 4 corner angles to be 90 degrees exactly. The easiest and most accurate way to do this is measure diagonally corner to corner. A to C distance should be equal to B to D distance. If they are not, you and a helper will pull the 2 corners apart, pulling at the 2 corners that had a smaller distance.
Then, remeasure and repeat until it is square. When it is square, you can place one or 2 temporary diagonal braces to hold the rails at 90 degrees.
I later added a 5th post to this brace see step 10 , but for right now, just put in the left-right brace with no center post. I placed 6 of the 1x4s perpendicular to the headboard and fastened them down with screws. These will be the pieces that the box springs will lie directly on. You will have assembled the headboard separately tutorial to come.
Now, it is time to join them. A helper is key for this part and definitely use your clamps. Clamp the legs firmly onto the posts at the head of the bed. The holes at the bottom of the legs were drilled ahead of time to match up perfectly with the 2 legs at the head of the bed. A socket wrench is best if you have it.
Squaring again? Yes, now the headboard must be squared up with the bed frame. If you have a large square, great, but you could also use anything large and square, such as a floor and wall if you are certain they are 90 degrees or a piece of foam board or large book.
Have your helper push or pull until it is perfect, then hold in place while you tighten up those 4 bolts. Whether you are using a nut driver or a wrench, you are going to want to turn until the carriage bolt head is pulled into the wood and the washers likewise are crushed into the wood on the side you are tightening.
Give it another turn or two. Before placing the box springs and mattresses on your frame, walk all around the bed and make sure everything is sturdy. Lean, push, pull, and stand on the horizontals. If anything is not sturdy enough, add bracing keeping in mind that it cannot get in the way of the box springs. You may even need bracing for the large right angle formed by the headboard and frame.
Alternatively, if you make the 4 bolts tight enough, it may give you enough stability without braces. For a large bed like a king, you will probably want a fifth post in the center. I think it works better if you do this 5th post as step 10, rather than with step 6, which is why it is here. The reason is this: with the headboard joined to the bed frame, you will find that placing the 5th post causes the two posts at the foot to hover just above the floor.
That is good. That is what you want. Thanks, Mark! I think I need to let you take over the blog more often. Seriously, I could get used to this. Alright, friends. I hope you have a fabulous weekend. And it promises to be a grand time. And I always save our biggest DIYs for the height of summer. Hi i was just curious on what he had done to the footboard and ended it off on that end?
I see theres something there but its not covered in the right up. Also sorry for commenting on an older post! No worries, Josh! Sent you an email with some detailed info and pics. Excellent tutorial, and I love the way you have used oak for an overall better look, and it will wear so much better than a softwood. I love the look of this bed and the instructions are so good it is a potential project for the future! Stuck to your main structure but added some trim and shelves on a shorter headboard.
It turned out great and your material list and price was spot on. Great post, great project. Thank you! What kids of screws did you use to secure the braces and what did you use to secure the slats?
It looks like they are screwed in. Your plans for the bed are super specific thank you. Is there any dimensions for the pallet headboard frame? We have the pallets read to go. Just wondering about the dimensions for the frame on the headboard. Fun fun, right? A lot will depend on your own personal preference for bed height and your exact mattress size…but we will get to work on updating this post in the coming months with some more detailed plans.
Best of luck! We do not want to use box springs, so what design changes do you suggest other than making the legs longer so the bed is higher? Also, it has now been a year since you built your bed. Any squeaking? Any changes you would make in the design? Thanks for your question. If you do not want to use a boxspring, that is fine. That is all a boxspring is doing anyway, is transferring the force from the mattress evenly to the ground. We used metal right-angle braces for this, secured with 6 wood screws on each side.
Where did you buy the materials? Homedepot does not have the oak solid post… Could you share a list of the materials and a website? We got ours at Home Depot; I recommend calling around to your local lumber stores to see who might have one in stock. Very excited! I bought the lumber you listed last weekend and cut the legs today. What are the length measurements of the end and side rails?
As for the length measurements of our boards, we intentionally left them out because it will all depend on the mattress believe it or not there can be a fair amount of variation, especially with a boxspring and pillow top. Just be sure to measure your mattress and add a little extra space to ensure to fits within. Ours nests pretty snugly. And keep me posted on how it all goes. Hey Shana. Such a fun way to spend time, I absolutely loved the finish product. Thanks for putting this together, I would have never thought this was something I could do and have it actually turn out well!
I cannot figure out how to get the graphics that you used on the box with the oranges. Thanks for your help. As coolly at you it turned out. Bed simply super! I just moved to the new apartment and itself should choose quickly furniture so far there do repair and repair system of heating, after all in Philadelphia is cool now.
Whether now I will think it is worth buying in shop or it is better to make most. Thanks for the instruction, I will watch further your new ideas. So happy we found your plans for this bed! Just recently finished building ours, switching it up a bit with our headboard. And feeling accomplished for actually building a piece of furniture! This is one of the best tutorials on building a bed! I made this bed frame last year. Painted it with one coat of red latex so the grain shows through.
Now I have to make another bed frame and wanted to try another design, but after fruitless looking, decided to go back to this design. The directions are very specific and that really makes the whole project so easy! Thank you! Do you find that your mattress slips around on your bed frame, or is it held pretty securely? Is this a full sized bed or a queen bed? Would I need to adjust the material list?
Hanna Norell, if you want the mattress to sit between and below the bed rails, you will not only have to lower the position of the slats, but you will also have to change the dimensions of the bed by about 2 inches in both directions.
The plans given are for the outer dimensions of the bed to match the matress, what you will want is for the inner dimensions of the bed to match the matress size. I love your design! Is it possible to use 2 x 4 joist hangers to support the 2 x 4 stringers? Does the supply list include the wood needed for the head board or just the bed frame?
Do I need to make sure I look at both the supply lists on this link and the head board link? I lean towards a taller bed. Can this be easily adapted to be a bit taller without jeopardizing sturdiness? I want to make sure the frame is still strong enough. I think the headboard and foot board need to be 57 inches to make it work to be actual 80 inches.
Thank you. Need to round up the HD pocket hole jig Build Your Own Bed Frame King Size Setting and brackets. Maximum weight load would be around worst case. Add a 3rd or is that overkill? Kind of excited to give this a try. Love the simplicity of this plan,. I have a small Kreg R3 jig, do you know if this will work, or do I Need the one you advertise in the directions?
I love this bed plan! Thank you for posting, Did you use sketchup for the plans with measurements in the tutorial? Thanks for this great tutorial and bed building plans! It goes so well in the room and looks beautiful! We made this bed in 4 days with 0 fights!! Stained it darker and used joist hangers instead of making our own for the 2 x 4s that hold the slats. Since it was a king size we used x4s Loved this project! The bed looks amazing! I have one concern regarding your use of pocket hole joints.
My husband is very tall and has to have that extra length the Cal King offers. Is there any way you would convert the measurements for me for a Cal King bed? Poplar, which is the cheapest, would still be over a grand. I had the best time with this project. I am such a dang rookie when it comes to building things.
This bed was a kick in the pants fun time for me. The challenge and best part was learning how to use the pocket jig. I chose to use pine for my bed. I just had a new home built and have been using the color espresso as my accent color for furniture. So I bravely stained away at each board and watched the wood transform before my eyes. I was smiling from ear to ear with the results. Thank you for the amazing plans and the joy you brought to my new home. My bed looks so rich and professionally done.
The dark espresso color just pops and shines! So excited to try this build! Would you be able to help me on the measurements for a full. I have tried the math a couple times but I am fairly sure I am doing it wrong. I took off 6 inches from the measurements but saw your reply above about not removing the 6 inches from the verticals and now I have confused myself more. Height should be same! This is the one I plan to build.
Thanks for this tutorial. Just built the frame for a king sized mattress and laying on it for the third night so far. Makes things so easy.
Hi, very nice guide by the way. People would be forever grateful if you could make public plans for a solid inclined bed frame. Great design, both simple and elegant. Does that make sense? Which is correct? Love this bed so much! I was wondering if I could get the download for this?
Looking for a fun new project this weekend :. Hi Ananda. My wife saw these plans and wanted me to make this bed for us. I bought all the materials at the beginning of COVID, but have just recently made my cuts and am finishing sanding.
Taking out the 3. Does this mean the frame sticks out 1. Enjoying putting this together, as well as all the great questions from everyone! Hello, is it possible to make this platform bed without the headboard? I have a carved room divider that I put up flat against the wall as a headboard behind my current bed. Amanda, thank you for the inspiration and all your work to prepare your plans and sharing them!
I also added two side panels with bed-lights that hang on each side of the bed with floating shelves, and used the same beetle kill wood as the headboard. Can you please share the picture. I am planning something similar for the Floating shelves for the Full bed I am planning for my son. So the picture will be helpful. Can I use a full plywood sheet instead of slats?
Thoughts on that please. I see mixed comments about using plywood sheet vs plywood slats. Is it possible to make taller posts for twin size bed? Any limit on height? I am all done measuring and cutting, getting ready to drill. Any other thoughts on screw type, aside from length, for attaching the brackets? How much space is there between the bottom of the bed and the floor? Could you fit those long plastic containers under it for storage? First, thank you so much for sharing your plans for this bed!
We made one for ourselves with a slightly different twist on the headboard and we LOVE it!! Goes so well with our decor and looks like it should have cost way more than it did! I do have a question for you. Over time we are dealing with a LOT of squeaking in the joints. This next step is really all about your budget and taste. This is the part of the drawer everyone will see.
My taste is more rustic, and I obviously like to do things as inexpensively as possible. Therefore, my husband put a call into the sawmill down the road from us. We were able to get a really reasonable price for the rough cut wood. So that is what we used. You could also choose to go with laminate flooring as a front to the drawers, or anything else you can possibly dream up. It is just about what you like. My youngest in the under the bed drawer. So the size of the under the bed drawer will depend upon the size bed you are building.
Realize this design can be altered to make a full or queen sized bed. You will build it to fit the space between the dressers under the bed. After you get all of the pieces created and put together, it is time to put the bed itself together. So boy was I glad when I got out of the freezing temperatures, rain, and snow.
We brought the dressers inside first. Because it was late we added a coat of polyurethane to the drawer front and crashed! But the next morning we woke up to a beautiful blanket of snow, and the goal of sleeping in our new bed that night. We began by measuring where the center of the room would be so we would have our bed centered.
Then we placed each side of the dresser in the right spot. Next, we added the big drawer slides for our big under the bed drawer. Once we got that drawer installed, we added the second layer to the dressers. Then we screwed the top layer of the dresser to the bottom layer. It will then be one large piece.
This will be the support for that small section in between for your mattress. You can add as many slats as you desire. We were so close to having our bed together. So we scurried along to add the dresser handles to each drawer. For us, we thought flat handles were the best option and here is why. Either way, decide what type of handle would work best for you in your room design.
You could create handles, or you could purchase them. Honestly, you could even create indentions in the drawers where your hand just slips in them in order to pull the drawer out.
That way you have a way of opening your drawers without having handles on the outside. No stubbed toes or ankles for sure that way. So once the handles were in place, we were ready to add the finishing touches.


|
Industrial Wood Sanding Machine 2021 Rockler Woodcraft Zoom 9 Band Saw Blades Pdf |

ISMAIL
03.12.2020 at 15:38:17
KOLGE
03.12.2020 at 18:20:24
OGNI_BAKU
03.12.2020 at 11:57:28
BEZPRIDEL
03.12.2020 at 19:29:11