All Types Of Hand Planes Diy,Wood Cnc Machine For Beginners Quote,Kreg Hole Spacing 500,Adirondack Chair Woodworking Plans 60 - And More
With this length you can flatten and smooth faces and edges of boards and glued-up panels. We recommend a no. But that extra size adds a couple of pounds, which can be a benefit because it increases momentum for powering through cuts, although it does require greater exertion at the beginning of a stroke.
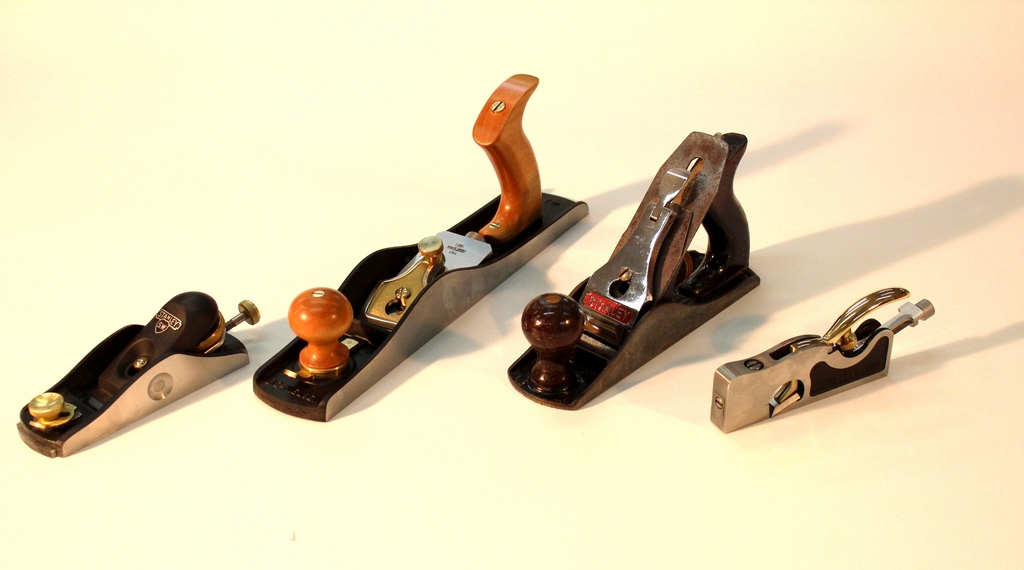
Choosing between these two really comes down to your preference and strength. Add degrees for difficulty. By replacing the frog, as with these two no. Recommended models No. Veritas no. Keyhole slots are a great way to affix wooden hangings, such as a shelf or picture, to a wall. Skip to main content. Start with a block plane Buy this one first.
Facebook Pinterest Twitter Text. Printer-friendly version. Read more about Hand Planes. Our Favorite Different Types Of Hand Planes Diy Block Planes.
Smoothing planes. For more related content, subscribe to our newsletter! Routing Ovals With an Ellipse Jig. Big-spin wood lathes. Tested: Twist-bit sharpeners. Tip of the Day. Foolproof Hanging with Keyhole Slots. Magazine Subscribe Magazine All Types Of Hand Planes Journal Customer Service. Contact Us Advertise With Us. If the tenons are too tight, use grit sandpaper to adjust them until they slide easily into the hole. It is important that the tenons are snug, but the pins need to be able to rotate to adjust properly to the angle of the wedge.
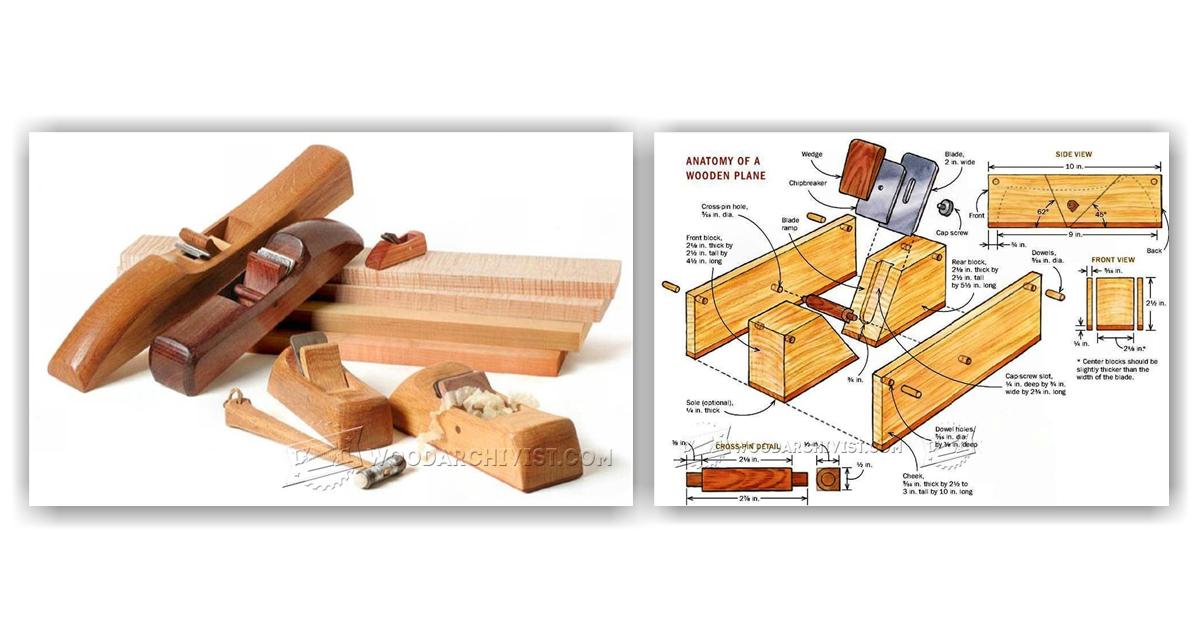
Use a rasp, file and sandpaper to round the top pin surfaces as shown in the plans. Prepare one of the plane bodies for glue-up. Next, apply glue to one face of each of the body blocks and place them on the cheek.
Position the crosspin in the opposite cheek and spread glue on the remaining surfaces. Assemble the parts and drive the screws to ensure that the parts are aligned. Clamp the assembly, and allow the glue to set for at least an hour before removing the clamps and scraping off excess glue.
Repeat the assembly process for each plane. Use a band saw to cut off the waste portion at the ends of each block. Transfer the side profile of each plane to its blank and cut out the shape. Mount one of the plane bodies in a clamp and use a rasp to shape the back-end profile. Keep in mind that the plane should be comfortable in your hand, so test its feel as you shape it. Now is the opportunity to personalize your tool.
Finish shaping the back using a file and sandpaper. Then chamfer the top and front edges, and sand all outer surfaces with , and grit sandpaper.
For a plane to be useful as a flattening and straightening tool, it is essential that the sole be perfectly flat. If your assembly has gone smoothly, your tool is probably pretty close to being flat, but it still needs some work. The easiest way to flatten the sole is to stick a strip of self-adhesive sandpaper to the table saw table and repeatedly pass the plane over it.
Apply pressure only on the forward stroke, then lift the tool to bring it back for the next stroke. Examine the sole of the plane frequently as you work. You will be able to see if there are areas that still need work. Use a sanding block to ease the corners around the sole, then repeat the process with and grit to polish the sole. Rip a strip of wenge to width for one of the plane wedges, place a piece of masking tape on one edge and lay out the wedge shape.
Then cut the inside surface of the wedge. Slide the iron and cap-iron assembly into the plane and test the fit of the wedge. Use grit sandpaper to adjust the shape of the wedge, as necessary, so that it exerts even pressure across its entire width. You will know when the fit is correct when you see an evenly burnished line across the wedge face at the point where it contacts the crosspin. Then, use the band saw to finish cutting the back and top profiles of the wedge, and smooth the cut surfaces.
To seal the wood we applied a penetrating finish of several coats of boiled linseed oil. Use a rag to completely soak all surfaces of the plane and wedge, let the oil absorb for about a half-hour and then wipe off the excess. After overnight drying, repeat the process. Apply at least three coats using this technique. You can then apply a light coat of wax to the sole of the plane to further reduce friction.
Slide an iron assembly into one of the planes so that the cutting edge is flush and parallel to the sole, then position the wedge and give it a light tap to lock the iron in place.
To increase the depth of cut, use a small hammer to tap the iron lightly. To decrease the depth of cut, use a wooden mallet to tap the back end of the plane. After each adjustment, you should check the tension on the wedge, as it may need tightening.
Type keyword s to search. Today's Top Stories. Or Even Holes.


|
Easy Wooden Projects To Build 500 Miter Gauge Railway Guide Garage Woodshop Layout Usa Woodworking Plans Laundry Hamper |

SeXyGiRl
24.10.2020 at 19:56:21
GuneshLI_YeK
24.10.2020 at 10:26:25
Almila
24.10.2020 at 18:15:44
SuNNy
24.10.2020 at 21:27:31