Workbench Woodworking Plan,Best Budget Woodworking Table Saw Kit,Build A Toy Glider Pdf,Dewalt Biscuit Joiner Nz 75 - Plans Download

Cutting everything to size and sanding it is likely the most time-consuming part — afterwards, simply screw everything together to assemble. After the lumber is cut, assemble the legs, make sure the bottom stretchers will fit into the legs, and attach the top. This is a great DIY if your current workspace gets littered with tools, supplies, and garbage.
This has a place for everything so you can keep everything in its place. This entire table can be made from one huge sheet of plywood or you can buy the lumber cut to the sizes given. Cut the pieces, drill the bench dog holes, and put it all together. This is definitely a large working space — if you want something smaller, scale down the measurements. Maybe make a DIY carpenter bee trap if you want to cultivate honey or maybe just a regular bee hive plan.
Any scrap wood you have around the house would also work. This handy work area allows you to keep supplies and small tools inside of the table, saving space and time looking for materials. Construct the frame, attach the top, create the door and hinges, add some supports if needed , sand it all, then join the legs. Once done, try a plan like this one: a DIY raised garden bed plan. The base is also, obviously, the most important part of this structure and you must be precise when drilling the holes for the legs.
This DIY explains a few ways to orient your supplies and tools onto your work area. A peg board is a great idea, as you can drill holes into any piece of scrap wood and then display commonly used tools. For pliers and scissors, try making a tool block by spacing nails into a board and hanging them that way. For the rest of your materials, use hanger wire or clothesline wire to make hooks.
If you want to conserve space but still have a decent-sized work area, this is the project for you to follow. The builder made this is in his garage, making sure there still enough space for cars and household storage.
An extensive list of tools and materials are given. The builder also let his lumber sit inside for two months to allow the moisture content to equalize, although this is an optional step. This will surely take a beginner a day or two to complete and an experienced crafter more than a few hours. Try building a DIY murphy bed on this handsome table- it would be an ambitious undertaking!
Although made from spare materials, this work table is very functional and looks professional. The builder used a kitchen countertop for the top, though a piece of wood could also be used. You can paint this any color you want, Traditional Woodworking Workbench Plans 20 but make sure to use sealant and polish on both the countertop and wood. Why not build your living room a stunning DIY coffee table using this table- it would be a crazy ambition! If you want a natural and utilitarian workspace, this is the perfect DIY.
This project may seem daunting, but the steps are simple: cut the wood, make the legs, create planks and the backboard, assemble the bench top, then put it all together and add any finishing touches.
Assembled from miscellaneous bits and bobs, this workbench is a fun DIY to make and personalize yourself. This designer used old prison beds, a piece of a bowling alley, swivel casters, and a vice! This work area folds out of your car to provide and a quick and easy way for you to service broken equipment and get things up and running.
Measurements will probably need to be adjusted based on your own vehicle, though this concept is easily scalable up or down. This is on wheels to facilitate moving it around the house, but it still is heavy — especially when loaded with your tools.
This also features an extension that slides out to give you more surface area when working. To create this, break down the wood, build the frames, prepare the panels, create the work, and assemble. For storage, you can add some bottom panels. This is a very simple and to the point work area.
If you want to spice it up, consider painting it or staining the wood. This DIY uses a folding table as a base. Depending on the size of yours, orient the measurements to fit. You can get creative about storing and hanging things on the wall.
This builder used bamboo skewers, made a pegboard, and even drilled supports to hold heavier tools like drills and hammers. Perfect for anyone who wants more space, this project helps you create a basic workspace you can be proud of.
Supplies include adjustable bench legs, plywood, a power drill, sandpaper, polycrylic, and locking casters. To build, cut your wood, mark the holes, drill the legs into the base, fasten the bench legs, attach the casters, and add finishing touches.
This designer just sanded his, but you can paint, stain, or polish yours however you like. As the title states, this is a DIY for a simple work table in seven steps check out a DIY sewing table for something a little different check out a DIY sewing table for something a little different.
This is not the most visually appealing or creative, but it is a strong and sturdy area for you to create things and work on projects. The designer himself is a beginner woodworker and this project is a great way to hone your skills.
One poster says that he was pondering creating a garage workbench from a free pdf- he had done a lot of research on YouTube. Luckily, his friend had some kitchen worktop available that he could upcycle into a durable, hardware and countertop for his workspace. Saw Bench Woodworking Plan. For sawing with a traditional handsaw, the lower-than-sawhorses working height of this saw bench. Easy-Build Workbench Woodworking Plan.
Biscuits, glue, and screws; a high-performance workbench doesn't get much easier. Compact Workbench Woodworking Plan. Build this bench in a weekend, and enjoy it for the rest of your life.
Tablesaw Outfeed Table Woodworking Plan. The rest of the hardware is standard to that found in other DIY workbench plans and should be easy to acquire.
This workbench could actually be called a staining station. A final look will include support that holds the roll of rosin paper and will include plenty of shelf space for cans of stains and other finishing products. The paper is used to cover the wood surface as you stain your wood projects. Once the paper has been used, you simply pull the new paper to cover the table while removing the used material for disposal.
Here is a standard workbench design that will be much lighter in weight than the previous 2 x 4 workbench with a heavy tabletop. Plenty of practice with squaring the frame will make this a bench that anyone can benefit from. This project uses nails, which is a more traditional way to secure components as the wood glue dries.
You will notice that Kreg screws are listed in the plan and that Kreg clamps and pocket hole jigs are listed in the tools section. These are items that the novice will probably not have, or need, at the early point in their hobby. A sheet of Birch plywood is suggested here. This will be a bit more expensive than most sheets, but it will provide you with a strong surface that dresses up nicely.
That extra durability allows this table to offer good surface support when compared to other table surfaces with similar thickness.
That wider lumber will be used in the leg portions of the workbench. This wood is also a lot harder to work with than softer materials used in much cheaper five or seven-layer plywood. Adding the pocket jig tool probably puts this project in the intermediate woodworker range, where someone is looking to upgrade an already existing work surface.
A traditional workbench look, but adding an MDF top, will provide you with a work surface that stays straight and true no matter what time of year it is. There is a lot of new hardware to look at for this build. That includes metal rods, S-clips, and levers. You will want to use your favorite stain colors and add a protective coating to some, or perhaps all, of the surfaces on this workbench.
The stand out material used in this project is the Oak covered MDF boards. This will give your bench a traditional look. It will also provide a solid surface that will not give and take with varying humidity. Oak hardwood can be used wherever you would like, but it will be a necessity for the vices if you install them.
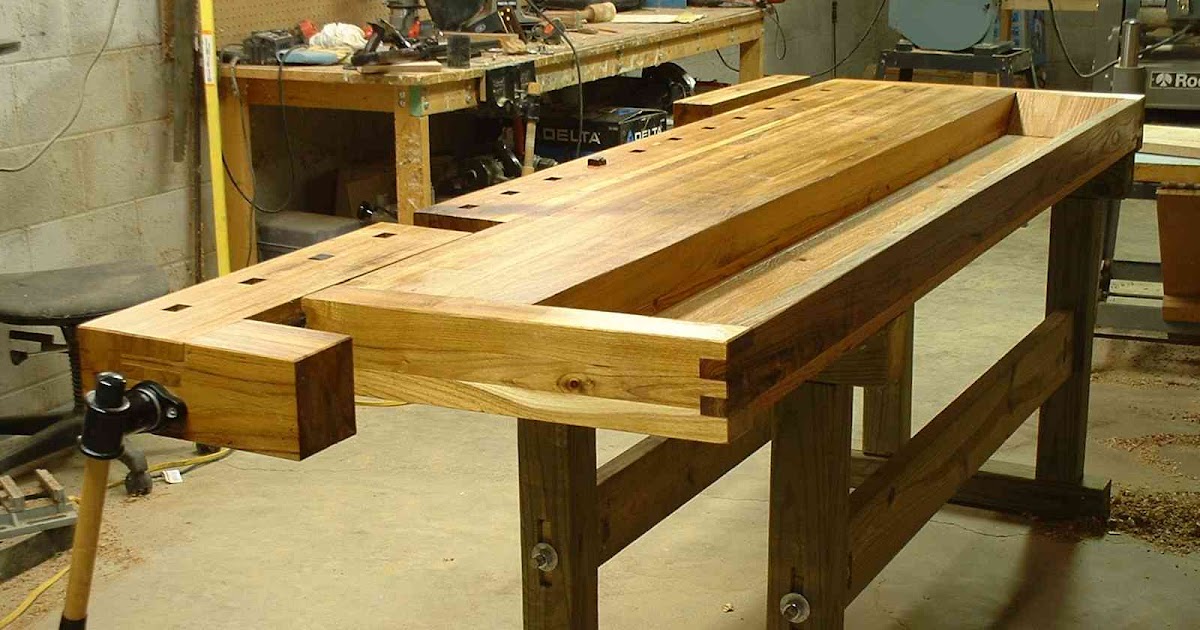
You will notice the holes on the table surface that will be used for dog holes. Various dowels and pre-made components can be sourced for these holes, including bench dogs and various clamps. This project is perfect for intermediate and advanced woodworkers. Especially those that work with hand tools. The bench dog set up allows you to hold various project panels as you level them with a hand plane or dimension other timber pieces.
The oak wood is tough and sturdy and should handle the torque from hand tools, while the MDF will stay Woodworking Workbench Plans Free App straight and provide you with a flat surface to work on. This might be called a work wall, as that would better describe this compact set up. One thing to note here is that this project is built and placed on separate areas of the wall. Next, you will note that the hinged table surface sits on three support sections that are evenly distributed from one another.
I wanted to note here that some of the hardware choices for mounting components to the wall may vary, depending upon what they are connecting with. Thinner 1 x 1. If not, you can dimension down extra 2 x 4 pieces. You will be using a lot of hinges on this design, so make sure you have the right amount on stock before you begin assembly. This DIY workbench plan is for anyone who has limited room. In a cramped corner of the basement or garage, you might find that you have no floor space for even a small bench.
This wall-mounted system not only provides you with a work surface. It will also help to hold and organize tools and small objects you want to store.
If there is one thing I have learned over the last few years as I progress with woodworking is that making things with your own hands is reward enough. Finally, no matter what, be safe and have fun.


|
Wood Supply Store Near Me Manufacturer Best Kitchen Drawer Slides 4d |

Ronaldinio
28.09.2020 at 19:45:21
DunHiLL
28.09.2020 at 16:40:16
BIG_BOSS
28.09.2020 at 12:50:43