Woodworking Plans Jewelry Armoire Instagram,Small Shop Dust Filter Zoom,Kreg Pocket Hole Driller Installation,Incra Master Lift 2 Zoom - Step 1
:max_bytes(150000):strip_icc()/ana-jewelry-58f8e0a33df78ca15979cd4c.jpg)
All of the board cuts are shown in the images below for your reference. I used pine and stained it Fruitwood and I think it looks great. Velvet lining is the other major expense, but depending on the quality you desire you can get some pretty cheap from Joann's.
Lumber board feet :. Would you be willing to share the sketchup file? I'd like to try some different material combos on it, and renders would be nice :. Reply 7 years ago on Introduction. Just send me a private message with your email address. It's a shame they don't allow you to post sketchup files here Reply 4 years ago.
The measurements for B are incorrect. In the sketchup they are In the drawing above its I have another question on the dimensions. On the sketch posted for piece J the dimensions are Reply 6 years ago on Introduction. I'm not sure how to share the sketchup file on this site. I just joined Instructables. Maybe someone else on the site knows. I just know that I love your jewelry armoire, but I wanted to change the depth. I too, like "twall2", would like to try some different renders on this.
That would really help Reply 8 years ago on Introduction. Introduction: Jewelry Armoire. By LMO Follow. More by the author:. Lumber board feet : 1. The general strategy for the armoire is to build it from the inside out in sections.
That way, if you make any mistakes like I did you can adjust the remaining cuts. I started by putting together the interior section first, which holds the drawers. The images below show the boards required for Section 1 and how they come together. Take your time when cutting the 45 degree miters to avoid any gaps.
Keep in mind that in this step you are making 2 identical panels. Make sure to make the panels mirror images of one another make the drawer guides flush with the left side of one panel and the right side of the other panel. The next step in the project is to make the rear panel for the interior assembly. No miter cuts here, so this step is much easier!
Now on to the doors. You'll have to make more miter cuts and the doors are external, so make sure you take extra special care to perfect the joinery on the doors. You may also use dowels or 00 biscuits to add strength to your joinery.
Assemble the necklace holders by fastening 2xM pieces to a single L piece using 1. I installed 6 hooks on each holder, 1" apart. Once the glue dries, secure the doors to the interior section using hinges. I've found that the best way to do this is to turn everything on its side.
At this point, measure the overall dimensions of the interior and door sections and make any necessary adjustments to the board cuts shown below. You may want to remove the doors to make this step easier. If you will be installing a mirror in the top lid, be sure to adjust the hinges for the extra width of the mirror.
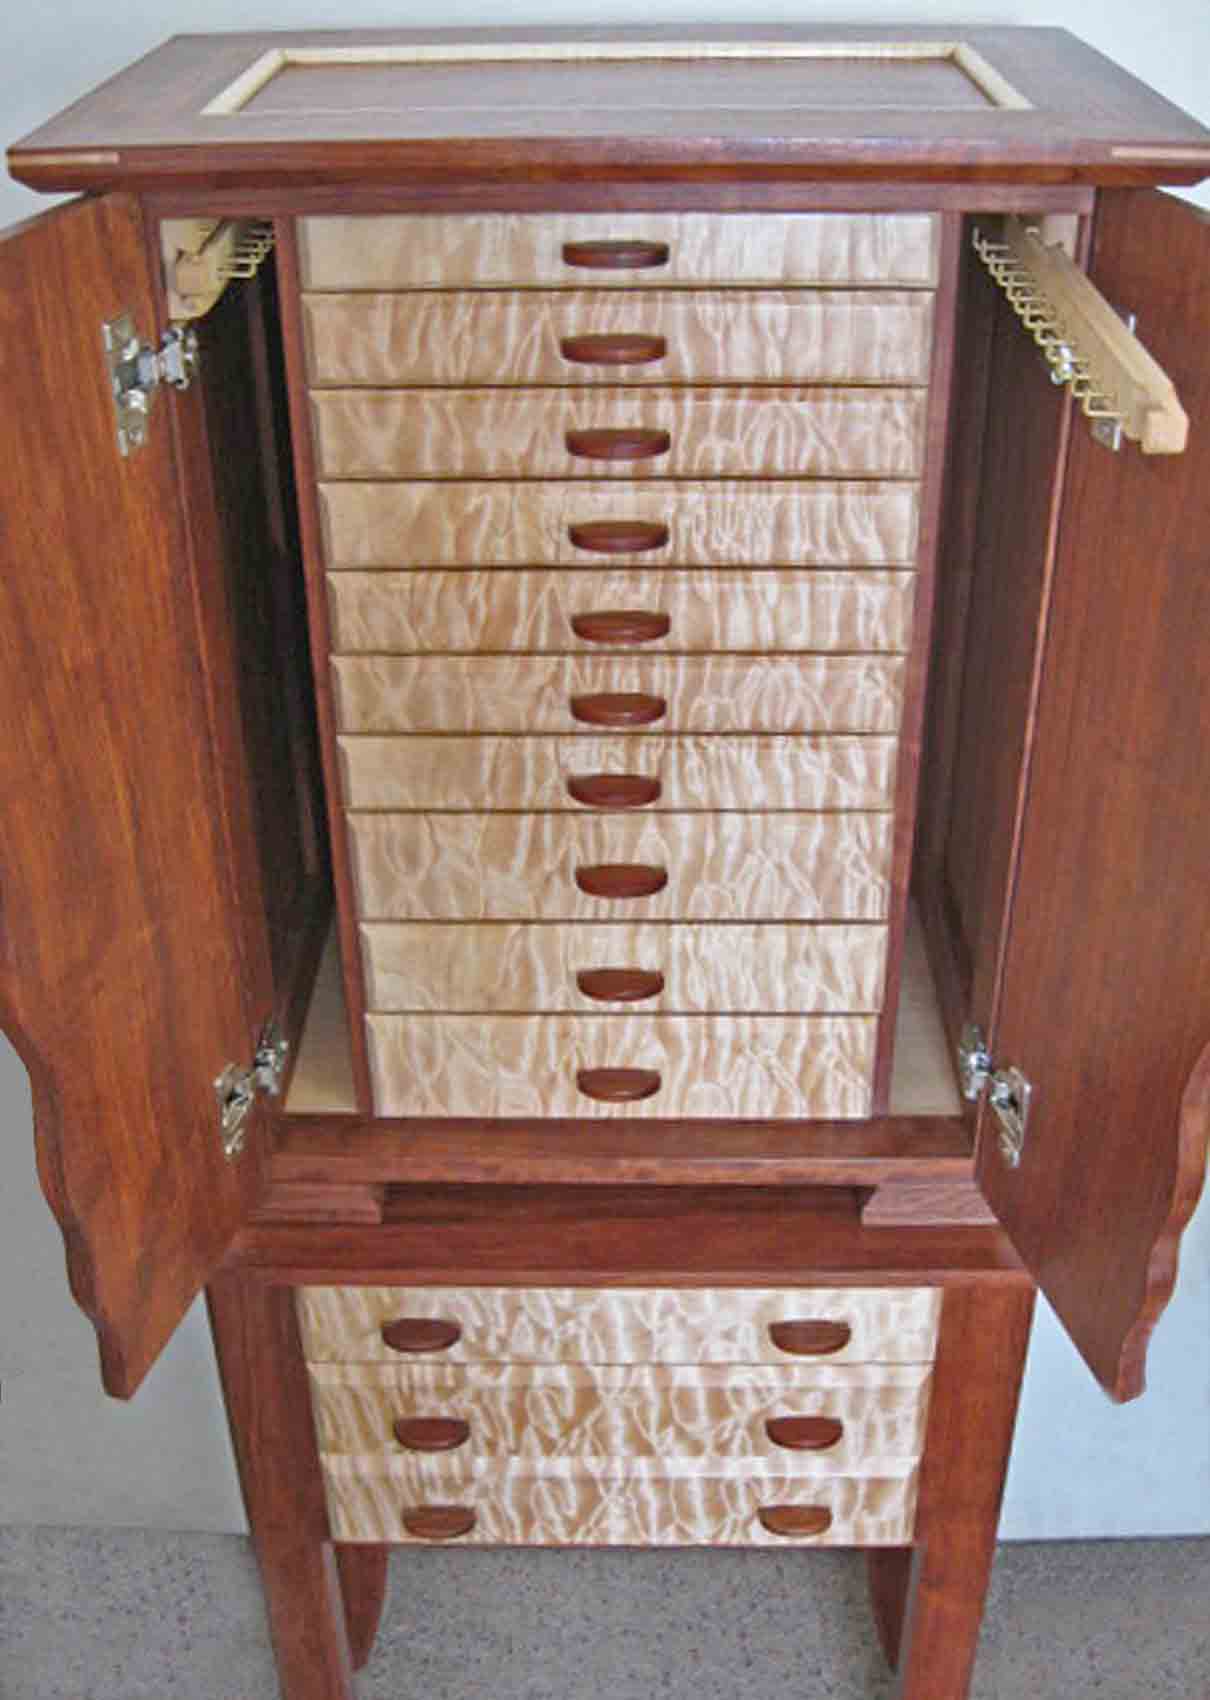
You will need to make 6 small drawers and 5 large drawers. Be sure to use your best boards for the drawer faces, since they will make up the majority of the armoire exterior. Begin by ripping the 2. The waste boards can be used for the drawer guides in Step 2. Drill holes in the center of each drawer for the knobs. Drill holes which are slightly larger than the bolts for your knobs, such that the bolts slip through easily.
Test fit the drawers in the armoire and make any last-minute adjustments as necessary The inserts that you use depend on the items you will put in each drawer. She also chose to leave the bottom drawers open without any dividers.
No glue is necessary. You're about halfway done with the project! Take a step back, relax, and appreciate how far you've come. Now we will start finishing the armoire, which took a lot more time than I thought it would.
Some basic instructions with tips are listed below: Disassemble as much of the armoire as possible to make the finishing steps easier. Use 80 grit sand paper to smooth out any major defects. I also like to round off the edges of my boards at this point to give them a "softer" feel Next, use grit sandpaper to smooth each surface. You don't have to sand the interior sections which won't be visible or the surfaces which will be covered with velvet If you are planning on staining pine wood, it is absolutely essential to prepare the wood with a stain conditioner.
Absolutely love the Jewelry Cabinet…. My jewelry is still all over the place, though. Beautiful — I subscribed — wish I was handy with saws and drills and building plans — cause I could never make it but it is awesome.
You have some wonderful projects on your blog, and thanks for the free plans also. My wife would really love this jewelry cabinet for mothers day. You are super inspirational!!! Keep it up girl!!! I look forward to new projects from you and I am going to have to spend awhile here on your blog checking out old ones I may have missed!!
I love this! Beautiful work! As always…. Looks so good. Pinned and tweeted. Lou Lou Girls. You have got such talent!! I am amazed at all you do as I go through each of your posts!!
Not only am I going to be following you closely but my 17 yr old son will be as well. He just begs for these kind of projects to do. I am so making this. My daughter asked me today if we could build something out of wood. I said sure what? She said a jewelry box and your fits the bill perfectly for what she wants in it. Going to go out and buy the wood this weekend.
Your email address will not be published. Notify me of follow-up comments by email. This site uses Akismet to reduce spam. Learn how your comment data is processed. Step 6 To cover up the plywood edges that show, you can use edge banding, molding or make your own molding.
Add molding or trim to the bottom. Step 7 Apply wood filler to any cracks, blemishes and pocket holes as necessary, allow to dry. Download the Jewelry Cabinet plans Pin it! Comments I looooooove this jewelry chest!! This is an amazing piece. You did a fantastic job! I subscribed! What a beautiful piece; it will make some lucky gal very happy! Amazing and absolutely stunning. Great job Amy! I LOVE it use it all the time. Amy you are my hero!
This is stunning! Beautiful job! I love this it is so beautiful. What a beautiful place to store jewelry! What a beautiful job. The cabinet is beautiful. Would love to win it. It looks gorgeous! This is a beautiful cabinet!


|
Wooden Letter Jigsaw Vision Woodworking Equipment Uk Zoom |

Hellboy
13.12.2020 at 10:15:44
Roni_013
13.12.2020 at 16:36:16
889
13.12.2020 at 18:43:49
LEONIT
13.12.2020 at 16:33:51