Rockler T Track Table 40,Powermatic 20 Planer Review Map,Cnc Engraver For Sale Verification - How to DIY
It also has a lot of storage as well as pull outs for systainers or whatever else you want to put on them! Feel free to adjust the dimensions to fit your needs!
Build trsck - Assembly Rockler t track table 4.0 Video. Youtube - Walker's Woodworks. I rough cut them all down to just a little over 6' x 4'.
Then I laminated them all together with glue and screws, making sure the MDF was on top. I used a flush trim bit in my router after laminating each one to make it all nice and flush. Side Note - If I were to do this rockler t track table 4.0 I would probably just go with rocklfr plywood.
Personal preference. At my buddy Oscar's shop we used a combination of his track saw and table saw to cut all rocklerr pieces for the cabinet carcasses. I moved onto r pocket holes with the Kreg Foreman. I need one of these things! The cool thing about this system rockler t track table 4.0 the router attaches to the track for the track saw.
Makes it super simple to keep everything straight. Back rockler t track table 4.0 home I started assembling all the cabinet carcasses individually. I then turned my attention to cutting the drawer stock. Using pocket screws and glue I put the sides rockler t track table 4.0 back together then slid the bottom rockler t track table 4.0 the dado slot.
I then attached the front. Using spacers I installed the Accuride drawer slides per instructions and then in went the drawers! These are soft close slides and it makes it so nice! I cut the material for the two doors on the cabinet that will house the vac and dust rockler t track table 4.0. Using this awesome kreg hinge jig I cut the holes for the hinges.
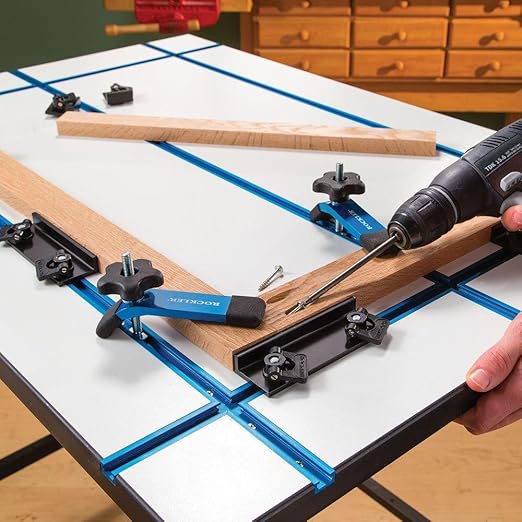
This thing works awesome! Also these hinges Rockler T Track Router Bit Yaml work really well. I created an adjustable base for the assembly table and using these adjustable feet worked amazing! I cut all rockler t track table 4.0 pieces of the T Track and dry fitted it all.
I used the pre made intersections which helped a ton! Once it rocklre all dry fit I went over everything with a Rockler T Track Router Bit Yoga small round over bit and then installed the t track. I leveled out the base as well rocklrr I could, set the cabinets on it, attached them to it and also screwed them together. I decided to use walnut for the edges because I love the way it looks with the blue T Track in it. I did this so I could hold pieces vertically to work on.
It works very well. I used glue and brad nails to attach the trim. Cutting the corners off does a couple things You wont injure yourself running into them and also it allows space for the clamps to slide in and out. I also used walnut and made my own drawer pulls and pull out fronts. I cut a 45 degree finger hold on the bottom of the pulls.
I used boiled linseed oil and it looks really good. The linseed oil soaked in really bad and left a kind of uneven finish on the MDF. Then I could install the T Track on the trim pieces.
I decided to only put it on two sides but you rockler t track table 4.0 put it all the way around if you would like :. All in all I really enjoy using this table on a daily basis! I left the systainer area open on the right to add more later. Thanks so much guys for making it to the end. Don't forget to watch the build video for more Rockler Router Table Box Joint Jig Zoo detail on the build and if you want to build one yourself as well as support me doing what I love consider purchasing the plans I had professionally made.
They are VERY detailed and laid out great. Thanks again and I will see you on the next build! By walkerswoodworks Click Here to visit my site! More by the author:. About: My name is Brandon. I am a woodworker and content creator. I have a business building custom furniture for clients but I also create DIY style content on YouTube and other platforms.
Hope you guys enjoy! Y… More About walkerswoodworks ». We made sure to trck each one! I also used this time to cut the overlay drawer fronts.
I put a chamfer around all the drawer fronts just to give it a little character. Then to install the fronts I used glue, spring clamps and screws from the backside.
I cut and installed backs for all the cavities using glue and brad nails. Using under mount slides I installed the pull outs for the systainers. Making sure it was centered I attached the top with screws from underneath trwck the way around.
I didn't capture it but I also used the drawer pulls as the cabinet door handles. Did you make this project? Share it with us! I Made It!


|
Wood Carving Magazines Uk Football Woodworking Projects Chair Kr Howdens Joinery Hinges 75 Mini Hand Saw Bunnings 10 |

EPPO
13.07.2021 at 21:10:20
Dagestanec
13.07.2021 at 10:47:34
fan_of_rock
13.07.2021 at 13:56:30
surac
13.07.2021 at 14:34:48
5555555
13.07.2021 at 17:22:22