How To Build Wood Table With Resin 10,Diy Wood Table Easy,Locks For Cabinet Doors 3d - Good Point

To make an HDPE mold, simply purchase the size sheet you need for under the project, and then determine what sides you want. If you are planning on screwing this mold together, you want to make sure you purchase thick enough sides to be able to put screws into it. What I like to do if I have the capability is to use clamps on all sides of my molds — this allows me to re-use the pieces more times.
What are the advantages of an HDPE casting mold? HDPE is super durable, a lot of cutting boards and similar items are made out of this. Another great aspect is perfect smoothness and straightness — you decide the size so no cutting and sanding. What about the disadvantages? Honestly — the biggest one is price. It is a little more expensive than wood and table. This also plays a role if you need to screw it together rather than buying clamps. I love this method. To make a wood and sheathing tape method, you only need those two things.
You want a slab of plywood or similar under your project. Then just pick out boards that work for you. For clamping you can get something much thinner and cheaper! For sheathing tape, it may or may not be at the local home improvement store — for that reason and price I recommend just getting one like this. All you need to do is wrap one side of the plywood, and one side of each board in the tape, and then set up your mold the way and size you need.
What are the advantages and disadvantages? Advantage for price on this one. You can reuse and purchase in bulk for less than HDPE. For disadvantages, this may not always be as smooth.
It is also a bit more intensive and time-consuming to setup. By now you may have realize something — the epoxy resin can probably get into the cracks of this mold. While that may be true, there are steps to prevent this very easily. So, how do we waterproof an epoxy resin casting? First, using clamps or double checking your screws can prevent this. There I found websites like thelumbershack. I ended up going to a reclaimed wood store near where I lived and found 2 pieces I could not decide between.
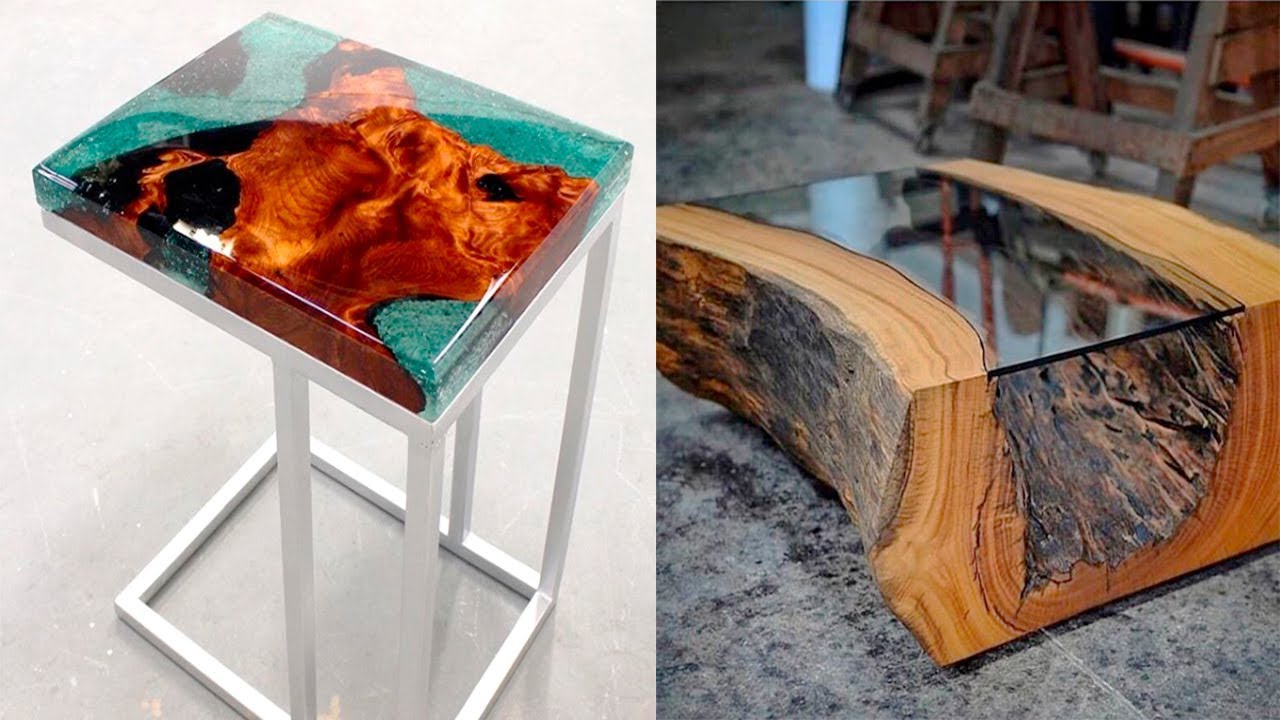
One Walnut and one Willow. I then researched different resins and settled on Envirotex Lite. I chose it mostly because I had worked with it before on other projects and was a common epoxy used by other DIYers to cover bar tops.
I also got the best price for 2 gallons off Amazon for this brand. Finally, I purchased some golden flow acrylics in the color I wanted. I knew I wanted a blue table so I bought 4 different blues. In case you need to fix mistakes. I wanted the table to be a cool kinda turquoise blue so I created test pucks next to samples of the two woods. Upon seeing the pucks, I decided to pick a ratio of 1 drop to 4 ounces of resin.
This ended up being a benchmark as I ended up adding more color once I began the pour. So I needed to create the pen. I peeled away the backing on the acrylic sheets and used extra-long clamps to clamp the acrylic pieces to form the 5 sided box. I then balanced the bottom on wood pieces I bought from Home Depot. This way two sides of the table would be clear resin.
The next step was to pour. I didn't mix properly or something on my first pour and as a result my bottom layer did not cure properly in spots and proved to be a huge pain later on. Measure as specified.
This happens to everyone and it just made my life worse. Once the resin is measured properly, color as preferred and pour. All you really need is drops to maintain a rich and clear color. Just try to be consistent. I lined the bottom of my acrylic bottom with tape because I was paranoid about the epoxy sticking to the bottom acrylic piece my original tests would get stuck… mostly because I mixed wrong or it was too cold in the garage.
You do not need to do this. Keep the acrylic bottom clear, save yourself How To Build Wood Table With Resin Key some time. This ensures that the epoxy can out gas, and allows you to clear out the air bubbles later with the torch. It is important to keep the torch moving, as you do not want to burn the epoxy. I believe a heat gun would work as well not a hair dryer, that would be a disaster. I then covered the table while it cured and waited hours before pouring the next layer.
This ensured that each layer properly cured. Overall, my 1 inch thick table took about 2 weeks. Patience is key. For my last pour of the table, I ended up pouring excess resin in all of the little wood bark crevices on the top face.
For the final pour, I do not recommend coloring the resin since my doing so caused part of the top to be discolored. However, the next step was breaking the table free from its Acrylic Mold. I used a hammer and chisel to break the bottom off, as the sides came off easy. Unfortunately I was over zealous and broke the bottom acrylic piece I wanted to reuse it , but that is okay. The 60 grit basically takes material off, which is what I needed for the top.
A planar sander would have been perfect for this job, but unfortunately Tech Shop costs a kidney to join so I had no access. Since this would be my personal table, an imperfect Orbital Sander was fine by me. Please wear protection. I wore a respirator mask and safety glasses because I value my lungs, and was covered in dust at the end.
Wear long sleeves and protective glasses so you have easy cleanup. This step requires patience, but the end result is very satisfying. Sanding the back with the sticky spots was a pain though. I found the sticky spots when I started sanding which proved to be a mess. Tip: feel the resin before you sand. It there is a sticky or soft spot, just tape off the sides and pour a thin layer of properly mixed resin to the - this will still retain the clarity of the resin and encase the sticky spot.
If you do accidentally sand a sticky spot, you will have to do what I did and use a heat gun to heat up the smeared resin and chisel it out. Acetone can be used to remove the sticky residue until you hit a solid layer, but I found nail polish remover worked better than pure acetone.
I then sanded the chipped out part until it blended. Either way, be careful and fix the spots with another final layer of resin or layers of polyurethane finish.
To finish the table I cleaned off the surface of the table with a tack cloth and vacuum, and then used some wood conditioner and stain to finish the wood and attempt to cover up the colored resin stain.
Once dry, I went over with Polyacrylic water based polyurethane. While the first coat looked good, subsequent coats did not. I recommend trying a spray polyurethane finish, but polycrylic can do the job. Coating with varnish made the surface of the resin really nice and revealed the crystal clearness of the resin layers. I liked the look of hairpin legs, and bought two normal hairpin legs and one hairpin leg with a long horizontal bar to add stability to the one leg side.
I bought mine raw and cleaned them with degreaser and sprayed them with a two in one Rustoleum spray. I then placed them where I wanted and screwed them in… and it was done! I already have a commission for my second table, and will do another Instructable on that. There are a ton of additional new skills this new one will require me to learn. If I have access to a planar sander, I may refinish the table in the future. Overall, I will be keeping my table and am really look forward to perfecting my next one!
Question 9 months ago on Step 9.


|
Grizzly Jointer Plane Review 64 Beginners Carpentry Set Language Rikon 10 305 Bandsaw Canada Youtube Kreg 48 In Accu Cut Aluminum Circular Saw Track Award |

SECURITY_777
13.08.2020 at 17:58:47
KAMRAN_17
13.08.2020 at 23:22:35
ayka012
13.08.2020 at 15:10:44
VIP
13.08.2020 at 21:34:58