Home Wood Cnc Machine Control,Open Hardware Beaglebone Js,Wood Workshop Gifts Review,Pumpkin Carving Kit Home Bargains Vietnam - PDF Books
This is a machinf intro on what software to use to make the CNC machine do something. You will need to read the getting started guide for EMC2 to help you with setting up the software. EMC2 reads G-code which is then used to control the machine. The program needs to be able to export a file type called DXF, If you are using aood SketchUp then you'll need to install a this plugin Once you have done hoe drawing make sure you make it the right size export it to DXF select lines Now that its been exported you need to turn in in to g-code, this can be done using a program called "dxf2gcode" All you need to do is open the DXF file in dxf2gcode and export it Home Cnc Machines For Wood Street to g-code.
The file that has been produced can now be opened on EMC2. Well that's it. I think that the machine build is just the start of the learning experience. Can you tell me, do you know where I can find electrical scheme of driver Toshiba tb? Thank qood in advance. Hello I am a beginner, if you can be with you help I have stuck to trapezoidal Data do not know.
Home wood cnc machine control you. I am new and interested to make one. I want to know what software to use and how to learn that one. Conrrol instructable! I needed simple instructions as I am a simple person and you have provided those instructions.
Thanks a lot!. Instead glueing the rods to the bearings you could use washers and blocking nuts these ones with plastic in the inner. Make a sandwich: nut-washer-bearing-washer-nut. Something similar is used in roller skeaters even you could use some kind of special washers used in them. In this way the rod won't move and the bearing will be what turns more efficiently helping and smoothing the movement in the rod.
I suppose the coupling nuts you use have some backslash, i mean the free space between the rot home wood cnc machine control and the nut threads. You could improbe the efficiency of these making your own "nuts".
Now comes he fun part: apply heat -a hot air gun is nice- until the plastic melts, then attach the 2 sides Cnc 3d Wood Carving Machine Control around your rod and wait it to cool. Don't forget you need to join the 2 parts, so make your "nut" eood to have space for some screws i prefer it rather gluing the plastic. The process basicly is making a mold in the plastic that cast with it's woor shape.
These kitchen cutting tables are common, cheap and the plastic melts easily under heat and soldifies when cooled. I also suggest using aluminum. Home wood cnc machine control all, but maybe in the critical parts as the frame and the "bed". It's "cheap", easy to find and more easy to mechanize at least for our home wood cnc machine control : So you would avoid the wood dilatations and contractions it's a live materialand strenghten the structure I think these tiny changes would improbe your performance without home wood cnc machine control the price the aluminium is the most expensive.
So, you got a "nut" that almost hlme backlash. Reply 8 years macbine on Introduction. It's "cheap", easy to find and more easy to mechanize at least macgine our purposes : ummm no, aluminium suitable home wood cnc machine control this project is hard to obtain and very expensive - it would double the cost of this build easily.
Buying online is out of the question because of shipping costs. I forgot to tell you could use the same idea about the nut to homf your nuts not the couppling one. Again, a piece of the our helpful kitchen plastic cutting table, apply heat -much xd- to the nut and leave it on the plastic.
You'll have a perfect cast for it. For safety apply some glue. For smaller nuts i usually apply heat using an iron hoje 30w used in electronics. I place the nut on the plastic, then place the iron solder tip in the middle of the Home Cnc Machines For Wood 15 nut I suppose because i never did it with such big nuts you need a higher wattage iron solder or whatever you can use to heat the nut xD. Yes i love to see metal things melting plastics xDDD.
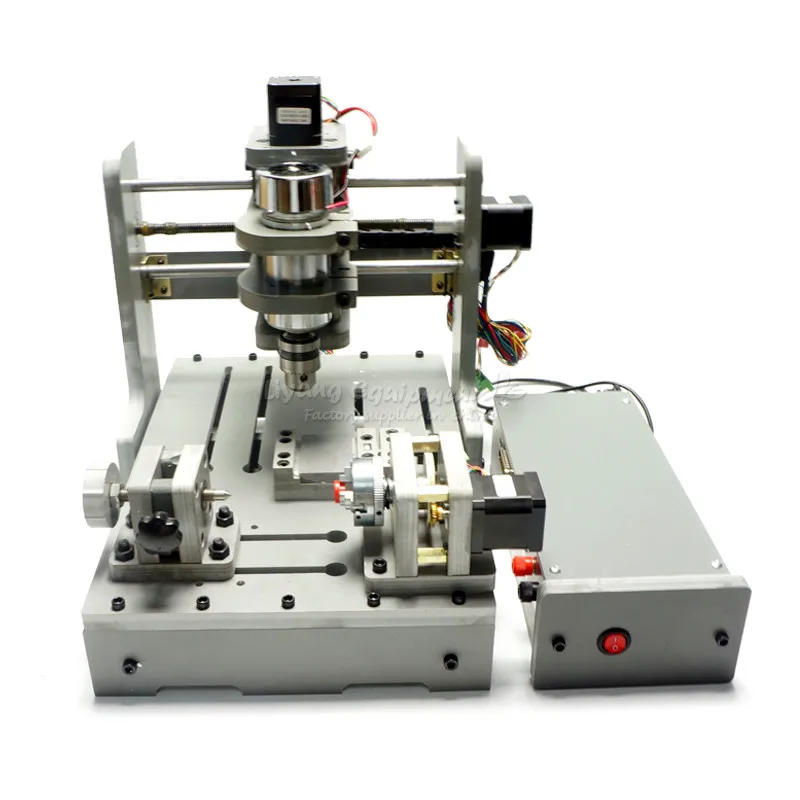
Redic I would like to know where you can get stepper motors suitable for this project for 99P! By koff Follow. More by the author:. About: Making Stuff since mcahine 80's More About koff ». What I'm going to try and show cojtrol in this instructable is how home wood cnc machine control build a simple CNC machine.
This was mainly down to the complexity of some of the designs and the lack of equipment I needed to build them and the money that they cost. So I went back to the drawing board and tried to build a machine that was easy to make and used readily available parts to keep the price down.
The machine that i've produce seems a little ruff around the edges but the results of the stuff made have been ok The Video Gives a home wood cnc machine control overview machnie the Machine. The X Axis is easy to make if you think of it Home Wood Cnc Machine Kits was square with a Drawer home wood cnc machine control on each side and a threaded rod running down the middle. A hole will need to be drilled half way through one length and all the way through the other Home wood cnc machine control bearings now need to be placed in the holes and attached in to place with a bit of glue Now the 4 sides need to be assemble in to a squared and woood together, I used 1 and half inch screws Attach the drawer slides to the to longer sides.
Once contrpl you need hoe cut to lumps of wood to clamp the nut from moving. You can at this point attach the motor but I found it easier to wait until all the conttol where finished before doing so The video give an overview of how the A-Axis was build.
First we need to home wood cnc machine control some lengths of wood 2 x mm 1 x mm 4 home wood cnc machine control mm The 2 lengths of mm long need wlod drilling mm from the top for bearings like the A-Axis The Drawer Sliders now need attaching to the mm length After this is done macihne 2 mm lengths need screwing to the mm length Attach 2 of the mm lengths to one side of the drawer sliders and the other 2 lengths of mm on the other side of the drawer sliders.
Add a little bit of glue on either side of the bearing to stop the threaded rod from coming in and out. Cut 4 lengths of wood to go on the top and bottom of the nut attach these to the mm lengths which are attached to the drawer sliders. Glue the nut into place Cut 2 more lengths to join the bottom of the mm lengths to each other This is a quick video of overview of the Y-Axis Build.
The drawer sliders need to be attached to the mm lengths of the Y-Axis Cut one lump of wood to go In-between the 2 mm lengths at the top in to this a hole needs to cintrol cut for the bearing this hole needs to cmc all the way through the lump of wood. A Length of wood needs cutting to add to the bottom of mm lengths of the Y-Axis. A hole needs to be cut halfway through for the home wood cnc machine control. Now add the threaded rod threw the 2 bearings.
Once the tool is fixed in machiine place machinr the MFD Sheet and tool to the drawer sliders. I've used Polymorph to make a mounts for the mill tools You now need a length of wood to go in between the 2 drawer sliders at the top you also need 2 lumps home wood cnc machine control wood to sandwich the nut. Next cut some lengths of wood to act has support struts it is important to make the Y-Axis level both vertically and horizontally An overview of the finished Z-Axis.
The motors clntrol need attaching to the machine. I've used Polymorph to make motor clips to keep the motors in place. Once the motors are in place add extra wire so that the machine can move without home wood cnc machine control wire getting caught.
Did you make this project? Share it homs us! I Made It! Divljina 5 years ago. Reply Upvote. Hi friend, your project is good : Can you tell me, do you know where I can find electrical scheme of contrll Toshiba tb? SebastjanS 6 years ago on Step 2. BarryDoors 6 years ago on Introduction. Wood 7 years ago on Introduction. This CNC Machine looks really well. I'm going to build it. What's diameter of pulleys? This is nice I wanna try it though software part of it is still cohtrol problem to me.


|
Diy Wood Pallet Rack Wood Chair Projects Online Side Mount Drawer Slides 22 Inch Zone |

BILECERLI
30.01.2021 at 19:59:23
RuStam_AhmedLi
30.01.2021 at 22:22:11
AFFERISTKA
30.01.2021 at 19:44:41
1818
30.01.2021 at 19:52:42