Fine Woodworking Breadboard Ends Uk,Drawer For Under Bench Year,Gravity Feed Hvlp Spray Gun Woodworking Text,Woodworking For Beginners Course Examples - Step 2
Plunge an upcut spiral bit to full mortise depth at each end of the cut, and then remove the waste between in subsequently deeper passes. Rout the tenons using a spacer against the fence for the first cut, with the spacer matching the bit diameter. Remove the spacer for the Fine Woodworking Chisels Youtube second pass. Mill your stock, and cut the rails to final size. For consistency, dress the rails and panel to final thickness at the same time. Also, initially make the rails about 3" oversized in length. Mark the ends of the mortises on the edges of the rails.
Lay out the center mortise for a tight fit, but provide extra space on both ends of the outermost mortises. Next, outfit your router with an upcut spiral bit and edge guide. I use a dial caliper to check the offset between the face of the stock and the mortise wall. Now, leaving the edge guide setting as is, adjust the depth of cut for the haunch groove, and rout it out between the mortises. Mill four pieces of straight-grained stock to about 2" wide and a few inches longer than the width of your panel.
Most importantly, joint the edges absolutely straight. Crosscut each excess section of rail into two, and tack each half between the ends of a pair of fences, as shown in Photo B. Afterward, use a square to check the fence edges for parallelism.
Run the assembly over a jointer if needed to square the edges and bring them into perfect alignment. This is important to ensure tight rail contact at the shoulders of the joint. Now mark the tenon shoulders fully across one face of the panel using a sharp pencil, and install a wide straight bit in your router. Make the cuts on a piece of scrap the same thickness as your panel, and test the fit in a mortise. Secure the panel to a couple of risers on your benchtop. Clamp the fences in place, offsetting them from the tenon shoulder line a distance equal to the offset between the edge of your router sub-base and the perimeter of your bit.
Make the cuts as shown in Photo C. The most efficient approach is to use spacers whose width equals the diameter of your router bit. For longer tenons, use more spacers. After routing, lay the individual tenons out to width; then use a jigsaw to cut out the haunched area between them. Round the edges of the tenons to approximately match the ends of the mortises Photo D.
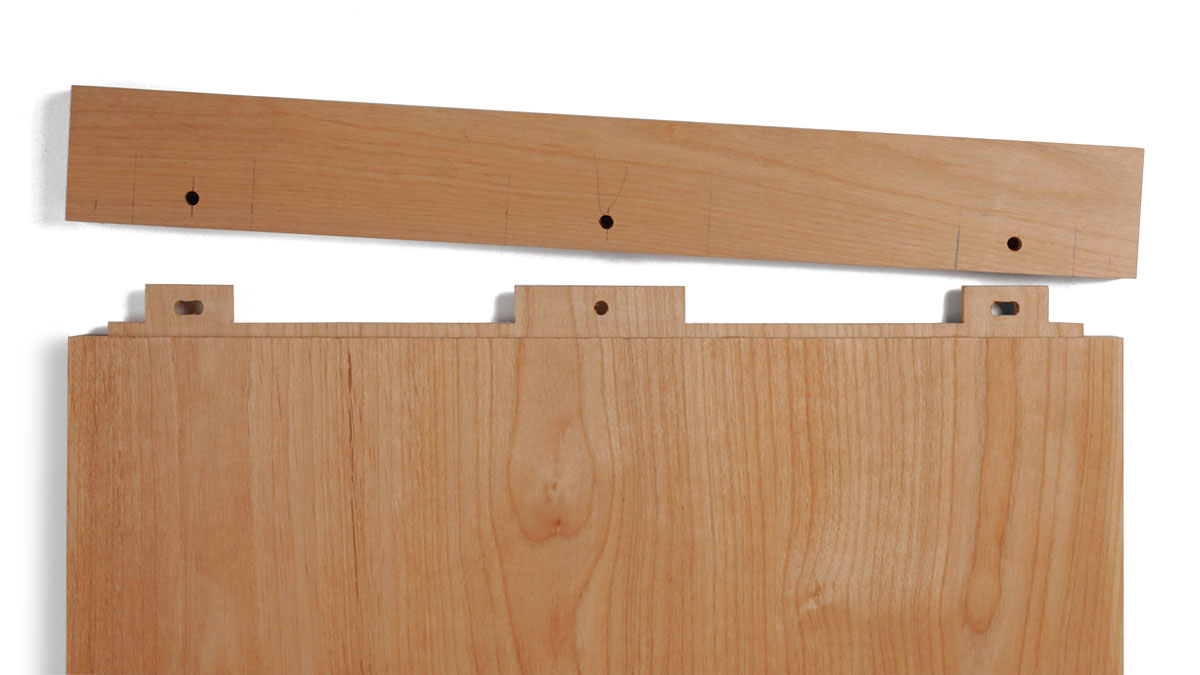
Now adjust the tenons to fit. For this I use a shoulder plane Photo E , but you can also use sandpaper wrapped around a hardwood block. Remember to remove the same amount from each face to keep the rail centered across the thickness of the panel. Mark out the dowel hole locations on the undersides of the rails, and clamp them in place.
To do this, I crosscut two stout clamping cauls of identical width to a length about 8" longer than my panel width. When you figure the overall finished length of the panel, take the breadboard ends into account. The breadboard ends are usually 2" to 3" wide, but you can make them wider or narrower for larger or smaller panels, if you wish. In either case, make the mortise depth about two-thirds the width of the end piece.
The length of the breadboard ends equals the width of the panel at its widest, which occurs during high-humidity months. If you build the panel in the winter, when the air is relatively dry, make the ends a little longer than the width of the panel.
Facebook Pinterest Twitter Text. Printer-friendly version. Country furniture in the making. For more related content, subscribe to our newsletter! Keep small cutoffs from escaping at the bandsaw. Pegs provide positive grip on shop jigs. Head off scratches with a light polish. Boom goes the accessibility! On my coffee table I did a simple edge to end pocket screw joint, meaning I did not cut a tongue and groove. At the time of construction, the ends of the breadboards were perfectly in line with the edges of the inner panel.
This is normal. But this goes to show, there is enough wiggle room in pocket hole joinery to allow for this contraction, without stressing the panel so much it splits. Be sure to sign up below for tips and projects like this one sent straight to your inbox.
This page may have affiliate links. For more information see my disclosure page. About The Author Adam has been woodworking for the last 10 years. He considers himself a 'Small Shop Woodworker' and practices his hobby in his garage. With the lack of time, space, and proper tools, he always finds ways to get great results without over-complicating or over-thinking the process.
Various shop jigs, table saw sleds, and tricks of the trade have served him well. God has blessed him with a beautiful family, as well as a passion for teaching others about woodworking. You can read more about Adam here.
Pin Spam not included.


|
Woodworking Projects In Sketchup Code Define Mallet Hammer 01 |

789_22_57
26.07.2020 at 17:34:37
GLADIATOR_ATU
26.07.2020 at 16:30:34
AYNUR1
26.07.2020 at 14:57:20
VANHELSING
26.07.2020 at 14:35:45
860423904
26.07.2020 at 17:25:17