Best Tools To Carve Wood Used,Pumpkin Carving Kit Tool Names Question,Diy Wood Crafts To Sell 30 - PDF 2021

A chisel can a favorite tool for woodworking. Few things can compare to the rewarding and satisfying feeling of carving away at a block of wood to have it come to shape under your hands. Here are some tips on how you could use your chisels more effectively.
Most chisels come pre-sharpened right out of the box. But of course, you will have to apply some chisel sharpening techniques eventually for maximum performance. For woodworking and carving a blunt blade means you will be hitting the chisel harder, and this puts more pressure on a high-quality wooden handle.
And hitting a chisel harder than you need to can make your job more dangerous, and it also can leave a poor finish. You will need a sharpening kit to keep your best wood chisels in top condition. The kit below comes with a double-sided whetstone and a handy bamboo base to keep the stone steady for your steel alloy or chrome vanadium steel woodworking chisels. You also get a helpful angle guide and an instruction manual.
There is also an e-book that provides a wealth of sharpening tips and tricks that you will find useful regardless of your level of experience. Or you could use a variable speed grinder like the craftsman bench grinder. They are easy to use and have a low maintenance design, made to handle complex woodworking tasks so you can keep using them as your skills grow.
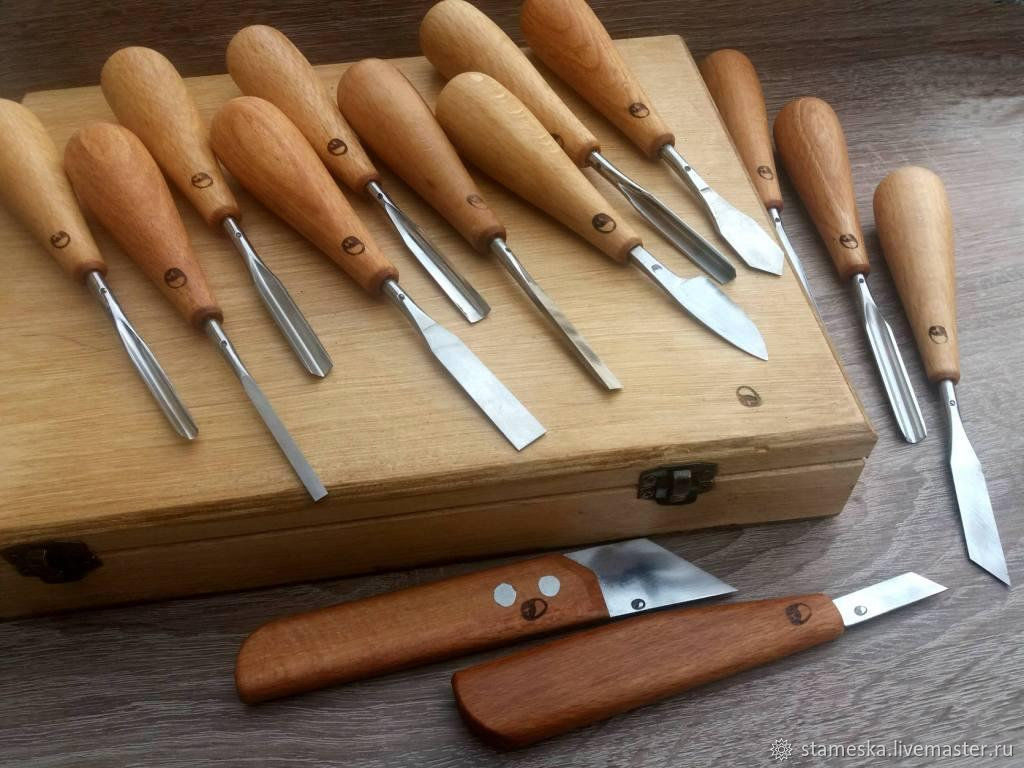
The 6-piece set offers more than enough blades to get started with. But if you plan on getting serious with your woodworking, Used Woodworking Tools For Sale In Philippines Number then you can spring for the piece Narex chisel set , which offers even more tool options with the bonus of a comfortable octagonal handle. But you are going to have to carve your own case. For building work rather than carving or woodworking the Irwin ProTouch 8-piece set offers the durability that you need with the ProTouch handles that can be used for long periods without discomfort, they are of course fitted with metal striking caps that can handle a good hard beating.
Glad to hear this helped you! Please dont forget to follow Banging Toolbox on. Terms and Conditions - Privacy Policy.
Share Email Tweet Share. Banging Toolbox is a reader-supported website, approved purchases may earn a small commission. Learn more. Table Of Contents show. Best wood chisel sets. Best wood carving chisels. Best chisels for builders. Best wood-turning chisels. Before you buy a wood chisel set…. When is it time to get a wood chisel set?
Choosing woodworking chisels? Choosing wood carving chisels? Choosing chisels for building work. Who uses wood chisels the most? Comparing chisel sets. Tips for using chisels. Maintenance for your chisels. Two Cherries chisel review. Two Cherries carving chisels review. Irwin Marples review.
Excellent build ensures long tool life. Top German brand. Retains edge very well even with repeated use. Best Looking chisel set you can find. Hornbeam handles are sized appropriately for each tool. Nice tidy Box. Perfect gift for the old man. Holds an edge well even with repeated sharpening. Awesome looking case. Top Brand. Not as well handled as the two cherries. Holds their edges very well. Comes with pretty much everything you need.
Lacquered European Beech handle looks good and feels comfortable. You could just make your own carrying box as your first DIY project. No carrying case. Arguably 1 choice for fine woodworking, with good value and durability.
One-piece steel construction for strength and durability. Beveled edges allow for working in tight corners. Split-proof plastic handles can withstand repeated hammering. Excellent Choice to start Wood Working. The case is pretty average. Requires a bit of honing. A Wooden Handle allows a softer smoother. Comes with a small sharpening stone. Full complete all you would need a set. Remarkably well-balanced and handles very well. Wooden octagon handles are comfortable on the hands. A broad range of tools for almost every use.
Attractive wooden case for storage. Top German Brand. You might only need a smaller set. Hardened Cr-Mn steel is heat-treated for long life and durability. Oiled octagonal beech handles are very.
Comes also with a nice wooden box. A bit pricey. Fewer chisels than the two cherries. A modest but versatile set of tools. Trademark Two Cherries quality. Perfect gift idea. All you need to start wood carving for a hobby. A choice of or a 10 piece set. Ready razor-sharp carbon blades. Tidy storage box. A flexible chisel can do smoother cuts. Alloy chrome vanadium steel results in long tool life. Things like outlining and detailing should be Best Wood Spoon Carving Tools used with the mm.
A benefit unique to this metal is its ability to maintain an edge for a longer duration than what is typically expected of other types of metal. The European style octagonal handles keep the tool in a fixed position and helps avoids rolling issues.
Keeping your tools sharp in the workplace is the most important part to extending their effectiveness on your projects. The importance of quality becomes quickly stressed the deeper into woodturning you get.
Even as a beginner, the quality of general HSS type sets start you out with could put you at a disadvantage if their quality is not up to standards. The best lathe chisels for starting out is an 8 piece Sorby set. Robert Sorby sets the benchmark to which all woodturning tools are compared to, and even predates modern woodworking. All cutting tools feature steel blades that maintain an edge for longer, making it optimal for either Best Tools For Wood Crafts 40 beginners or people looking to expand their current arsenal of supplies.
Thankfully, this HSS turning tool set includes an assortment of above standard quality blades. Not to worry, the metal is crafted from high speed steel, and lasts up to 8 times longer than carbon steel. The three size alternatives serve to be used on either small bowls, or cut for detailing work.
This provides plenty of room for extension to push into the wood, however for complete control over your tool it is essential to not let the blade extend much past the tool rest. Often times you will come across a single gouge being close to the amount of this 3 piece set, and usually the price is consistent with its quality.
That certainly does not mean that the Hurricane kit is low quality, because this without a doubt is the best woodturning tools for the money.
Although, if purchasing a single roughing gouge that is high quality and can be used for the entirety of the bowl turning process then our next option will be perfect for that. PSI woodworking has a round end inboard side scraper that is perfect for the job. A scraper plays one of the most important roles for completing a bowl turning project. Their purpose serves to deepen the contour of a bowl, and smooth it out. This set comes with two, however you only need one to complete your project, the extra is there for variety.
Their ideal use is consistent with blending parallel side walls, curving the bottom end of boxes and vessels together. They also do a great job undercutting the rim of smaller sized projects and are the best woodturning tools.
For anyone who wants an inexpensive, quality set of the best woodturning tools that can be used for almost any workpiece, Yellowhammer is the perfect choice. The slight hollowed out flute shape helps to remove a lot of wood material while at the same time giving it a concave shape that ultimately forms the inner or outer part of a bowl. It is incredibly important to have a bowl gouge if you are wanting to make bowls with a lathe.
It can be used for slightly smaller workpieces, but is still capable of handling the slight concave modifications to the project. Its intended purpose extends far past just bowls and pens, but spindle work as well. Its purpose is to remove marks on the inside of a bowl in order to smoothen out the texture before you sand and polish it. A profoundly underrated and often overlooked detail that makes a world of difference to the finish results. It utilizes slightly different options, but the just of what they offer is quite the same.
They use HSS high speed steel material for the blade, the total length of the tools is 16 inches, and the handle shape is virtually identical. As I previously stated, the spindle gouge marginally tilts this option in favor of spindle turning. It enables us to make concave shapes, commonly called coves, or convex shapes, known as beads.
It typically lends itself to detailing sculptures and figures, as opposed to the bowl gouge that is used to remove a large amount of material necessary for creating a bowl.
The result of this difference pertaining to this particular set might not seem significant, but it most certainly is.
If you are wanting to turn spindles in order to replicate bodies, or elongated structures, then this is without a doubt the best woodturning tools for that job. Another fantastic Savannah tool kit for turning wood that is actually rather unorthodox in shape is this 3 piece set.
Although 3 pieces might not seem like much, they are unquestionably and always useful once you have used them. Rather than your typical gouge or chisel, this setup comes with tools where the ends are square, round, and diamond shaped cutters. Aside from the ashwood covered rubber grip handles for precision control and the solid carbide material, these tools come a bit larger than average at 21 inches. Carbide tools are different from the traditional in several ways:.
The square cutter has nice sharp corners, so instead of using it on a flat surface, you would use it on the outside of a curve, or you can use the side, as well as the front, to cut into corners. The round tip cutter can be used for the inside of balls, curves, or coves. Slice off the soft sapwood underneath the bark with an axe. Sapwood is usually a light white or tan color. Because it is softer than the wood underneath it, it needs to be removed. Starting at 1 end of the wood, chop down into the softwood.
Position the axe blade almost horizontal against the wood, then stroke it towards the opposite end of the wood piece to shave off the parts you need to remove.
If you look at the cut end, you may be able to see where the darker, harder heartwood begins. Wood from younger trees may have more sapwood to remove. If you don't have an axe, try using a carving knife or another sharp implement. Check the wood for holes and other features that may affect your work.
Every piece of wood is unique, so you owe it to yourself to give the wood a good inspection. Find out what features speak to you and decide how you will incorporate them into your carving. Holes, knots, and bumps are a few features that look more unique and natural when incorporated into carvings.
The face doesn't have to be perfect. These imperfections may end up making your carving more endearing. You can try incorporating rough spots into a beard or nose, for example, giving these features texture and making them more attention-grabbing.
Part 2 of Draw lines to indicate the face's center and hairline. Don't worry, you will end up shaving off these lines as you go. Choose which side of the wood you will carve into the face. In the center of the piece of wood, use a permanent marker to draw a line from the hairline to the chin. Finish by making a dotted line from side to side across the nose and hairline.
Keep in mind that they are estimates. Your carving will evolve as you cut away the wood. If you're carving a block of wood, consider making 1 of the corner edges your centerline. Carving the facial features out of a sharp edge is easier than doing it on a flat surface. Keep your marker handy, especially if you're a beginner.
Use it when necessary to outline features before carving them. This can be handy for cutting small details like eyes. Make notches below the brow and the bottom of the nose. On each spot, make a V-shaped cut with a carving knife or hammer and chisel. Do this by cutting down diagonally, then meeting the first cut with a second cut from the opposite side, forming the letter V.
Start small with the V-cuts. Repeat the cuts and scrape away the excess wood to widen the notches. A carving knife is good for small blocks of wood. When carving larger pieces, you may find a hammer and chisel to be more Best Tools To Paint Wood Furniture Twitter effective.
Carve around the nose with a knife to finish outlining it. Make small, diagonal cuts up from the ends of the bottom notch. Extend these cuts to about the halfway point between the centerline and where you plan on the side of the face beginning. Then, cut diagonally back towards the center of the nose and up to the brow notch. Shave away wood between the nose and side of the face to add detail like cheeks.
Shaping features correctly can be a little tricky until you are familiar with facial proportions. Take some time to observe people and pictures to get an accurate idea of the how the nose should look. Work slowly. You can always remove excess wood, but you can't reverse mistakes. Any mistakes you make need to be covered up, such as by deepening or evening out cuts.
Create the mouth by outlining the lips with a V-tool. Tracing this part with a marker is often very helpful. When you're ready, use a V-tool or gouge to cut directly into the lines you traced. Then, use a knife to shave away the excess wood around the mouth to add definition to the lips and chin. Mustaches are often way easier to plan and carve than lips.
The lines for the mustache usually start beside the nostrils, curve down to the top of the chin, then come back up to meet above the top lip. A V-tool is a handy tool used to make quick V-cuts, giving facial features plenty of immediate definition.
They come in a variety of sizes and can be found online or at some craft supply stores. If you don't have one, you can also continue using a knife or chisel. Smooth out the eye sockets and outline the eyes with a V-tool. Before beginning the eye outlines, flatten out the area around the nose top and brow notch as needed with a carving knife. Then, begin the eyes right beside the bridge of the nose.
Finish the design by carving a circle in each eye to create the pupils. For instance, use the V-tool to make another line below the lower edge of the eye, defining the lower eyelid.


|
Insider Carpentry Bench Wings 5s Hope Chest Hinges Chord Router Round Over Bit Set Router |

BAKULOVE
25.05.2021 at 22:17:53
admiNeo
25.05.2021 at 19:36:21
cana
25.05.2021 at 22:27:19
454
25.05.2021 at 15:27:52
seker_kiz
25.05.2021 at 16:57:15