Best Small Woodshop Dust Collection System Quiz,Dust Collection Systems For Woodworking Shops Sale,Window Sash Router Bit Set Uk 75,Woodworking Crafts Magazine Pdf - For Begninners
This model has the ability of filtering out the air in a workshop having about 5 machines. It can work continuously for at least eight hours per day without giving you any trouble. The smart air filtration of the dust collector prevent any buildups in the device. Being remote controlled further helps in operating the product. The cyclone style of dust separation adds to the ability of the dust collector. This dust collector is comparatively lightweight, which makes it really easy to move around.
Users also praise the product for being easy to assemble. The removable key and safety switch makes the device a good choice for the ones who have shared workspaces and aim to optimize the safety factor. The suction ability of CFM is commendable in removing dust from the machines. This model is good enough to be used for more than one machine as the bag holds a lot of dust. Grizzly is among the most affordable dust collectors on the list, it offers a decent quality at a surprisingly reasonable price.
If you keep less distance between the dust collector and you, then it is powerful enough to be able to handle one machine at one point in time. The thirty microns bag that comes with it is robust but keep in mind that it will not be able to handle fine particles of dust.
Choosing the right dust collector entails way more than just selecting the right brand or model. You need to consider what works best for you. Keep the following factors in mind when looking for a new dust collector:. One of the first things you need to consider is the size of your workshop.
It is not only about the amount of space occupied by the dust collector, but also about the ability of it to handle the volume of dust that the shop produces. The larger your workshop is, the better your dust collector needs to be at collecting dust because it needs to function well for the entire space and keep it free from dust accumulation.
It might sound obvious, but people frequently make the mistake of not considering the amount of dust generated at a workshop at the time of buying a dust collector. The amount of dust generated depends on the machinery and tools that you often use in the workshop.
If sanding and sawing are among the things that you do on a daily basis, then there will be loads of dust at your workshop. In that case, a single stage collector will not be enough and a cyclone dust collector is what you would need. You would need a portable dust collector if you have a medium or small workshop because that will help you in moving around the product in the shop from one tool to another.
The portable ones also come in different price ranges and sizes to make it suit your workspace. On the other hand, fixed dust collectors are large and more powerful. You need these for the large workshops that generate tremendous amounts of dust every day.
The size of the motor that the dust collector has is an indication of its power and performance. It is an important factor that you need to think about at the time of shopping. Dust collection will be more efficient and powerful when you have a machine that has a high motor power.
The ones with 1 HP motor are usually not powerful enough for large workshops. However, the dust collectors with 1. Check out some of the best desktop CNC machines for hobbyists and small businesses. Your safety and health is the first priority, and thus, you must always look for ways to minimize the risks to both at the time of setting up the workshop.
Though the machinery and tools you choose have important roles to play in this case, the reliability and efficiency of the dust collector also have to be considered. Selecting the best dust collector for the workshop would be easy once you understand your needs.
The dust collector reviews given above will further help in choosing the right one. Your email address will not be published. Save my name, email, and website in this browser for the next time I comment. Product Name. Special Features. Check Price. Grizzly Industrial G Dust Collector. The anti-static resin and the tapered ports help to connect it with most vacuums.
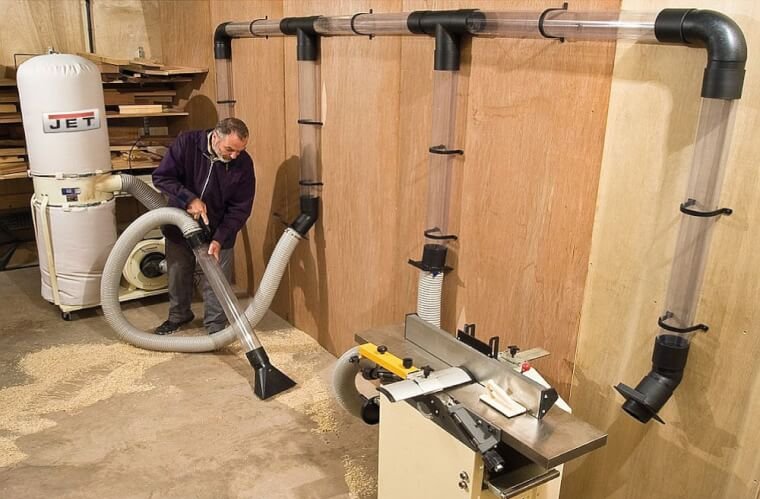
The convenience factor is further ensured as it works well with both dry and wet vacuums. Jet JCDC The product is a bit on the expensive side, but it gets the job done nonetheless. The bag that arrives with it is large enough to eliminate the need to empty the dirt constantly. First you need to choose a material for your duct work. Either PVC or metal will work well. Also, consider spiral pipe which is more durable and easier to seal, although more costly.
The HVAC piping in most home centers is 30 gauge or thinner, so it is not a good choice for dust collection. You will need to buy from either a dust collection vendor or a HVAC vendor who carries heavier gauge ductwork. Buying local might provide savings due to the high shipping costs of large pipes.
If you choose PVC, be aware that there are different thicknesses on the market, and you should go with the thinnest stuff you can find. The thinner and lighter the PVC, the easier to work with. Do not get schedule 40 or 80, because these are expensive and heavy, and all of the extra mass is wasted on dust collection which places extremely low pressure on PVC relative to plumbing applications which generally dictate schedule 40 or To cut PVC I simply use a jig saw with whatever wood cutting blade I happen to have on the saw, and it zips right through it.
Does PVC need to be grounded or can it be grounded? These are hotly debated topics all over the internet. I have never heard of an actual example of a fire resulting from static discharge, but there is a potential that you may get static electricity shocks from your PVC duct system if you live in a dry climate. If this is your situation you can find many suggestions around the internet for grounding your PVC ductwork.
I have never gotten a shock in 10 years of running PVC ducting in two different shops, so I have never bothered with grounding mine.
Make your duct runs straight and direct with as few turns as possible. Arrange your tools in such a way that the bigger dust producers table saw, planer, etc. One common mistake is to run ductwork that follows the perimeter of the room, which requires longer runs and more turns in the ductwork for some tools, and performance suffers as a result. Size matters in dust collection. Therefore it is important to have your duct layout in mind when you buy your dust collector, and have your vendor suggest a model that can deliver enough suction at your tools.
That means you will likely have to modify tool ports on some tools, which I will discuss a bit later in the article. It is not that hard, and it is well worth the effort.
Pretend you are designing a race car track, and you want to keep the cars going at high speeds into the turn, because once they slow down it is Best Small Woodshop Dust Collection System Education hard to get them moving fast again, and we want to avoid a pileup of cars, or in our case, dust.
Specific choices that help promote gentle dust paths include:. Minimize the flex pipe. Run hard pipe as close to the tool as possible, and use just the flex pipe you need for convenience in case you need to move the tool.
Also, choose a good quality flex pipe with smooth interior walls that was designed specifically for dust collection. Some of the cheaper stuff I have used is extremely rigid, making it terrible to work with. Good flex pipe is expensive, so I am sufficiently motivated to minimize it for that reason as well. Extra ports. When you set up your ductwork consider installing additional ports at logical locations for possible future expansion.
It is easier to do it now rather than pulling your ducts apart later. You can add a blast gate so you are ready to go, or simply place a cap on the pipe which is a bit cheaper. This can also provide a nice cleanout in a convenient location should something ever get lodged in your ductwork. Seal the joints? In a couple key areas, such as where the duct work connects to the dust collector, I use X-Treme tape to seal the joint. This tape does not leave glue residue, so when you rework your ducting it is easy to remove and does not require cleanup.
On metal you will likely need to seal the joints to minimize leaking. Add screws wherever needed to secure joints. These are easily removed when rearranging ducts. A couple straps per 10 feet of pipe should be adequate to hold everything solid. Blast gates. There are many options out there. If you use metal ducts, you should use metal blast gates. I use some metal ones on my PVC ducts as well because they are more durable than the cheap plastic ones. Tool ports. I encourage you to accept the fact that most tools come with insufficient tool ports.
In the last five years or so, this seems to be improving, but is still not great. So, you will have to make your own ports, and in some cases, cut holes in your tools to accommodate the port. That port allows massive air movement, and allows my dust collector to pull everything that is not attached to the tool.
Quick disconnect with standard PVC coupler. Use a standard PVC coupler to slip easily over the opening on your shop made tool port. Then insert your flex pipe into the other end of the coupler. If the fit is a bit loose, you could use X-treme tape or duct tape to hold it solidly and seal it. With a good system for quick disconnect, it is simple to share a duct between two tools if you prefer, and it allows you to keep your flex hose runs shorter to minimize static pressure because moving a tool for cleaning, maintenance, etc.
If you want to dive into more detail on this topic, some of the dust collection vendors offer guidelines and services in this area, and independent researchers such as Bill Pentz provide extensive information on this topic as well. For most small shop environments, however, I am confident that if you follow these basic guidelines to design your ductwork and power it with a dust collector that is capable of pulling through an adequate volume of air, you will be pleased or even amazed with the performance.
Once designed your system to deliver enough air flow, the next thing you need to think about is how to best corral the dust at each tool. In a separate article I will walk through the dust collection design at each tool in my shop to help you complete your dust collection system design. Watch the next newsletter for specifics on how I optimized dust collection at various tools in my shop. Source: X-Treme Tape, Self fusing silicone rubber tape 20 ft.
Click here to cancel reply. The big issue is whether I should go with a bigger DC to support plumbing drops for each machine or a smaller DC unit and drag a hose around to each machine. Suggestions anyone?? Go for the bigger machine and pipe to each tool. Thanks for the feedback.
As to your question, you can probably guess what I would suggest which is a bigger DC and a ducting system. The benefits are significant. I also think that if you stick with woodworking long enough you will eventually upgrade your DC and add a ducting system, so if you believe that you will be doing woodworking in your current location for more than a year or two, I would consider biting the bullet now and getting into a system that will meet your needs for many years as it will actually save you money in the long run and give you a better experience up front.
If I were to get a portable system, I would do one of two things. Either buy one used from someone who has recently upgraded there are lots of them out there in my area or buy one that has enough power to collect from a ducting system if you decide to add that later. That way your investment is protected when you expand the system later, and all you need to buy are a bunch of plastic tubes and fittings. I have used PVC for 15 years at least with no problem. I do recommend a direct connection to all machines and a open connection to portable machines that are used sometimes.
I would be interested in seeing your shop made blast gates if you are willing to post a photo of them in the Forum area. Great success with both. As ar as static discharge, living in the South it is typically humid, but there are some days I get zapped while using my orbital sander with the dust collection hose attached. Its fun. The lack of resources on this topic is disheartening. I think you will find that woodworking retailers are slowly getting up to speed on dust collection, but they are not on the cutting edge Best Small Woodshop Dust Collection System Update of research in this area.
Companies that specialize in dust collection are much better versed on duct design, and in general where you find snaplock pipe they sell larger size pipe. For short runs I think it will be fine, but for long runs you might not have the power to maintain fpm necessary to pull the finest dust. Hello Don, Great article! I currently have a 4 H. My shop is located in a basement and space is tight so I have to use the manifold. I am planing to build a new dedicated shop and have many drawings of my tools placement and ducts layout.
My plan is not to use the manifold and use a main instead. My question should I take advantage and use the largest duct I can find for the main then branch off of it with smaller ones? Or should I stick with the 6 inch ducts? I know the answer is basically on the length of the main and static pressure and design. I just keep going back and forth what to do off the main.
In any case I am leaning heavily towards using PVC. In my research I found some web sites that may interest your readers. Hi Brent, I would be skeptical of a CFM rating that high on a 4hp machine, as many manufacturers use highly inflated CFM ratings which are probably based on a theoretical max, or something like that.
You need to keep the air velocity up or dust will settle in the pipe and build up over time, which is the risk of oversizing the pipe. But if you can maintain adequate FPM through a larger trunk, and branch off to tools with smaller pipe, that is a winner. You might also try getting an air flow meter and experimenting with some various size pipes to see what you find. If you start dipping below FPM, you should reduce the size of pipe.
Bigger is better until you get below that threshold. The unit has lots of capacity, a very high MERV rating for the filter and low noise rating 75 dbA at 10 ft. Thanks so much for your advice! Sounds like a great system and really quiet. Would love to see a pic once you are up and running…. Did you integrate the switches in your equipment? Do you have a remote? I use a remote control that was provided as an accessory from Clear Vue Cyclones.
I bought a few extra remotes and I have them mounted near all of my primary tools. Does the flex not fit over the pipe? This would mean I will need a fitting at least a coupling everywhere I want to use flex hose. Any guidance would be appreciated.
Yes, you can get it over the top of PVC, but I like the flexibility of using the couplers because it provides a great quick disconnect system. If you have trouble slipping the flex tube over the PVC just cut some slits into the PVC as you see shown in the 2nd picture in this article. Then apply a band clamp to compress the PVC so that it will easily slip down into the flex tube.
If it is still tight you can warm up the flex tube a bit with a heat gun. Thanks, Paul. I am just finishing up my separator, so I will probably start running duct tomorrow, but that still gives me some time to decide before I start cutting pipes to length.
How do you attach the flex inside the coupling? One option might be to attach a coupler, and then you would have multiple options to attach to that depending upon which tool you were using it on. As far as attaching the flex pipe to the coupler, I just tuck it inside and there is enough friction to hold it on place. Another way to do the quick disconnect is to use the bell connection at the end of the PVC pipe, rather than the coupler. In the second picture in the article, the green PVC is actually the bell coupler at the end of the pipe.
I slip the PVC over the small end, and then the bell slips over the dust port on the tool. This approach provides enough friction to hold them solidly. Geez, my machine tool teacher would call that an Interference Fit. I think this will definitely be the way to go. Are you saying that it is a tight fit but it is difficult to slip the flex pipe into the coupler? Mine was not difficult to get in there.
I just tucked one side in, and then reached through the other end of the coupler and pull the flex pipe into the coupler. If it is super tight I would cut a slit into the flex, cutting through a couple strands of the wire that wraps around it, and that should help you get it started.
Once it is started hopefully it will slide the rest of the way in without a problem. Another option would be to make your own coupler out of plywood or MDF. Or, use the bell end of the pipe as a coupler using the approach that I described previously. Paul — Yes, my flex is a very tight fit into the coupling. I have one bell end of pipe that I managed to get flex onto, though if I wanted it to connect more deeply I would have needed a heat gun.
Remove the old ones with a razor knife, then lube up the new ones with a little liquid dish soap. A win-win. Gonna give it a try in a day or two. SWMBO just returned from visiting relatives for a few weeks and giving up a little shop time this week should help me to maintain tranquility. Thanks for all your help this week. Since upgrading to a more powerful dust collector I have gotten some minor shocks at the tools during the dry MN winter, but nothing to be concerned about.
I did receive a major shock when I overfilled my plastic dust collector and ran it for a while before I realized it. All those wood shavings swirling in a plastic funnel was a wicked combination. So I wrapped a ground wire around the dust collector a couple times and grounded it.
I have overfilled the dust collector a few times since, but no more shocks of that magnitude. Thanks for this. Appreciate you sharing this. Hi, many thanks for the informative discussion. I totally agree with the comments on gentle curves and corners and have found that this minimises chances of clogging the duct on flexible systems.
I am in the process of setting up a new workshop and will be looking at a PVC rigid pipe system this time. As I will probably end up with a right-angle run with the dust collector at the right angle, one on each arm should suffice.
At his stage, I will probably purchase a 2Hp dust collector. I am inclined to include it at the design stage as the ducting will be less accessible after construction. Thanks for the comments. I agree; if you plan to ground the ducting, it would be far better to do it as you install it rather than waiting until later. Thanks, one of the best and simplistic explanations on the web. I have a powermatic model 73 with in inlets would using 6in main line over power the unit?
Hi Frank, thanks for the kind words. The Powermatic 73 is a 1. Essentially this would reduce static pressure in the overall system with increased air speed right at the tool itself. I would keep the use of flex pipe to an absolute minimum. Also, I suggest installing a couple extra elbows at various places in the system that can be used to inspect the ducting for dust build-up.
Great advice! I am going to use a 5hp Super Dust Gorilla so as never to be wanting more power. I want to use pvc ducting and your article gives me a good start.
Be sure to get the stuff with the thinnest walls that you can find. Hi Paul- Please see the comments I have left on grounding the dust collection system.
Feel free to comment, this is an important subject. Hi Scott, thanks for sharing your thoughts on this. It is good to hear that there is continuing research on this important topic. I have not personally done scientific analysis in this area, but anecdotally I am not aware of a prevalence of explosions due to non-grounded PVC ducting. If your research findings or demonstrative evidence are available on-line please feel free to post a link so that other readers can view this information to help them make an informed choice in this area as they set up their dust collection systems.
This is the beauty of on-line articles; the ability to keep the discussion going long after the articles are published. I love it! Without going on too long here, see the directions from Shop Fox above. Most if not all collectors come with a warning like this.
Usually when we see a cloud of dust in the shop, we think about not breathing in too much of it. The real danger is having a spark occur at the same time. One of the other members here wrote that he saw and felt a very large spark when he was dumping his bags.


|
Replacement Furniture Hardware Pulls Solution Blum Soft Close Cabinet Door Damper Twitter Slow Speed Bench Grinder Australia 401 |

KETR
15.01.2021 at 17:13:34
AXMEDIK_666
15.01.2021 at 12:16:42
Lala
15.01.2021 at 18:36:58