Woodworking Workbench For Sale 32,Open Hardware Monitor Zabbix 60,Pumpkin Carving Kit The Works Youtube - Videos Download
Repeat for the other two holes. To precisely set the span of the compass, use a rule with etched markings, and set the points of the compass into the etched grooves. Place a centerpunch on each of your four points in turn, and press down to make an indentation. This will mark the center of the hole. Drilling the holes Because of the depth of the holes, drilling each hole became a four step process: 1. Flip the leg, position the jig, and finish the hole off with the Forstner bit. This gives a clean exit.
The top hole on each does not extend through, and only steps 1 and 2 are necessary. If you bought 6' lengths, cut off two 24" long lengths. On one end of each, place a washer and a nut.
Screw on the nut only half way, you don't want the end of the rod protruding. Thread the rods through one of the legs, then set the leg flat on the table. Insert dowels into the dowel holes. Place the matching stretchers into place. Put dowels into the dowel holes at the top end of the stretchers.
Place the other leg onto the threaded rod and settle it down onto the dowels. You'll probably have another opportunity to whack away with your rubber mallet. When you have the other leg seated, the threaded rods will extend father than you want them to. You'll want to mark them so they can be cut to length. Place a washer and a nut on each threaded rod, and then tighten down the nut to pull everything tight. Depending upon the wrench you are using, and how much longer the rod is than it needs to be, you may find it necessary to stack up a number of washers, so that the nut is positioned where the wrench can operate on it.
Once you have pulled everything tight. You want to cut it slightly below flush. Then take everything apart. Cutting the rods There's nothing very tricky about cutting the rods. Clamp them to your temporary table, and cut them off with a hacksaw. Make sure you're using a sharp blade. While you're setting up the clamps,.
The hacksaw will often damage the last thread when it cuts. Running a nut off the end will fix this. You'll have to run the nut all the way down from the other end. This doesn't take long, if you chuck up the rod in your drill and let it do the work. Hold the rod vertically, with the drill pointing down, and just hold on to the nut enough to keep it from spinning. Assembly When you have the rods cut to length, put everything together the way you did before, and you'll have your first trestle.
Repeat the same process for the second trestle, and then for long stretchers to assemble the base Once the stretchers and legs have been connected, flip the assembly upside down, and install the levelers. Then flip it back upright. Next is the shelf.
Start with the 24x48" piece of MDF. Clamp this on top of the base, and pencil in the outside of the stretchers and the inside angle of the legs. Flip it over, pull out your trusty cutting guide, and cut it to width and to length. Cutting out the angles is simple, with a jig saw. It's not much work with a hand saw. If you took enough care with supporting blocks and stops, you could probably do it with a circular saw. Since I did have a jig saw, I used it.
I'd decided on an oil-and-wax finish. Oil finishes are by no means the toughest. In fact, they're really rather pathetic, so far as protecting the wood goes. But they're easy to apply, and not even the toughest finish will stand up to the abuse that a workbench will suffer, so it's more important that it be easy to repair. Wax is usually used to add a high gloss. On a bench, it's there to keep glue from sticking. And then decided that the oil alone would be sufficient for the base.
The wax serves to give the surface a gloss which I see no need for , and to make it easier to remove spilled glue and paint which I also see no need for, on the base. So I oiled the base and oiled and waxed the top.
The "Getting Started in Woodworking" video series has an episode on applying oil-and-wax finishes, that includes steps such as wetting the wood, and then sanding down the raised grain. All of this seemed excessive, for something that I was going to put in my basement and bang on with a hammer. I made a low table out of a couple of step-stools, my hollow-core door, and one of the MDF panels that would eventually form part of my top. I was concerned that any oil that dripped on the door might interfere with its glue adhesion, when I finally get around to the project for which I'd purchased it.
The top side of the top sheet of MDF, though, I planned to oil, anyway. Ditto for the bottom side of the bottom sheet. Putting the base up on this temporary table put it an a more convenient height than it would have been on the floor or on a full-height table. Applying the oil is easy. Put on some vinyl gloves, pour some oil in a bowl, take a piece of clean cotton cloth the size of washcloth or smaller, dip it in the oil, and apply it to the wood.
You want the wood to be wet. Apply oil to the entire surface, and then go over it looking for dry spots, applying more oil as needed. After fifteen minutes of keeping it wet, let it sit for another fifteen minutes. Then apply another coat of oil, and let it sit for another fifteen minutes. Rub it dry. Wait half-an-hour, and then wipe dry any oil has seeped out.
Check it every half hour and do the same, for a couple of hours. The next day, apply another coat, wait half an hour, then wipe it dry.
Do the same on successive days for as many coats as you think are necessary. I applied three. Remember those fire safety tips you used to get in grade school, about the dangers of oily rags? It was linseed oil they were talking about. All oily rags are dangerously flammable.
Linseed oil will self-combust. Linseed oil doesn't evaporate, it oxidizes. The oxidization generates heat, and the increased temperature increases the rate of oxidation. Linseed oil sitting in a bowl, or spread on the surface of wood, is perfectly safe. But a linseed oil soaked rag provides a vastly increase surface area, so the oxidation happens faster, and the rag can provide insulation, trapping the heat. The increased temperature speeds up the oxidation even more, which raises the temperature even more, and the runaway feedback can quickly result in temperatures that will cause the rag to spontaneously burst into flame.
This isn't one of those "do not drive car while sunscreen is in place" warnings. This is one of those "keep your finger off the trigger until you have the gun pointed at something you want to shoot" warnings. Rags soaked in linseed oil will catch fire, if you don't handle them properly, and they can do so far more quickly than you might think.
Hang them up outside, away from anything combustible, and where there's enough air circulation to keep them cool. Or put them in a bucket of water, and hang them outside later. If you're just setting a rag down for the moment, set it out flat, without folds, on something non-flammable.
Hanging outside in the breeze, the oil in the rags won't retain heat while they oxidize. For the oil to completely oxidize can take in a couple of days, if it's warm, or more than a week, if it's cold and rainy.
When fully oxidized, the oil will be solid and the rags will be stiff. At that point, they're safe, and can be thrown in the trash. Toss them in the trash before that, and you might as well say goodbye to your garage. Before you start cutting or drilling the pieces that will make up the top, determine the layout of the top.
This should include the dimensions of the MDF, the dimensions of the edging, the locations of the vises, and of the screws or bolts that will support the vises, and of all of the benchdog holes and of all of the drywall screws you will use to laminate the panels, If you don't lay it all out in advance, you could easily find that you have a bolt where you need to put a benchdog hole, or something of the sort.
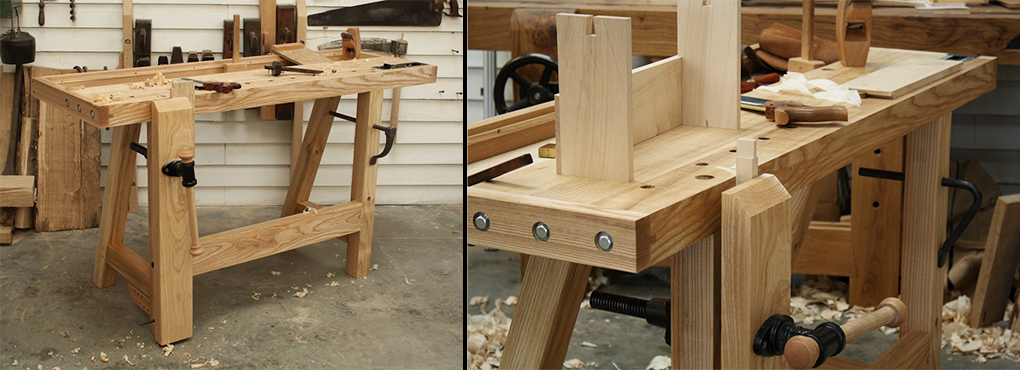
I sketched out ideas on graph paper, then drew the plan full-size on the top side of the bottom layer of MDF, using the actual parts as templates. The width of the top is determined by the width of the base. The length of the top depends upon the vise or vises you uses. The end vise I had purchased was intended to be used with hardwood jaws that extend the width of the bench.
I had a piece of 2x6" white oak I intended to cut down for the purpose. The decision to be made with respect to the end vise is whether the support plate should be mounted to on the inside or on the outside of the stretcher. Mounting the plate on the inside of the stretcher reduces the reach of the vise - it can't open as far, because the support plate is back from the edge by a couple of inches.
But mounting the plate on the outside of the stretcher means that we need to add some support structure for the inner jaw of the vise, which the legs would have provided if we'd mounted the plate on the inside.
I mocked up the two scenarios, and determined that with the plate inside the stretcher the vise would have a reach of 8 inches, and with it outside the stretcher it would have a reach of 9 inches. I decided that 8 inches was enough, and that the extra inch wasn't worth the extra effort. With the Woodworking Workbench For Sale Canada end vise mounted like this, the right edge of the top would have no overhang.
I wanted the left edge of the jaw of the front vise to be flush with the left edge of the top, the right edge with the left edge of the left front leg.
So the amount of overhang on the left depends upon the width of the front vise jaw. The width of the jaw is, at a minimum, the width of the plate that supports it, but it's normal to make the jaw extend a bit beyond the plate.
How far? The more it extends, the deeper a bite you can take with the edge of the vise, when, for example, you are clamping the side of a board being held vertically. But the more it extends, the less support it has. What you need to determine, by this drawing, is where you need to drill the dog holes, the mounting holes for the vises, and where you will put the drywall screws you'll be using for the lamination. As well as where the edges of the top will be cut. The next step is to laminate the two sheets of MDF that will make up the lower layers of the top.
First, trim the MDF to slightly oversize. You'll want room to clean up the edges after the pieces are joined, but you don't need more than a half-an-inch on each side for that, and there's no point in wasting glue.
If you're lucky enough to have a vacuum press, use that. Otherwise drill holes for the screws in the bottom layer at all the points you had indicated in your layout. You'll also want to either drill a row of screws around the outside edge, in the bit you're going to trim off, or you'll need clamps all around the edge.
I just added more screws. The screw holes should have sufficient diameter that the screws pass through freely. You want the screw to dig into the second layer and to pull it tight against the first. If the threads engage both layers, they will tend to keep them at a fixed distance. If you're using drywall screws, you'll want to countersink the holes.
Drywall screws are flat-head, and need a countersink to seat solidly. If you're using Kreg pocket screws, the way I did, you won't want to counter-sink the holes. Kreg screws are pan-head, and seat just fine against a flat surface. Both drywall screws and Kreg pocket screws are self-threading, so you don't need pilot holes in the second sheet of MDF. Regardless of which type of screw you use, you'll need to flip the panel and use a countersink drill to on all of the exit holes.
Drilling MDF leaves bumps, the countersink bit will remove them, and will create a little bit of space for material drawn up by the screw from the second sheet of MDF. You want to remove anything that might keep the two panels from mating up flat. I set a block plane to a very shallow bite and ran it over what was left of the bumps and over the edges. The edges of MDF can be bulged by by sawing or just by handling, and you want to knock that down.
After you have all the holes clean, set things up for your glue-up. You want everything on-hand before you start - drill, driver bit, glue, roller or whatever you're going to spread the glue with, and four clamps for the corners.
You'll need a flat surface to do the glue-up on - I used my hollow core door on top my bench base - and another somewhat-flat surface to put the other panel on. My folding table was still holding my oak countertop, which makes a great flat surface, but I want to make sure I didn't drip glue on it so I covered it with some painters plastic that was left over from the last bedroom we painted. Put the upper panel of MDF on your glue-up surface, bottom side up.
Put the bottom panel of MDF on your other surface, bottom side down. The panel with the holes drilled in it is the bottom panel, and the side that has the your layout diagram on it is the bottom side. Chuck up in your drill the appropriate driver bit for the screws your using.
Make sure you have a freshly-charged battery, and crank the speed down and the torque way down. You don't want to over-tighten the screws, MDF strips easily. Once you start spreading glue, you have maybe five minutes to get the two panels mated, aligned, and clamped together. So make sure you have everything on-hand, and you're not gong to be interrupted.
Start squeezing out the glue on one MDF panel, and spreading it around in a thin, even coating, making sure you leave no bare areas. Then do the same to the other MDF panel. Then pick up the bottom panel and flip it over onto the upper panel.
Slide it around some to make sure the glue is spread evenly, then line up one corner and drive in a screw. Line up the opposite corner and drive in a screw there. Clamp all four corners to your flat surface, then start driving the rest of the screws, in a spiral pattern from the center. When you're done, let it sit for 24 hours. The edges of MDF are fragile, easily crushed or torn. MDF is also notorious for absorbing water through these edges, causing the panels to swell.
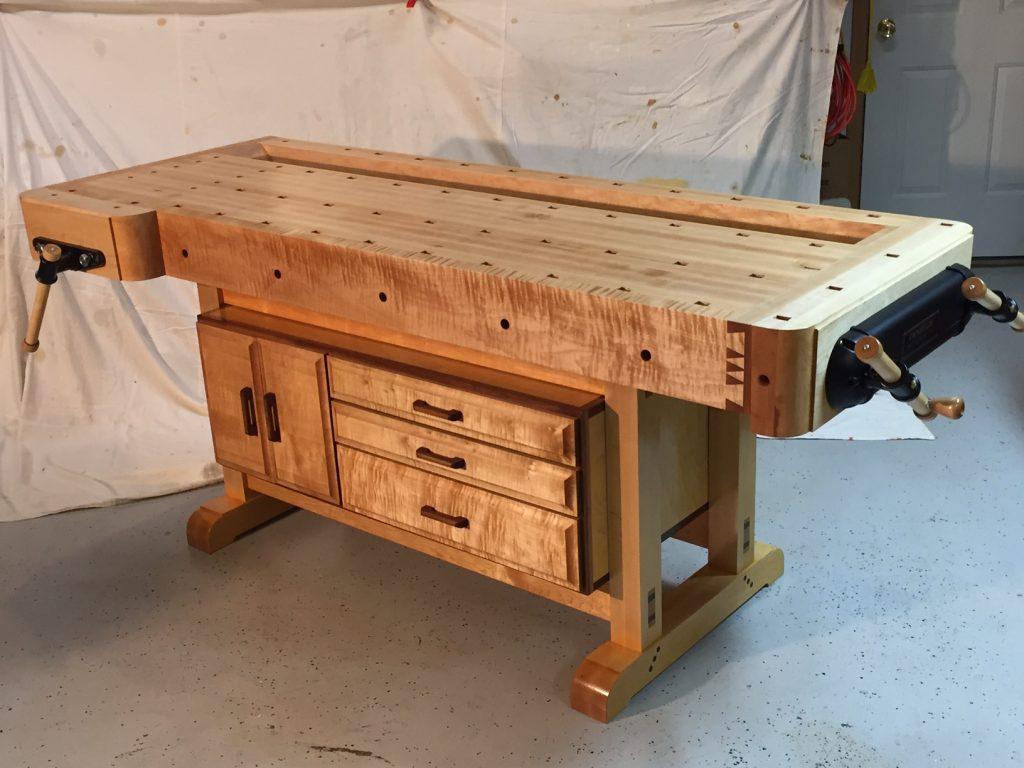
This edging is one of the complexities that Asa Christiana left out in his simplified design. I think this was a mistake. MDF really needs some sort of protection, especially on the edges. Of course, I, on the other hand, with my Ikea oak countertop, probable went overboard in the other direction.
I clamped the countertop to my bench base, and used the long cutting guide. I'd asked around for advice on cutting this large a piece of oak, and was told to try a Freud Diablo tooth blade in my circular saw.
I found one at my local home center, at a reasonable price, and it worked very well. Remember, you want the width of the top to match the width of the base, and you're adding edging. First, cut one long edge. Second, cut a short edge, making sure it's square to the long edge you just cut. Finally, cut the remaining short edge square to both long edges. The length of the top doesn't need to precisely match anything, so we don't need to bother with clamping the trim before measuring.
Glue up the trim on the end, first. Do a dry fit, first, then as you take it apart lay everything where you can easily reach it as you put it back together again, after adding the glue. To help keep the edge piece aligned, I clamped a pair of hardboard scraps at each end.
I used the piece of doubled MDF I'd cut off the end as a cawl, to help spread the pressure of the clamps. Squeeze some glue into a small bowl, and use a disposable brush. As you clamp down, position the trim just a little bit proud of the top surface. Once you have all the clamps on, take off the scraps of hardboard. You can clean up the glue squeezeout with a damp rag.. When the glue is dry, trim down the strip flush with the panel using a router and a flush-trim bit. Then cut off the ends of the strip with a flush-cut saw, and clean up with a block plane, an edge scraper, or a sanding block.
Leaving the ends in place while you route the edge helps support the router. The strips along the front and back edge is glued up the same way. I suppose you could try to glue both on simultaneously. I didn't try.
When the top is done, we want the edged MDF and the oak countertop to have exactly the same dimensions, and for their width to exactly match the width of the base. I could see three ways of doing this: 1, join the MDF to the countertop and use my belt sander to sand down their joined edges to match the base; 2, join the MDF to the countertop and use a hand plane to plane down their joined edges to match the base; or 3, use a flush-trim bit against a straight edge to route the MDF to the width of the base, then join the MDF to the countertop and use the flush-trim bit to route the countertop to match the MDF.
So I chose option 3. If you choose the same, you want to trim the edges of the MDF layer prior to joining it to the countertop. In other words, now.
Put the MDF on the floor, bottom up. Flip the base and place it on the MDF. Line up the base on the MDF in the posiiton you feel best, then mark the position of the legs. Sorry, I have no picture of this. Flip the base upright, put the MDF on top of it, then use a straightedge to draw two straight lines joining the outside edges of the legs and extending the width of the MDF.
I used the countertop as the straightedge. Use a carpenter's square to transfer these lines onto the ends of the MDF. Put the countertop on the base, put the MDF on top of the countertop, and line up the marks you drew on each end of the MDF with the countertop below it.
I clamped a couple of scraps of doubled MDF at each end to give the router base something extra to ride on at the ends. Edge-trimming endgrain can result in tearout at the right side, so route the short edge before you route the right long edge. Routing the right edge can then clean any tearout that occurs on the short edge.. When gluing the oak edges on the MDF, I made a mistake. On the back side, the edging was positioned too low, which would leave a noticeable gap when the MDF and the countertop were joined.
I was determined to fix it. Either of the strips I'd ripped from the oak countertop to remove the factory bevel looked like it would work, if I could figure out how to rip them safely with a circular saw.
I ended up using a couple of strips of MDF and a bar clamp to create a clamp that would hold the strip of oak, and had a profile low enough to fit under the cutting guide. Once I had the strip cut, I glued it in place, and clamped everything up. I'd intentionally made it oversize, intending to trim it flush.
Trimming is a little more complicated than usual, because I needed to trim it flush on two faces. Aside from the use of the edge guide, flush trimming the edge face was unremarkable. For trimming the top face, I again stood the panel vertically, with the router base riding on the top edge, and the bit cutting on the far side of the panel.
Because I was cutting on the back edge of the work piece, I needed to move the router from right to left. And here I ran into another problem. The gap in the edging that I was filling was not of even depth.
That means that on the right side, I was routing away all of the strip I had glued in. The result was significant tear-out. I did what I always do when faced with this sort of gumption trap - I turned off the router, set it down, and walked away for a bit.
I've found that whatever action I take in the frustration of dealing with something that hadn't worked right is almost always the wrong one, and usually makes things worse. What I did, when I came back, was to clamp down the strip where it had torn away, and then to start routing from the other end.
I still moved the router from right to left, but I did it in six-inch sections, taking light passes, and sort of whittled the strip flush. As the sections I was working were farther to the right, the strip was thinner. Eventually I came to where I was trimming the strip away entirely, at which point I took off the clamps and the remainder fell away. A better solution would have been to route a rabbet into the side, so that the added strip always had thickness.
The way I did it means that the strip I glued in is very narrow, and hence very weak, at a certain point. In this case, that's not a problem, because it's going to be sitting under the countertop layer. I also noticed that because I had only clamped the strip down, and not into the edge, there was a noticeable glue gap where the strip butted up against the MDF.
Again, in this application it isn't visible. But if I was doing something like this on the top of a table, I'd make sure to cut a clean rabbet, and to clamp both down and in. So while for the end vise, if we mount it lower, we can make both the jaws deeper to compensate, for the front vise we cannot, so we want it mounted as close to the edge of the bench as possible.
It's usual to attach vises with lag screws from the bottom, but there is a limit as to how many times you can tighten up a lag bolt in MDF. I decided to use bolts from the top down, embedding the heads of the bolts inside the top. First step was to cut a piece of MDF the size of the base of the vise.
I scribed the positions of the bolt holes in it, then driilled small pilot holes. I also drilled larger holes at the corners of the rectangular cutouts, and the joined them with a jigsaw. Then I flipped the top and the base, lied up the base in the proper location relative to the top, I then positioned the front vise and the support MDF for the end vise, and marked the locations of the bolt holes. Then I flipped the base right side up, drilled small pilot holes from the bottom side where I had marked the locations, and then drilled shallow countersink holes from each side, then a through hole that matched the bolts.
He also writes for the American Period Furniture journal of the Society of American Period Furniture Makers and has completed several instructional videos on upholstery techniques. Sign up today— space is limited. Over the years I have done hundreds of classes which feature projects that teach particular skills.
The problem with these project classes is that the logistics of the class prevent us from spending sufficient time on any given new skill to really understand and gain any kind of proficiency in it. In this 5 week 4 days per week class there is no project— Just skills, technique and practice. With no project to distract us we are able to spend days rather than hours to insure learning of basic— and not so basic—furniture making skills and techniques.
When I changed the format of this class to no project, just skills- I really believe it has become one of the best classes I have offered in years. Everyone really learns a lot and has a great time! Plan on spending two to three days on the basic milling process— a strong foundation is essential to more advanced techniques. Instead of learning just enough to get through dovetailing a drawer, plan on spending at least three full days— maybe four, on dovetails.
With these new hand skills, cutting a dovetail or a tenon by hand turns out to be a pretty simple affair which you will be able to do! FYI- You will be cutting a set of dovetails every day of this class. Machine set ups? I already know how to set up the machine— so in this class I will not set anything up— You will do that— after my demo and explanation of course.
You will learn what it takes to flatten a tabletop— by machine and by hand, and glue up a tabletop— using one clamp and a handplane.
We will get into planning a project, basic wood technology, buying lumber, tool sharpening, cutting joints -by machine and by hand, along with basic finishing techniques. Ornamentation is a big part of fine furniture so plan on spending a few days on working with veneers, inlay and making decorative bandings. It is always good to get a second viewpoint so I have arranged for some guest instructors to spend a day or two with us. Will Neptune will be here to do a day of hands on carving and hopefully Mike Pekovich will be able to stop by to introduce you to some of his design ideas and techniques.
Plan on expanding your ideas on furniture making and design- and plan on taking a few field trips to inspect some of the finest furniture made in Connecticut- entirely by hand! Proficiency in handtools is essential in any high end furniture making and we will spend a lot of our time on just that— plan on spending at least a whole day - probably two- just on working with handplanes— and at least another whole day just on sharpening.
Cheaper saws will just frustrate you and after using mine you will probably just end up buying it anyway! We will emphasize the proper and safe use of common woodshop machinery such as the table saw, jointer, thickness planer, router and bandsaw.
The school has a full complement of ready to use high end hand tools and power tools which you are welcome to use.
These tools also will give you some Woodworking Workbench For Sale Pdf experience and guidance in picking out your own tools which you will eventually need to acquire. This class is designed for the serious student who has both the time and the desire to commit to a comprehensive course of study. It is NOT designed for beginners but rather someone who has done a bit of woodworking and is now ready to get serious and really learn some skills.
Basic skills with the tablesaw, jointer and thickness planer are required!! If you are a beginner then you should sign up for the Fundamentals of Furniture Making, Intro to Cabinetmaking or the Woodworking I class.
If you have any questions then please contact me at This email address is being protected from spambots. You need JavaScript enabled to view it. This is an opportunity you do not want to miss. Building this introduces you to many of the techniques used to make a more complicated Windsor style stool, beginning with lumber selection, hand shaping, working with compound angles and all the way through to final assembly.
This class will introduce you to the basic handtools bused in any green woodworking project including drawknife, spokeshave, reamer, adze, scorp and scrapers. We will be laying out and drilling compound angles along with utilizing moisture content and grain orientation to make strong, long lasting chair joints. We will also be using traditional hide glue for assembly. Join us in this unique class and get a taste of green woodworking and Windsor chair making.
Due to the length of the class all turned parts will be provided. Space is limited to 8 students. Have you ever seen those faces with the leaves flowing from them? Join professional woodcarver, Mary May, in carving the traditional Greenman. You don't need any carving experience for this class, as Mary will walk you through every step from start to finish.
She will show you how to carve challenging facial features and curling, overlapping oak leaves. Bring a mirror so you can carve a self-portrait greenman! If you have ever done any re-sawing then you know how cool a book matched panel can be. When you incorporate veneers into your work the possibilities for creating spectacular patterns are almost endless!
Bookmatching is the simple one- but what about radial matching or parquet? Many veneers require a border to protect the delicate edges- so as a bonus we will explore a little inlay work and make a few different decorative bandings.
Incorporating veneer designs into your work will open up possibilities that you may never have dreamed of. Sign up today- this is a great class and you will make a great little box to hold all your treasures!! Sign up today- space is limited. This class will be a combination lecture, demonstration and hands-on session which will provide an overview of the history, tools, techniques and materials of upholstery.
Mike Mascelli has been a professional upholsterer his entire career and brings a lifetime of experience to this hands on class. Mike will set up a complete working shop including a collection of historic and modern tools, and cover the full range of traditional hand sewn, and modern upholstery methods. Students will complete an open frame slip seat by stretching and tacking webbing, cutting and fitting the foundation, lofting, and show cover materials, and installing a proper dust cover.
And then building on these new skills, complete a small-scale sprung footstool, by hand tying springs, and learning basic cutting and folding techniques, then finishing off the corners with proper blind stitches.
The class will also include a complete discussion of tools and machines, as well as tip s on common repair techniques such as replacing buttons without having to open up the chair!
Students will receive a booklet containing, excerpts, illustrations, yardage charts, and sources of supply. This class is for anyone with an interest in the tools, terminology and techniques of the upholstery trade. All of the tools you will need will be provided by Mike but if you shoulld want to bring your own the list is below.
The use of hide glue and hammer veneering goes back thousands of years. The walls of ancient Egyptian tombs portray craftsmen sawing veneers, mixing glue in a pot and laying those veneers down with the same hammer technique that is just as effective today as it was back then. Why this ancient technique has fallen out of favor eludes me. Join nationally known furniture maker, Steve Latta for this information packed two day workshop where we will take a hard look at hide glue and its characteristics, veneers, their preparation and usage, and the hammer veneering technique for laying them down.
Sign up today- this is a class you will not want to miss! Did you hear? Books are actually cool again, and here's a nice way to show off a small part of your collection. This compact bookshelf can sit on your desk or hang from a wall and it turns any space into your personal library.
We'll even add some simple chip carving to finish off the project and add a new skill to your toolbox. In this two-weekend class led by Mike Pekovich, you'll learn efficient ways to cut dovetails and through-tenons, as well as how to construct and fit drawers.
It's a lot of fun in a small package and it will definitely brighten your home. Sign up today- Class is limited to 8 participants. This class is for people who are serious about woodworking and want to learn how to use the SketchUp 3D design program to save time and money in the shop.
With SketchUp, you preview the actual construction of a piece and generate absolutely accurate plans, patterns, and templates. The class is built around four rules for success for using the program to its best advantage. You bring a Windows or Mac laptop loaded with the free version of SketchUp. We spend the morning on exercises that introduce the important SketchUp tools and get you accustomed to working in a 3D space on the computer.
In the afternoon, you see how the rules for success work by designing a piece of furniture. You'll also learn how to create measured drawings and a cutlist. Go to www. Explore the art of seatweaving in this new two-day hands on class. Bringing old or new chairs to a sittable state can be achieved with a variety of different weaves and that is what this class is all about.
We will begin with some history of cane, rush, wicker and a wide assortment of seating styles. On your first day, you will choose to weave a small stool using either fiber rush or porch weave. Learning these two techniques opens the doors to many variations using the same weave technique but moving on to different materials of your choice. Chairs should be in a finished state, as caning is the last step to a complete project.
Caning kits with cane, awl, booklet and wooden pegs will be available. We will need measurements of your chair 2 weeks prior to class to assure the correct size of cane. Sue Muldoon is a seatweaver among other things and owns Redux For You, repairing chairs and memories.
She has taught over a hundred students in and looking forward to sharing her skills. You can use power tools all day long, but you'll never know the true joy of the craft until you introduce hand tools into your woodworking. In this weekend class Mike Pekovich will take you through a series of skill-building exercises designed to boost competence and confidence using the essential hand tools.
We'll focus on chisel, block plane, backsaw, spokeshave and scraper skills, and also take time to talk about getting truly sharp with each tool. You'll gain a better understanding of the geometry and ergonomics involved in making a hand tool work for you.
The emphasis of this class is on making shavings not furniture parts, so there's no stress involved. The aim is to have fun and gain some skills and confidence with your tools that you can then bring to your woodworking projects.
He prefers to work with handtools when possible. One of the foundations of superior furniture making is good layout. Good layout is based on the ability to cut a single accurate layout line. This is accomplished with a good layout knife and a good cutting gauge.
Surprisingly good cutting gauges seem to be a thing of the past. Sure- there are some out there with really pretty rosewood and brass- but if you look a little closer you see how badly they are made, how poor the cutter is it is ground incorrectly and it is usually installed backwards! Why not join Bob Van Dyke in this weekend class to make you own cutting gauge.
Based on a design he learned from woodworking expert Will Neptune, this gauge has all the attributes of a great marking tool. In your choice of cherry or walnut. This tool will out perform any cutting gauge on the market today- and- you made it yourself! You will learn some good woodworking techniques, shape your own cutting gauge to fit your hand and learn how to sharpen and use the tool, accurately over and over, meet some new people and have a good time doing it!
Section A: Friday, March 5 am - pm. This class is an introduction for woodworkers interested in learning how to sharpen their own handsaws and backsaws. The curriculum will cover jointing, filing teeth to uniform size and gullet depth, setting, and final sharpening.
Topics discussed in depth will include the geometric and functional distinction between rip and crosscut teeth and how fleam and rake are combined to maximize the function of cutting along or across wood fibers. Proper file selection, filing technique, and saw vise requirements will also be discussed. No prior knowledge of saw sharpening is required. The class will be hands on with each student learning to sharpen a rip and crosscut saw.
Students are encouraged to bring one or two saws only. Woodworkers Vise. Rail Set. Saw Horse. Bench Top. Mechanics Vise. Floor Vises. Leg Set. Accessory Kit. Pen Press. Capacity 6". Jaw Width 4". Size 2' x 3'. Style Elite. Scandi Plus. Nordic Plus. Ships From Woodcraft.
Woodcraft - Special Order. Workbenches Prev 1 2 3 … 10 Next. Compare Items:. Filter Results. Quick View Item


|
Furniture Veneer Meaning Urban Dictionary Under Counter Drawer Kit Zombie Traditional Jointer Plane Zone Ferrex Belt And Disc Sander Spares Worksheet |

Lady_Neftchi
06.12.2020 at 10:40:11
Laguna
06.12.2020 at 19:50:18
NaRKo_BiZnES
06.12.2020 at 15:44:10
qedesh
06.12.2020 at 12:27:59
BlatnoY_VoR
06.12.2020 at 15:47:33