Using A Tongue And Groove Router Bit,Soft Close Drawer Slides Menards Curve,Cool Pen Turning Blanks Uk - Videos Download

You can try applying Rockler Tongue And Groove Router Bit Translation some steam to the dovetails. If the piece is old enough and uses hide glue rather than modern woodworking glues it might come apart with steam. If it is a modern piece that does not use hide glue you will have a hard time getting those dovetails apart.
We are convinced you will enjoy the benefits of becoming a member and having access to the best instructional how to videos and professional tips.
We would like to offer you a special promotion for your first year membership. I am putting an gold cedar chest back together. At each corner then pieces join with a self locking routed joint. Now nails or glue was used when the chest was built. I have never seen this joint before. Any idea when and where such a joint was used? Hi Zacharia. The joint did not break, crack or fail.
A very good article clean and concise with lots of good practical content no wasted words or opinions, thanks. This is one that I put in my saved group. Joints are joints and each generally speaking has an appropriate place in the woodworking industry and craft, with respect to time and budget available for the task. Especially with regard to the extensively used biscuit joint.
The editor would be well minded to appreciate the strength a biscuit joint leaves in the material around it through, depending on material thickness, not cutting out too much material in the weaker outer edges.
There is a valid place in the industry and craft for the biscuit joint and we should bother. I am building a planter box that will need to hold 8 cubic feet of soil. Will the Mortise and Tenon joint hold up to that the soil would weigh about pounds?
Hi Jack. There are lots of variable here, but if you mill everything properly and get a good glue bond, I would think that it would hold. Thanks for helping me learn more about different woodworking joints. Hi Jana. Cabinet construction typically consists of dados, biscuits, rabbets, and pocket hole joinery.
I am building a desk hopefully heirloom for my son using solid acacia butcher block. I am making it L-shape and was initially going to do a reinforced butt joint as I am a novice. Is there anything I can do to make sure this joint will Tongue And Groove Router Bits Canadian Tire Mp be strong enough to last for generations? Can you please elaborate on what you mean? Thanks Paul-Woodworkers Guild of America. Good Job! We do have a promotional offer if you are interested.
This would include access to expert advice like this , plus discounts, hours of Premium videos, etc. Please feel free to take a look. You can message us right back with your question if you decide to become a member and you will have a response within business days from our experts! Click on the Premium Membership offer. The Checkout page will display your Premium Membership purchase.
Fill in your Billing Details and create an account password. Finish by clicking Complete Order. If you have any further questions, please contact Customer Service at at your earliest convenience, or chat with us on our site. Are you missing dowel joinery in this article? I would like to see some editorial on this type as well.
Thanks for your feedback. I see you are currently not a member. If you are interested in becoming a member to Woodworkers Guild of America, please click on the special offer below:. If you have any further questions, please chat, email, or contact Customer Service at Anything you could reccomend would be great. Thanks for your question. They provide a long list of router applications that you can click on and see the bits that are associated with each one.
Hope this helps. If you have any other concerns, please contact us at , or chat with us on our site. Remember me. Lost your password? Privacy Policy. LOG IN. Search for:. Become A Member. Butt Joint The Butt Joint is an easy woodworking joint. It joins two pieces of wood by merely butting them together.
The butt joint is the simplest joint to make. It is also the weakest wood joint unless you use some form of reinforcement. It depends upon glue alone to hold it together. Because the orientations of the pieces, you have an end grain to long grain gluing surface. Edit this Article.
We use cookies to make wikiHow great. By using our site, you agree to our cookie policy. Cookie Settings. Learn why people trust wikiHow. Download Article Explore this Article parts. Tips and Warnings. Things You'll Need. Related Articles. Article Summary. Part 1 of View pictures of tables to figure out what kind of table to make. There are a lot of different types of tables in the world, so take some time to consider you want.
Go online and look up images of tables, noting the style of each one. Also, get ideas from furniture catalogues and woodworking magazines. Base your choice on your needs, such as what you want to use the table for and how much space you have available for it. For instance, you may desire a large, rustic kitchen table. You might also make a short coffee table or an elegant bedroom end table. Sketch out a rough design of your table on paper.
Use a pencil and a ruler to create your ideal table. Instead, think about how you want the finished table to look. Select what features you want, then settle on a size. Once you have a rough design, pencil in the dimensions. Your dimensions will vary depending on the kind of table you construct. A dining table has different dimensions than a bedside table. Estimate how much wood you will need.
Break your table down into its basic components. The simplest table has a tabletop and legs connected by apron pieces. If you plan on adding extra features to your table, you will need to get lumber for those sections as well. Get extra lumber or wood for any additional features you add to your table.
For instance, you can add rails for extra stability or add boards to extend the tabletop. Select an inexpensive but sturdy wood such as pine for a lasting table. You can still use it to create tables that last decades. Some common hardwoods, including maple and cherry, are also suitable choices for sturdy tables. Construction-grade douglas fir can be used to make tables.
Woods like poplar make for good furniture but are tougher to stain properly. For outdoor projects, choose redwood, cypress, or a treated wood like pressure-treated pine. Purchase the wood and and have it cut.
Once you know what you need, visit a home improvement store to purchase it. Most stores will cut the wood for you, so ask them to take care of it. Save yourself some work so you can begin constructing the table right away. You can cut the wood yourself if you have a workbench, some clamps, and a circular saw or handsaw. Always wear polycarbonate safety glasses and a respirator mask when operating a saw. Part 2 of Lay the tabletop planks side by side on a flat surface.
Try to pick a surface that is as flat as possible so your tabletop is even as well. Select a side on each board to serve as the top part of your table. Position each board so this side is facedown. Arrange the boards into the tabletop you sketched in your plan.
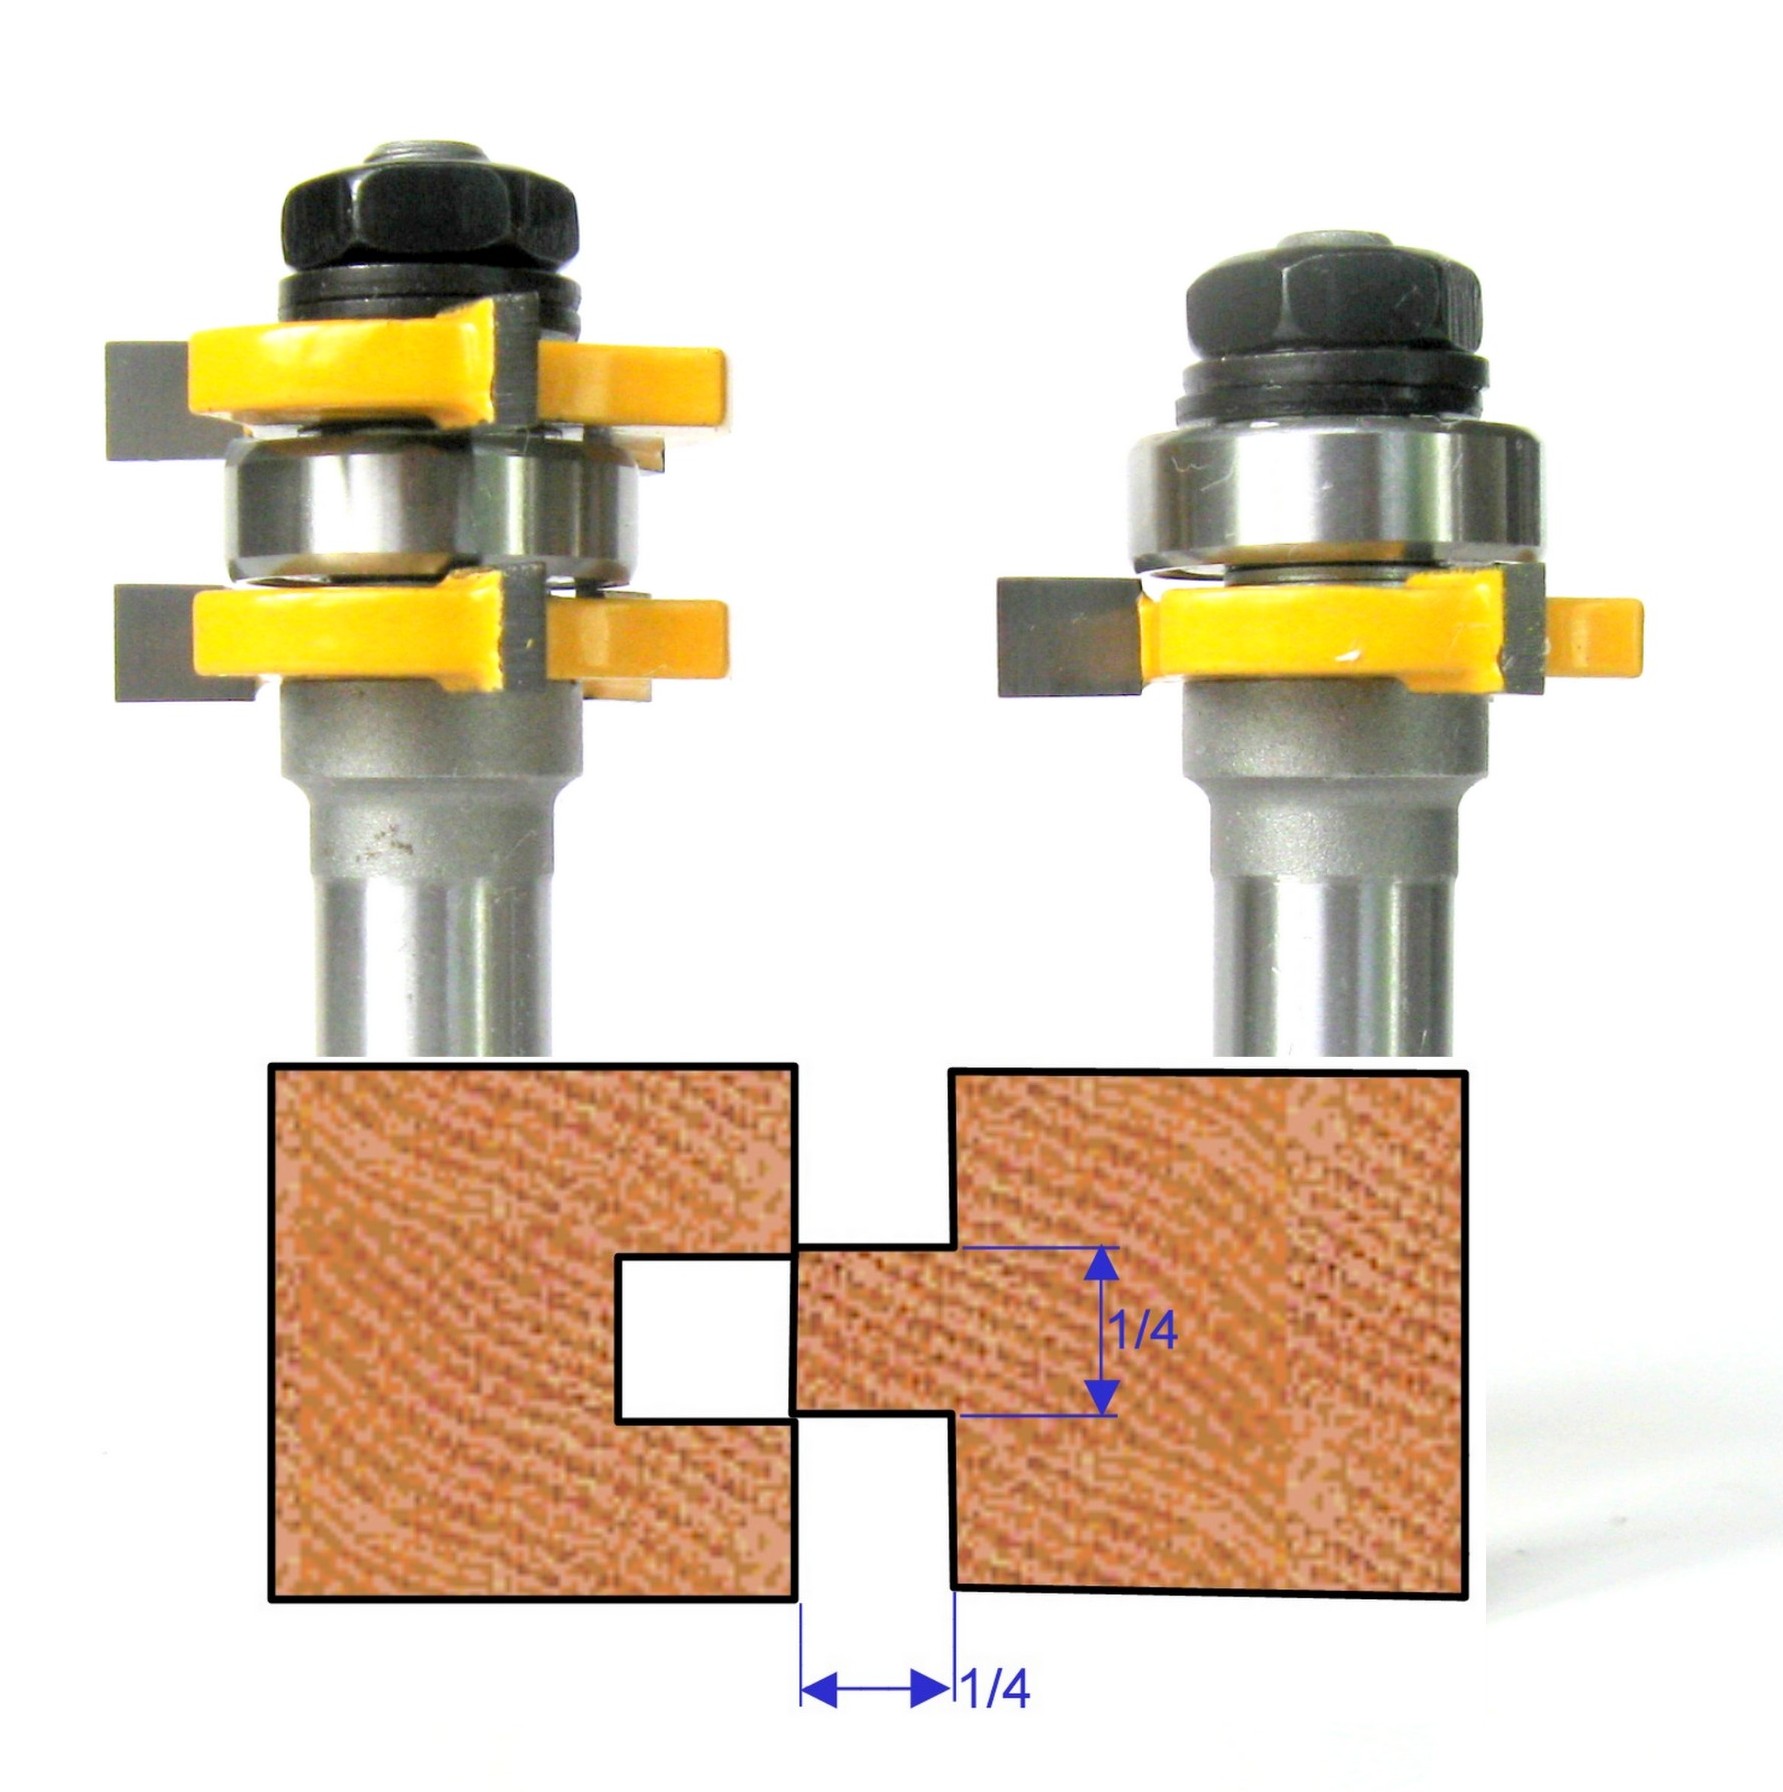
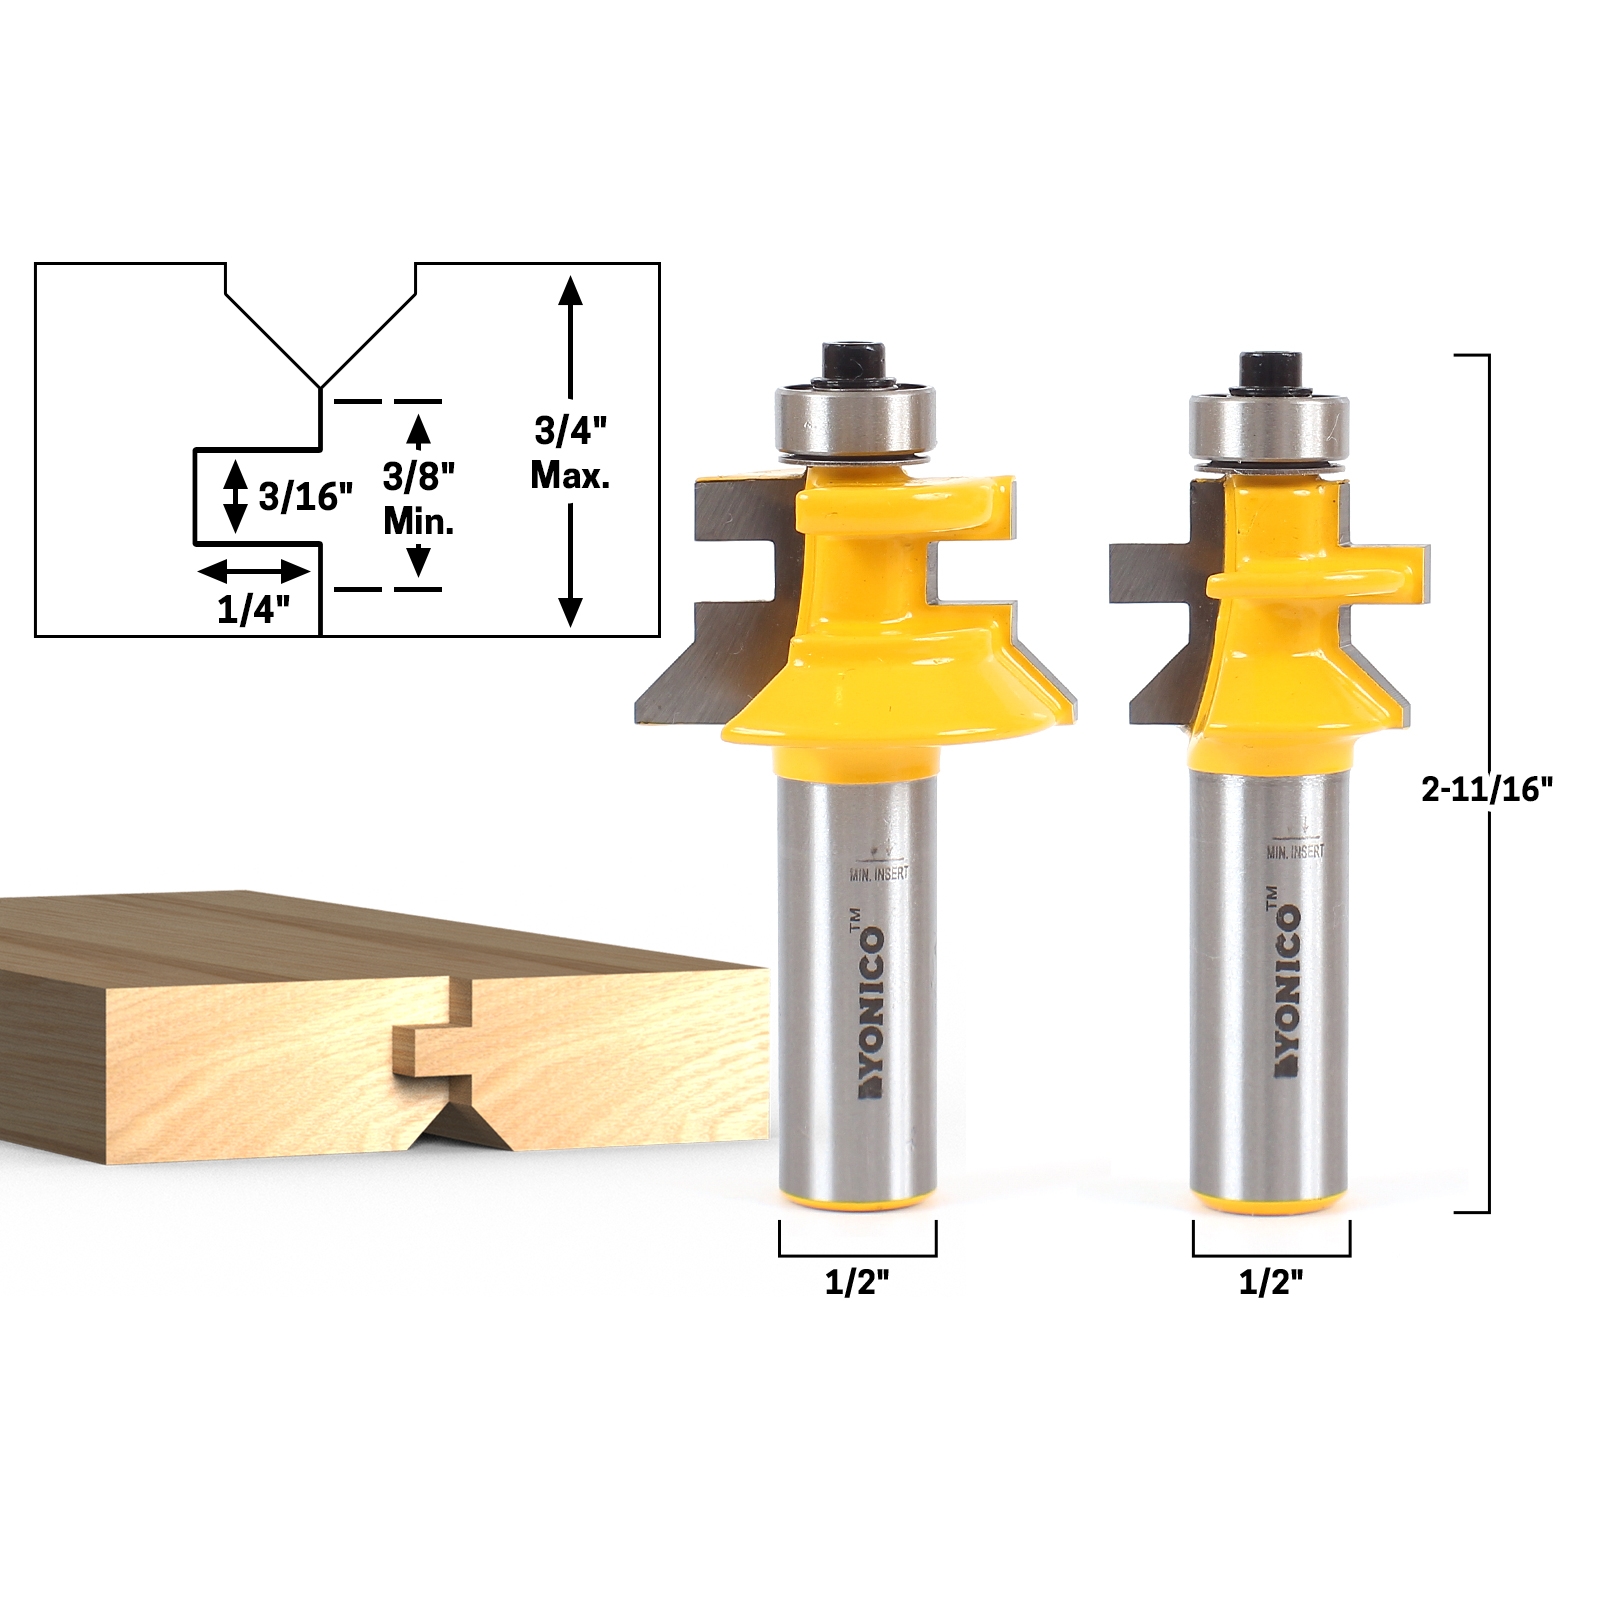
Planking is when you lay boards together. The easiest way to join the boards to the rest of the table this way is through tongue and groove planking, but you can also use a dowel to create a butt joint if you know how to do that. Another way to make the tabletop is with a single sheet of wood. This can be a little more expensive and difficult due to the weight of the wood.
To save money, consider using hardwood veneer construction plywood. Drill pocket holes from the outer boards to the inner board. Drilling the holes before adding screws prevents the boards from cracking. To create the holes, measure along the sides of the center board. Mark it about every 7 in 18 cm. You will need to use a very long drill bit, about 3 in 7. Drill at an angle down through the side boards and into the side of the center board every 7 in 18 cm.
It reduces the chances of drilling all the way through the wood. You will have a much easier time securing the boards if you clamp them together first. You can also assemble the legs and aprons first.
Attach the boards directly to the aprons with pocket holes. Attach the boards together with screws. Use a power drill to push the screws all the way into the pocket holes.
The aprons attach to the tabletop and legs, preventing them from moving. From the edges of the tabletop, measure in about 1 in 2. Then, draw a line in pencil to indicate where the aprons will connect to the tabletop.
Having the 1 in 2. This leaves a little more leg room and makes your table look better overall. Clamp and glue the aprons to the tabletop. Set the aprons down on the lines you traced. Spread a solid, even coating of wood glue underneath the aprons to secure them to the table.
Clamp them in place overnight to ensure they stay attached. Use a pocket hole jig to secure the wood together with pocket screws. You can also attach the legs to the table first then connect the aprons to the legs using pocket screws. You may then add corner braces to help hold the legs in place. Part 3 of Trim the legs to the size you need them to be. Attaching the legs is often the trickiest part when making the table. A bad leg can make the difference between a sturdy table and a wobbly one.
Line the legs up next to each other. Start by measuring each leg, marking its length, and reducing it to the proper size with a saw. You should check before attaching the Best Tongue And Groove Router Bits Limited legs to the table. If you make your own wooden legs, cut the wood roughly with a circular saw or hacksaw. Then, clamp the legs together and cut them all to the same size.
Prices may vary for AK and HI. Fastest delivery: Wednesday, March 24 Order within 17 hrs and 32 mins Details. In Stock. Add to Cart. Secure transaction. Your transaction is secure. We work hard to protect your security and privacy.
Our payment security system encrypts your information during transmission. Learn more. Ships from Amazon Sold by Routerbitworld Details. Ships from. Sold by. Whiteside Router Bits Add a gift receipt for easy returns. Brand: Whiteside Router Bits. Size: 1-Pack.
Four Pack. Three Pack. Two Pack. About this item This fits your. Frequently bought together. Add all three to Cart Add all three to List. Sold by Routerbitworld and ships from Amazon Fulfillment. Sold by AmericaMart and ships from Amazon Fulfillment.
Customers who viewed this item also viewed. Page 1 of 1 Start over Page 1 of 1. Previous page. Next page. More items to explore.
Register a free business account. Have a question? There was a problem completing your request. Please try your search again later. Compare with similar items. Product information Size: 1-Pack Technical Details. No Batteries Required? Would you like to tell us about a lower price? See questions and answers. Customer reviews. How are ratings calculated? Instead, our system considers things like how recent a review is and if the reviewer bought the item on Amazon.
It also analyzes reviews to verify trustworthiness.

|
Router Jig Round Hole User Table Cnc Machine 10 Wood Turning Wood And Resin 200 |

Ilqar_Vasmoylu
06.08.2020 at 14:54:58
mikrob
06.08.2020 at 16:10:55
SabaH_OlmayacaQ
06.08.2020 at 23:26:33
NeznakomeC_23
06.08.2020 at 11:11:42
gagash
06.08.2020 at 22:30:17