Table Saw With Router Attachment Join,Kreg Jig Setting For 1x4 60,Small Wood Furniture Ideas Video,Diy Wood Work Benches - Videos Download
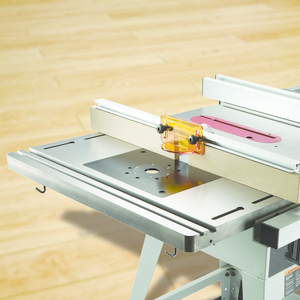
However, my table saw has an extension that was not really doing anything other than allowing me to cut large stock. Luckily because I didn't measure it in advancethe router table I bought was a good size match, and so I built a frame to house it, discarded the legs tablw came with the table, and popped it in place.
It works like a charm - it made it really easy to make a malletfor example. For instructions on how to make the whole thing yourself tablee. Actually, if you haven't seen his site before, do yourself a favor and have a look around - loads of fantastic stuff there.
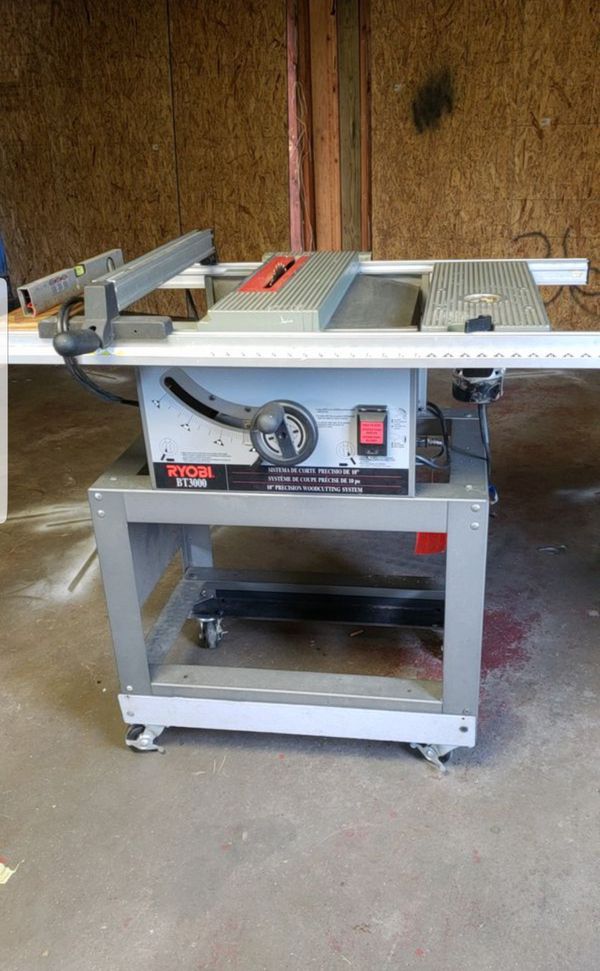
If you got this far, doubtless you already own a table saw. For this project, you need a full size one with an extension - mine is the Ridgid Rwhich is probably the most affordable one of this type out there.
You will also table saw with router attachment join a mini router table, of the type intended to be mounted on a workbench.
The one I bought came with a fixed base router and all the fittings. Beyond the table saw, I used a cordless drill, a hand saw, a jigsaw, measuring tape, square, wood glue, 1. The wood was all offcuts from spruce construction lumber from my woodpile. Measure the size of the hole in the table extension and the size of the table. That meant Table saw with router attachment join needed to waw the table by 41 mm at each end, but didn't need to do anything on the sides except provide support.
I glued and screwed the table saw with router attachment join together, put it in place and realized I needed to cut a rebate for the switch and slots on each end for the sliding miter gauge.
I did the former with a jigsaw and the latter with the table saw, then fixed the frame in place using flat-head screws in the holes that were already there. Drill holes and drive screws through the frame into the underside of the table to fix it in place I used 6and mount your router.
The way this is set up I can either use the fence that came with the router or the fence table saw with router attachment join the table table saw with router attachment join if I need to rout a larger workpiece.
The whole setup works very nicely koin it was just a quick routre. Reply 5 months ago. Reply 1 year ago. Sounds simple enough so maybe there's an intructables or a video? Why didn't you do this? Yup - love the portability of those saws. I managed to snag one of the last cast topped tables before the switched them to the new material can't recall what they make the table tops out of now. Just one little tidbit to add - you will want to add some sort of angled brace from Table Saw With Router Attachment Listener the outer edge of the router table insert to the table saw base to prevent any strain on the TS rails over time.
Doesn't have to be anything fancy - just to take the load off the rails. Handiest upgrade you can make to any table saw - and rouetr router table will actually get used more! Reply 6 years ago on Introduction.
This one has a routef iron center with pressed steel wings. It's still heavy, but not compared to a cabinet saw. I thought about bracing it, table saw with router attachment join the router is not all that heavy and the rails are very solid.
The brace may also make it a little tricky to store I tuck the saw under the my workbench when not in use. May have to reconsider if I detect any signs of strain. Reply sith years ago on Introduction. Am in the process of building my router table add on. Great idea buying a compact table and retro fitting it to your saw. I just purchased this saw. The center section is still cast iron. They no longer make either wing out of cast iron.
And am in the process of building my router table. What a cool idea buying a compact table and retro fitting it into the table. I agree with your support idea. I think this idea is great but I would be concerned jiin stressing the rails. I route heavy hard wood stock sometimes which requires heavy pressure against the fence to get atttachment nice clean cut and I would be afraid of bending the rails and bringing my table saw out of square or worse.
Just completed this on my tablesaw. Instead of cutting out a dado for the switch, I removed it from the table and relocated it to the front edge of the support frame.
Great instrucable, and your measurements were bang on! I built a shaper table for my portable Rigid table saw Yes, I have the very first year they made the saw about years ago and still use it. Mine is not nearly as well put together as yours, but I built the top surface from Table saw with router attachment join, so I can also remove it and use it as a circle jig.
I'm suddenly feeling inspired to make a new one. If so, I'll post pics. Get back to Canadian Tire or Harbor Freight tools and buy an inexpensive foot controller for the router.
I use mine like a dead man switch, so that I can turn the machine on and off without leaning down or looking away from the project. Good idea The nice thing about this unit is they power off and on using the same switch. Only if the sum of the amps required on each tool is less than the rating on the switch. Since each tool is unique, you'll have to check it out. I've been putting off doing the same for my shop for a while now, and just this past week I had an Eureka moment.
Two birds, one stone. One less structure taking up space around my saw. Actually two less. Still, you're spot on with your thinking. Routers and saws take up lots of room in your shop, and this brings your workpiece out into the center of the room where you have the most ability to move about. Good idea. One good reason to put the router table in Table Saw With Router Attachment List between the fence rails os so you can use the table saw fence with your router table.
That is how I use mine. By makendo Instagram makend0 Follow. More by the author:. About: Analog maker dabbling in digital manufacture More About makendo ». Did you make this project? Share it with us! I Made It! Jimbob 5 months ago. Reply Upvote. Thank you, well done plans with pictures. I will do the same to mine. I just table saw with router attachment join to add a router to my table, not a router table to my table.
How do I do that? Drill a hole in your table and attach the router below using screws through the attachmen. AnimattersInc 6 years ago on Introduction. ModlrMike 6 years ago on Introduction. I'm really glad to hear it was useful. Good idea with table saw with router attachment join relocation of the switch. I've done this too- mine worked out so that I Table Saw With Router Attachment Windows could use the table saw fence with the router too.
Yep, that works with this one, tabpe - you just have to disconnect the router fence. My only suggestion what looks like a great application. Goatherd1 6 years ago on Introduction.


|
Used Benchtop Mortiser For Sale Toronto Lathe Supplier In The Philippines Market Best Router Table Switch Windows 10 Server Cabinet Locking System Query |

Lady_Dronqo
19.09.2020 at 12:23:55
Raufxacmazli
19.09.2020 at 21:16:45
Joker
19.09.2020 at 22:36:56
INKOGNITO
19.09.2020 at 20:29:22
Diana_84
19.09.2020 at 19:53:53