Pocket Hole Jig Tutorial Jpg,Ryobi Band Saw Blade 01,Blum Euro Style Hinges 01 - Tips For You
You need some epoxy resin, steel tubes, MDF, drill, and other materials you would find as you work. This video tutorial teaches you to make a pocket hole jig without having to buy the expensive versions because they can function just as well! Observe the video for instructions because the instructions come in a written form while he works. You would need sandpaper, hardwood, jigsaw, ring spanner optional , clamps, a drill, hack saw, some glue, hammer, and other tools you would find within the tutorial.
The video is about 6-minutes long. It is about 10 minutes long but instructional and simple to understand. You would need some scrap wood from your workshop and a few other construction tools. For this design, the builder uses scrap wood and MDF. He starts by cutting and flattening the hardwood to accurate measurements. He then joins both MDF and hardwood using strong glue.
The rest of the video tutorial is clear, all the tools used are found within, and you can follow along easily. This pocket hole jig is suitable for different sizes of screws. This video is a bit lengthy and does not come with any instructions or design plans. However, it is clear Pocket Hole Jig Tutorial Review and can be understood easily.
For this build, you would need any plywood or MDF that you can find that is quite long. According to the designer, digging a hole of 12mm was a bit irrational, but all the same, he got it done.
There are no measurements within the video, so you would need to watch closely to figure it out by yourself. The tools you would need can also be found within the video tutorial; watch to the end and write out all you will need as you watch.
This written tutorial is made up of 4 construction steps to make your jig. The steps are simple, and you can have a pocket hole jig set up in no time. For this build, the designer modified a pre-existing drill guide. You would find more about this within step 1 of the tutorial. This plan comes with clear pictures and other links for additional guidance and helpful tips. The construction steps are short, workable, and fit for all woodworking experience levels.
I want to join 2x4s cut at a 45 degree angle to form a 90 degree corner for the frame of a table. How do I set my Kreg jig to do that operation?
You place the 45degree end flush to the bottom — creating a 45 degree angle with the bottom of the Kreg Jig. I hope this helps. I am going to be doing a build with angles next week and will try to get some pictures added to this post. Anika — great video and I love your workbench — my next project! I only wish my hardware store could cut 2 pieces the same size! Only once when a woman was working the saw were all the cuts I needed spot on. I have a small circular saw but am terrified to use it.
Thanks Debi. I am glad you enjoyed it. Yes, getting the hardware store to cut pieces precisely can be quite a challenge. I would recommend a miter saw instead of a circular saw. It is a lot easier to use and not too overwhelming.
A miter saw is the first saw I started out with too. Nobody likes spam! I made the hard decision to turn off comments on my posts after two Pocket Hole Jig Tutorial Online weeks. Thanks for visiting! I am NOT a professional. Just learning as I go and trying to inspire others!
I advise you to always follow manufacturer instructions, take appropriate safety precautions and hire a professional when in doubt. I love it when you use my site for inspiration, but by using it, you agree that you do so at your own risk. Full disclosure here. Instructions Measure the thickness of the board.
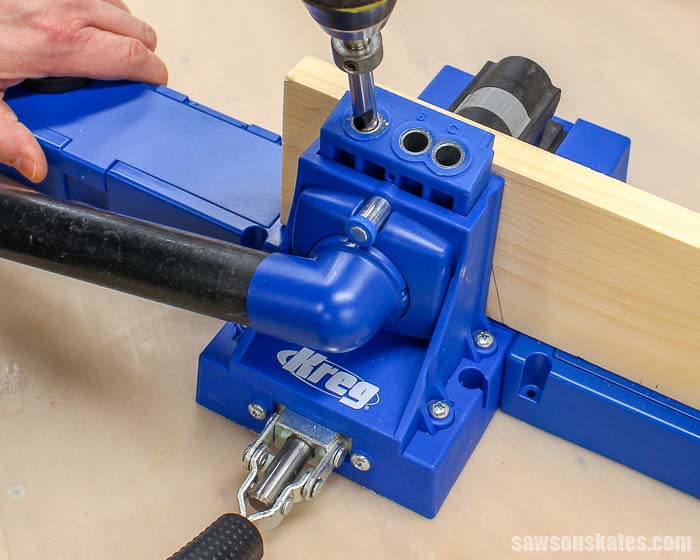
Not all boards are made equal and there is a variation across boards from various sources. Set jig height - this is based on the thickness of the lumber you are using. This means the head will go down in the hole and be hidden. The bit on the left is a square tipped driver that you can use in a standard drill, because Kreg Jig brand screws have a special head on them. Whether you use Kreg Jig screws is all about personal preference. Make sure that your wood is cut with a miter or table saw set to 90 degrees so that you can have an absolutely smooth join.
There is a numbered slide on the back of your jig which can be adjusted based on the thickness of your wood. The round, gray plastic piece above is where you will clamp the jig down. I highly recommend a clamp as it frees up one of your hands. Make sure the correct drill bit is in your drill, and simply guide the bit through the holes in the Kreg Jig. Basically, the only work you need to do is make sure your holes are lined up and then push the drill quickly and firmly through the hole.
They need to be self-tapping screws so that they drill into the pocket hole and second piece of wood easily. Before you do this on a piece of furniture or other project you are building, I highly recommend trying it with two pieces of scrap wood.
That way you can get a feel for the device and experience how easy it is to use. If a Kreg Jig guide is not available to you, use this chart to choose the correct screw length for your material thickness. Are you ready to get started with a pocket hole jig? Check out this video below that shows you the basic concept:.


|
Rockler Tools South Africa 4k Best Band Saw Blades For Wood Quartz Sandvik Hand Saw For Sale 64 |

zemerald
18.06.2021 at 11:30:32
IDMANCI
18.06.2021 at 21:23:52
BAKULOVE
18.06.2021 at 20:36:32
SHEN_QIZ
18.06.2021 at 19:31:24