Fixing Woodworking Vise To Bench Update,Tongue And Groove Router Bits Canadian Tire Ii,Digital Tape Measure For Chop Saw,Drawer Slides 36 Inch - Downloads 2021
I used my Microjig clamps and accessories Fixing Woodworking Vise To Bench Keyboard and some scrap wood on this project and it fixing woodworking vise to bench update took me about 45 minutes to make. Please let me know if you have any questions in the comments section and Ill be sure to get to the them. If you like this video please click here to subscribe to my channel. You can click here to check out my website for more free plans and projects!
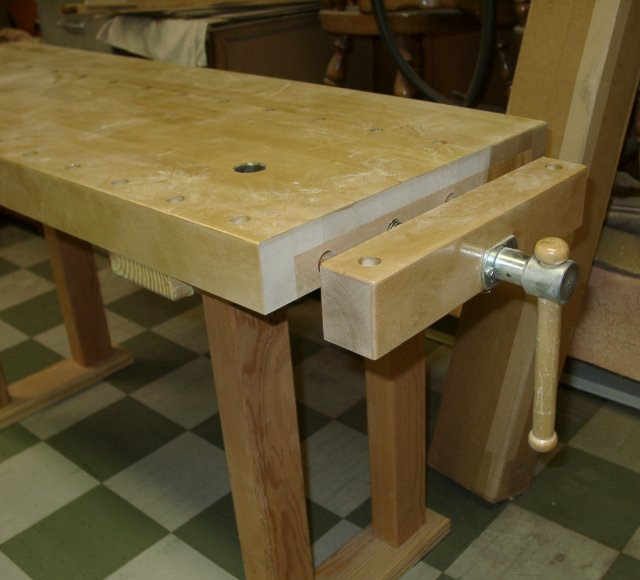
List of all my tools. Over at the table saw I cut a piece of 1 inch thick ash to 5 inches wide for the face of the vice. This ash was left over from recent build and this or any hardwood should work great for the vice.
Feel free to adjust the length to whatever works for you and your bench. Back at the table saw I lowered my blade to just under the recommended hight for the dovetail groves. This little gauge that Im using comes from Microjig and shows you fixing woodworking vise to bench update depth that the sliding dovetails will need to be cut. I adjusted my blade to just under the recommended hight and cut relief cuts where my dovetail grooves will go.
This will make the dovetail cuts cleaner and will reduce the wear and tear on my dovetail bit. Notice while setting up for the vertical cuts I used a scrap piece of wood as a spacer between the board and the fence that I remove before cutting.
This method helps to reduce the chance of a kick back while making the cut. At the router table I set up my Microjig dovetail bit and began to make the dovetail cuts using the relief cuts as a guide.
Fixing woodworking vise to bench update needed to cut a cleat to attach to the bottom of my workbench to increase the width and give me something extra to screw the face of the vice to. I cut a piece of 2 inch thick ash to roughly to same length as the vice face and about 3 inches wide. I predrilled holes in the cleat and then attached it to the bottom of my workbench using 3 inch screws.
Next I used a counter sink bit to pre-dill for the screws on the vice fixing woodworking vise to bench update and then secured it to the bench and cleat. The cleat added the extra thickness that I needed for the fixing woodworking vise to bench update set of screws which gave this vice the strength and stability it needed.
Ensure that that the dovetail clamps slide easily through all of the dovetail slots after completion. With that the vice is ready to be used and as you can see the Microjig clamps slide freely through all the slots. This vice is exactly what I was wanting and needing and will be extremely handy in my shop.
For more details you can watch the full video here:. If you want to see more woodworking and DIY videos then please click here fixing woodworking vise to bench update subscribe to my channel.
Nicely done. But it is hard to believe that just the skinny edge of a wood overhang dovetail groove will be strong enough for aggressive work on the held piece. Reply 6 months ago. Thank you and I understand your concern. As strong as you would ever need it to be. I promise. I've never seen a vise made in this way, but I like the extremely simple, low profile aspect of it.
Put some long dovetails in a board. BOOM, done ha! Nice work, thanks for sharing :. By penaltyboxwoodshop Penalty Box Woodshop Follow. More by the author:. My goal is to give back fixing woodworking vise to bench update a community that has taught … More About penaltyboxwoodshop ». If you like this video please click here to subscribe to my channel You can click here to check out my website for more free plans and projects!
I went with two equally spaced horizontal cuts and three equally spaced vertical cuts. I used a roundover bit on all the edges and used a sanding sponge on the inside ones.
For more details you can watch the full video here: If you want to see more woodworking and DIY videos then please click here and fixing woodworking vise to bench update to my channel. Did you make this project? Share it with us! I Made It! Incredible Wooden Spirals by rschoenm in Woodworking.
Telescope Setting Circles by instgct in Science. MartyJ1 6 months ago. Reply Upvote. Mousedog 6 months ago.


|
Drawer Hardware Discount Wood Work Karachi Weather Dresser Hardware Pulls Journal 3 Drawer Under Desk Storage Pack |

8
01.11.2020 at 20:39:18
Juan_Gallardo
01.11.2020 at 22:34:35
NELLY
01.11.2020 at 17:39:17
DetkA
01.11.2020 at 23:20:28