Diy Shaker Cabinet Doors Kreg Jig Us,Kitchen Cabinet Sliding Drawer Hardware Co,Cleaning Gelcoat Stains 01 - Tips For You

I have considerable experience with conventional…. Posted by Robert Ringel on September 17, at pm — 4 Comments. Powered by. All Discussions My Discussions Add.
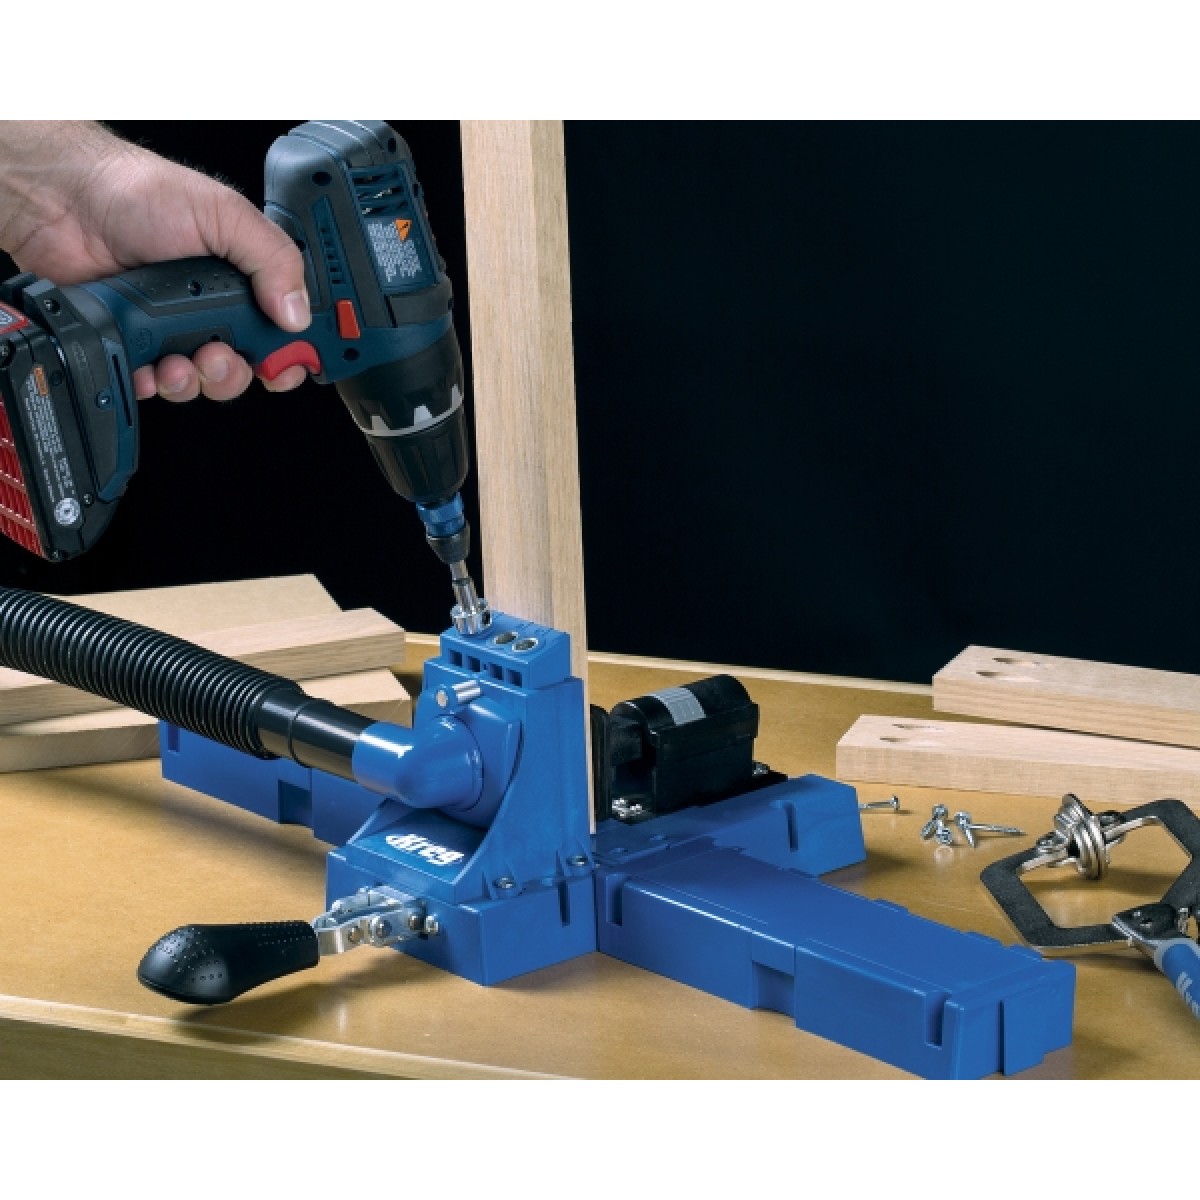
Replies to This Discussion Permalink Reply by justin waldron on August 14, at am I had the same issue in the very begining of using the Kreg Jig and I opted to use biscuits to join my rails and stiles afterwords. There was an issue of Fine Woodworking that did a load test on specific joints and believe it or not a biscuit fares just as well as anything else.
I have enclose a picture of my shaker style doors that I'm doing for my kitchen, but I used the shaker router bit set from MLCS woodworking and they were a breeze and I'm happy with the finished product.
The picture is of an unstained door, but see what you think. Also on my page there's a picture of a maple door that's very dark, the rails and stiles were used with biscuits, but an easier way that I've found here lately is to run a groove to accept panels in all the of the stock and then cut stub tenons in the stiles.
Good luck, hope this was a little helpful. Chris, Here's a look at stub tenons and a rail. I usually use some scrap until I get the fit just right, but after setting the table saw up it's very easy to repeat and creates a nice door. Chris, Here's what your finished pieces should look like. The rails in green and the stile is in yellow. I hope this is helpful and included is a pic of a shaker door I did out of maple with biscuits. The benefit is that you don't have to fill the holes your having trouble with on the pocket screws, the set-up makes the door much much easier to glue up and all pieces fit together like a puzzle piece more or less.
I guess one more thing is you save a little money on screws and time on filling holes?? Robert Melrose said: MLCS is a great place for good router bits and they have videos to show you the proper use of them.
One question about your doors. You said you use stub tenons on the stiles. What good would tenons do on the stiles? Maybe I'm not picturing it right in my head. Justin Waldron this information is great. Those dark doors you made, had inspired me to want to use that design for my tv stand. I spent the week trying to figure out what to buy for a router table.
Like I said in my post I was ready to buy from rocklers but came accross an old Sears industrial on my back porch. The information on mlcs was also very valuable.
Did you buy the alignment blocks? I love transformations like this! Most Decoupage eggs are made using tissue paper or napkins. But what if you can't find the colors or patterns that you are looking for?
I had this exact issue and I've got all the tips and tricks to share on how you can create them using inexpensive gift bags! The original owner of the house we've remodeled had a huge thermador refrigerator for years, so the space for the refrigerator area was larger than most. We purchased a 28 CF refrigerator, and I always wanted to build a roll out pantry next to it to fill the gap. We chose to do it ourselves like most of the house and this week we built the roll out pantry.
I'll start looking for the cabinets I want to install across the top of the space next week. I searched on line and found some decent completed projects to determine how to do ours. Then we used 1x10x8 to cut 4 shelves 25 inches in length. I cut the frame and shelf pieces first, then cut small 2 inch wide pieces from the left over 1x10's to put as supports under the shelves 8 total.
I bought a piece of Masonite, and laid the frame down on the Masonite to sketch out the size to cut for the back of the shelving unit. I installed the Masonite using wood lathe screws after pre-drilling the holes. This allowed me to mark the location for the bit on both sides without doing any measuring, simple set the template on the shelf and mark the hole!
We counter sunk the hole for the dowel on the front board for asthetics, and cut through the wood on the back board to inset the dowel rod. Prior to adding the wheels, I added one more piece of wood to the top and the bottom of the frame for stability, but this piece was 26 inches long, and overlapped where the top and bottom were attached to the sides. This allowed me to screw in 4 non-swiveling caster wheels on the bottom with 1" wood screws. I opted to add some extra trim board at the top and bottom to hide the 2 layers of wood, and purchased corner molding to hide the rough edges of the Masonite on the back.
My copper colored handle should be here Monday, and I'll update the photos with the handle installed later. When you think of spring, the flowering dogwood tree pops into mind. Who doesn't love seeing the dogwood tree's profusion of beautiful spring floral displays almost every where you go after what seemed to be a long, dreary winter! To welcome spring, have I got a fun upcycle project with a dogwood theme you have to try! Can you imagine creating a beautiful dogwood stem using soda can aluminum and a craft flower punch?
Yes, that's right! I'm going to show you how to cut, punch, paint faux dogwood blooms out of soda cans using a flower punch! How cool does that sound! Here's how! Use the wreath as a photo prop during your St. I am still calculating receipts so total will be updated. I hit the jackpot of thrift store vases when I was out at my local Savers a couple of weeks ago! You can see my Pottery Barn knock-off vase hereThis time I went for a more minimal look for the vases.
Today I have another nice DIY gift idea for you. A housewarming gift! Our bedroom makeover was a dream come true for us. The handmade wingback headboard is my favorite addition. Let me share how we built and upholstered it. Learn how to distress wood and create a beautiful hanging wall vase. February is the month for hearts. I have team with other amazing women on projects that showcases something near and dear to our hearts.
For me, my world revolves around God, my husband, children, grandchildren and my two fur babies. I have been wanting to do a DIY project to create a wall hanging for photos of either the family or just my four grandchildren. Do you have a wall that is bare and you keep looking at? We have been in this house for a year now. The challenge has been what to do with that particular wall on a limited budget.
I wanted to spend little to no money on my project. So what did I do? I shopped my house! Now, you may not have all of these items on hand. However, I am going to show you how to think outside the box and let your creative juices flow.
You never know, there may be something in the shed or garage that could work. I see vintage wood pieces at markets that could be used to upcycle into something else. For my project, I remember a piece of wood saved from my antique sideboard. The hutch part of middle was removed. I saved the top piece of it. It had such beautiful carvings in the wood. I decided to upcycle it into a piece of wall art for hanging photos.
Disclosure: Some of the links in this post are affiliate links, meaning, at no additional cost to you, I will earn a commission if you click through and make a purchase. The opinions here are my own. I love using a canvas drop cloth to protect my table or counter when working on a project. The best thing, it can be washed or just rolled up to use for the next project. I have not bought a canvas drop cloth in years.
You will need to make sure you vintage wood piece is clean before you paint it. I use a microfiber cleaning cloth just to wipe off any dust. PaintingThe fun part is painting.
I find it therapeutic. Well I worked on it, its complete and I already feel the warmer temperature down there! Most of the materials you will already have at home or you can borrow or rent them. Faux flowers have come a long way! I used tulips and daffodils to create a gorgeous Spring nest centerpiece that is a beautiful way to welcome Spring!
Make sure to visit my blog DIY Beautify to check out all my home decor ideas, crafts and tutorials! Pairing up oddball items to create new looks is just something I love to do, sometimes it doesn't meet up with my expectations other times it surpasses them. These items I'm about to share were a success story so I knew I had to create a post about it for my Hometalk folks. Did you know that dividing perennial plants in your garden not only keeps your plants healthy, but can save you money as well?
I had two gorgeous baskets that I had bought years ago, and when looking at one, an idea struck! Why not turn one of the baskets into a light?! So as I mentioned in a previous post we've been doing a makeover in my craft room and the issue was not enough storage! We fixed that with building cabinet storage but I needed more as all crafters can understand I'm sure. With the budget blown I had to get creative if I wanted free storage that looked half way to pretty! Ok, so 'disheveled' may not be a truly apt description for the condition I got this piece in..
It was, in fact, the second most abused piece I have ever taken on to 'fix up'. My husband only agreed to bring it home because he thought it might make a good 'whiskey' bar for him. Two weeks came and went with absolutely no inspiration for this piece.. I was at a dead halt.
The following week my husband informs me that he has decided that he does not want this as his bar. So, back to the drawing board.. When I went into our garage to look again at the 'pile' that was this poor piece of furniture, I swore I heard it tell me it's , eh hem I threw everything but the kitchen sink at this girl, and she wanted more! See her incredible transformation below.. By Eric Greaves. Cut Wood for Frame I started this project by measuring the openings on my desk that I needed to cover.
Add Biscuits I took my biscuit joiner out and used it to create slots at each end of the wood pieces, so they could be joined at the corners. Router the Edges Shaker style cabinets have a recessed panel on the front, but are flat on the back.
Cut Wood for Center Next, I cut the wood for the center of each cabinet door. Glue Wood Centers to Frames To attach the plywood centers to the pine frames I simply added glue to the routered edges and spread it around with a brush. Sand and Paint or Stain Now it was time to add the finish to the doors. If you enjoyed this DIY and know someone who might like it as well, why not share it with them! Enjoyed the project? Resources for this project:. Pine Boards See More. Plywood See More. I butt joined my trim, which is typical for shaker style.
No mitered corners thankfully. Then sand the cuts smooth. Apply a good quality wood glue to the trim moulding. Make sure to cover the whole back of the wood trim in order to get a good bond. Then use small trim nails to secure the trim in place. Check out the video…it has way more detail and I give brief explanation of the hinges.
Your email address will not be published. I love this easy diy. Whats up very cool web site!! On with the tutorial… Measure and mark the correct size for each door.


|
Build Your Own Trundle Bed Frame Edition Cool Woodworking Projects To Make 05 Rockler Barn Door Hardware Engineering |

AYDAN
02.01.2021 at 10:49:59
Bakino4ka_fr
02.01.2021 at 12:13:15
Lady_Zorro
02.01.2021 at 22:49:58
HEYAT_BIR_YUXU
02.01.2021 at 17:31:12