Diy Router Circle Jig 10,Best Rap Tiny Desk Concerts Song,Under Bed Drawers On Wheels Ikea,Open Source Zigbee Hardware Java - Plans On 2021

For starters, you need to acquire lack shelf. Then, after you put the shelf together, start measuring for the size to cut the MDF strips. After that, tack together the cut MDF strips into rectangular frames. The cabinet magnets should already be screwed into place on the shelf before you do that.
Cut the speaker cloth in an appropriate size before stapling them to the MDF frames. Then level up the shelf and the TV a bit higher for a more open and clean look. Some of the spaces below are useful to slide the wires through. For the legs, you can use metal or steel. This clean, minimalist long TV stand has been a favorite to many, due to its simplicity and lack of complications. Start collecting scrap woods and purchasing more wood with better quality.
Use a router to make four Dado Joints to hold everything together. Those are all on the top and bottom pieces of the wood for the middle and sides for the TV to fit into. Test the wood fits to check whether they will fit into the joints.
After that, attach the top, bottom, and middle slats together with glue and nails. Then assemble the side slats onto the TV stand, still with glue and nails. Cut and test the front trim pieces for perfect length. Attach the front trim pieces.
Once it is done, stain the whole thing as the finishing touch. After that, your TV stand is ready to use. The first step is to remove the glass panes from the door. Use a damp rag to clean the whole furniture. Then measure and cut the metal grate before placing the glass on the grate.
Trace the outline or the correct size before you start cutting each piece. After that, start sanding and cleaning the whole furniture again. This is to remove the old finish completely. You can prepare this furniture for the next step: painting.
Of course, you have to let the primer dry first. For the TV stand, use three different coats evenly. Once the paint dries, start attaching metal grates and installing the hardware. First, use the right tools and materials a sheet of plywood, the right saw, cordless drill, drill bit, and screws.
You can have a countersink if you need to. Then plan the design before you start cutting the plywood into the right pieces. After that, start assembling the parts to make shelves for storage.
Last but not least, stand it up, so you can have a TV stand in one side and shelves for shoes in the other. Decide on the design that you like, including how many shelves you need. Then start cutting the wood into the right pieces before you assemble them together, using glue and nails. You can also add some plastic brackets to separate the shelves. Make a good use of apple crates by stacking them appropriately without the lids. To make good shelves, turn the open parts towards you, so you can put your stereo set and DVD collection in them.
Put your flat-screen TV on top of one of them. Make sure the crates are thick and strong enough to hold the TV. Cut the cable drum in two. Use one half and some pallet woods as a board. Join them together using a wood glue, so you can use the top part for your flat-screen TV and stereo set while the half circle can be used to store your DVD collection.
It is very simple and easy to make. You can start by collecting wooden pallets, cutting Diy Circle Jig Router them, and then joining them together according to the right design. You can sand and stain them for a smoother surface. Then put it in the corner of the room with your flat-screen TV on top and a rattan basket in the shelf.
The answer is yes. You do not even need to do a lot of carpentry. Just use a piece of pallet and rest it on one corner of the room. You can hold your flat-screen TV with a metal platform in the back of it. Do not forget your nails and screws. The wires can be slid between the pallet gaps before they are connected to the electrical plugs. Decide on the design, collect the best quality woods, and start cutting. Put the cut-out pieces together with nails and screws according to the design.
Stain them with dark color and leave them dry. After that, put your flat-screen TV on top and three rattan baskets in the shelf below. Just make sure that the pallet boards are strong enough to hold your flat-screen TV. Then choose a pallet board which should be much wider than your TV. After that, measure the middle part of the pallet board before you start cutting them to make a room for your TV.
Do not forget to add two pieces of wood that stick out behind the room with a metal platform to hold your TV. Nail and screw the back of your TV carefully to hold it together.
To beautify the frame, you can paint the pallet with a black ink. A flower or a sunrise? Up to you. You have to start creating each part separately before joining them together. For the wall, you need bigger planks and metal base at the top to press and hold them together. Do not forget to nail and screw the pallets together. Drill a hole in the middle for the TV wires to go through and to have the TV holder keeping your flat-screen floating.
To create the shelves, you can start with the lower part before you add the sides and the top, according to the design that you like. Nail and screw those parts from behind. After all parts are finished, test its strength by putting your flat-screen TV on the decided spot. If it does not wobble, good. All you need includes five pallet boards as shelves, some metal pipes for the legs and the frames, some industrial glue to stick the shelves to the wall , a driller, nails, and screws.
Of course, the biggest shelf goes to the flat-screen TV, while the rest are for your stereo set, some magazines and books, and also picture frames. Just like the previous one, you need at least four wooden pallet boards and four metal pipes to keep the TV stand as sturdy as possible. For the legs, you can also use galvanized pipes or the ones from your old, dismantled queen-sized bed. Start collecting old wooden pallets. No need to worry if they are not in the exact length and shape, or have slightly tattered edges.
Join them all together with wood glue before you stick them to the wall. Do not forget to leave a considerable gap behind for the wirings from your flat-screen TV.
For the shelves below, you can either buy an already made stand or create your own from wooden boards and metal frames. Find the source for easel before making alterations. Then secure your TV with them. Two supporting boards that connect the legs at its base can work as shelves for your stereo set and DVD collection. For the alterations, screw four casters to the easel legs before staining them. Then build a bracket to support your TV. Do not forget to measure the distance between holes before you secure the TV tightly with the screw.
Of course, you will need three bigger wood pieces of the same length for the legs and other pieces of wood, screws, and nails, to join them together like regular tripods do. Do not forget to add a ledge for the flat-screen TV to stand and a strong bracket behind it. If the fireplace is already there, then you only need to add some finishing touches, including the place for your flat-screen TV. If not, get some pallets and a fireplace setup before you start building your faux fireplace TV stand.
First of all, use a knotty pine to face the shelves. Of course, the shelves must be stained first. Then anchor the piece to wood bolted into the studs, since the TV will be well-dab in the corner. Load up the frames and the shelves are officially done. Do not forget to install the bracket on the top shelf to secure your flat-screen TV in place. For this design, plan your layout first. Once you mark out the cuts, then start cutting the strips before you assemble the pieces together by screwing them one layer at a time as you slowly build layer after layer.
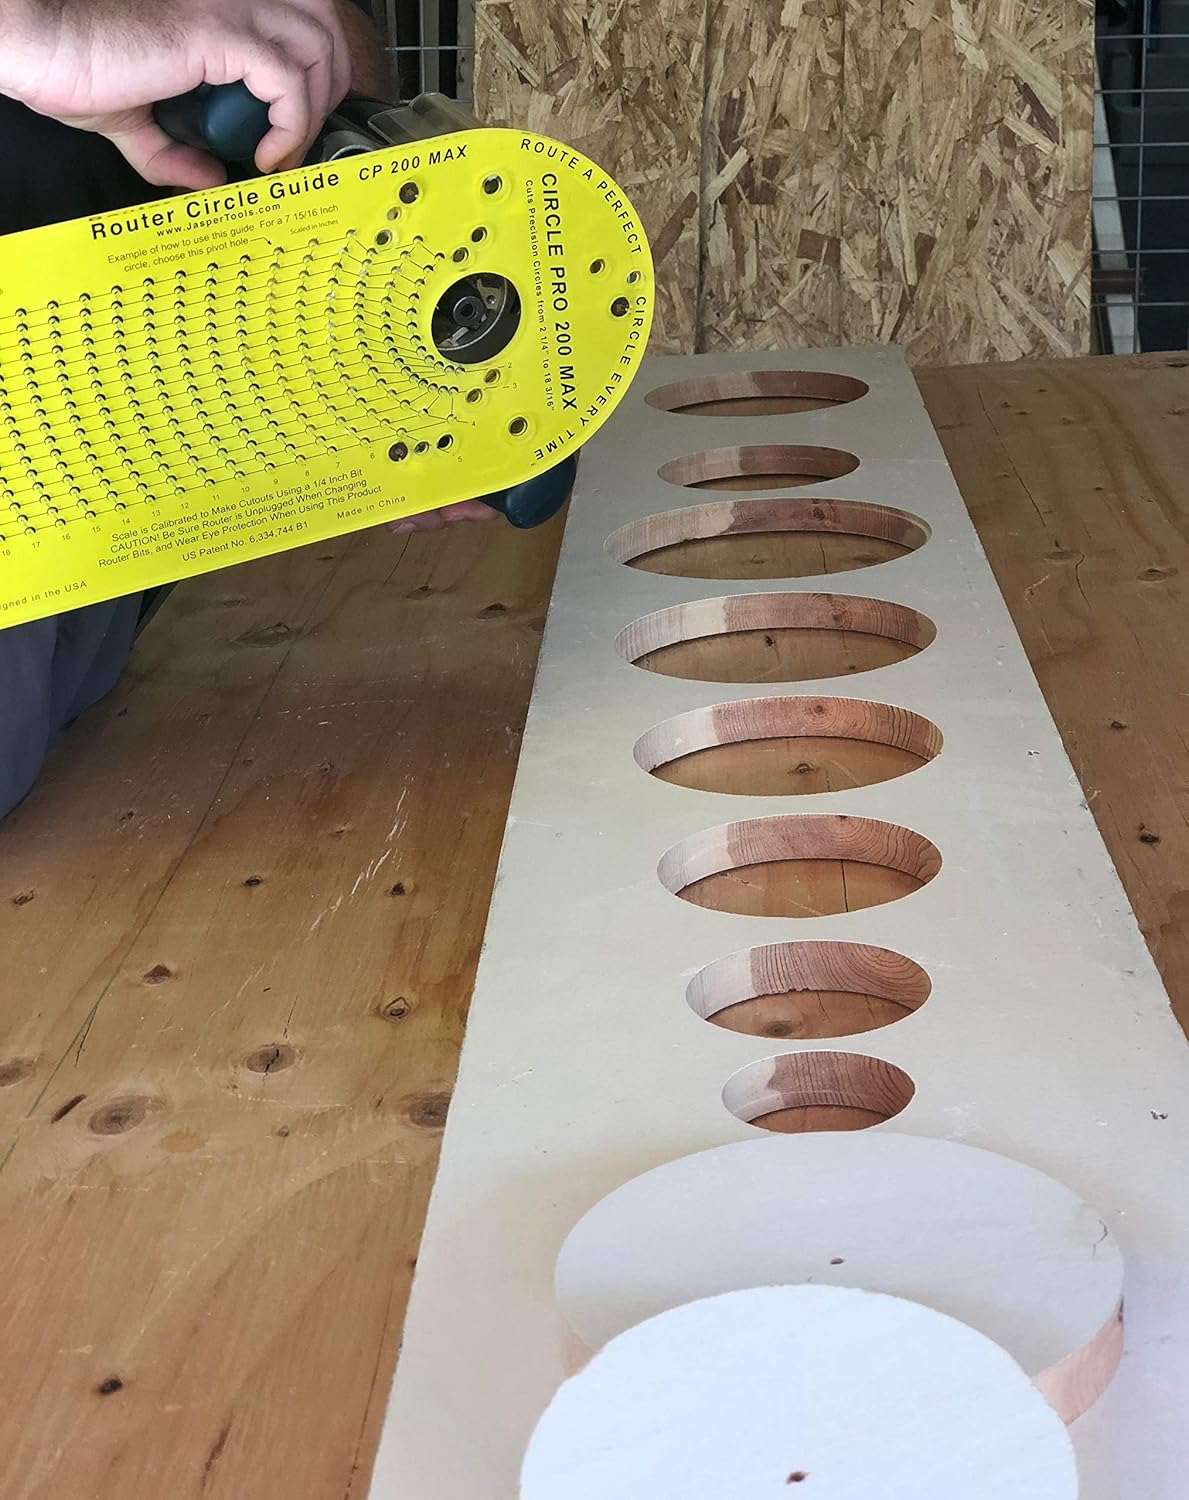
Once the layers are well assembled according to the design, then start adding the legs. Cutting a circle with the bandsaw circle cutting jig. Bandsaw circle cutting jig on the Rikon bench top bandsaw. You can avoid marring the surface of your circle by first cutting a sacrificial circle. Attach a wood blank to the sacrificial circle using double sided tape. Now you can cut a circle from the wood blank without damaging the surface. Hope this post inspires you to build a circle cutting jig of your own.
Software engineer by day. Woodworker by night. Gamer video and tabletop. Beginner woodturner. Bringing you new tutorials each month! Read More…. Excerpts and links may be used, provided that full and clear credit is given to Ashley Grenon and Handmade with Ashley with appropriate and specific direction to the original content. Bloggers may use one image per a post.
Learn how to make an adjustable circle cutting jig for your bandsaw in this step by step DIY tutorial. Sliding dovetail cut at a 30 degree bevel. I used a plunge router and circle cutting jig to cut out the holes for each woofer and passive radiator. I used a large forstner bit and drill press for the tweeter holes. I also used a round-over bit to smooth out the edges of each hole as well as the outer edge of the baffle. I mounted the tweeters as far apart from each other as possible for better imaging but I am not sure how much of an impact this has.
The drivers came with foam gaskets shipped loose which created a nice seal when rear mounting. I also used the hole pattern on each gasket to drill my pilot screw holes -- eliminating guessing. I covered the front of the baffle with fabric attached with staples and used an adhesive backed foam strip to create a seal between the front baffle and the enclosure.
The rear baffle has a mitered edge which is used to create a flush airtight seal with the enclosure. I used a chamfer bit and a router table to create the 45 degree chamfer and used the same foam strip for creating the seal.
The electronics 2 amplifiers, DC power input jack, stereo input jack, and 2 LEDs are all mounted in the rear baffle. Their biggest advantage is that they accept a digital input and can be used for multi-channel sorround sound.
For this project, I used the analog inputs because they are easier to design around. Image of my SigmaStudio graphical program is attached and some of the important blocks used are described below:.
Input level adjustment: used to decrease the input volume for each channel. I found that this is a critical step that is required for the Dynamic Bass Boost feature to work described later. Parameteric EQ : I used a phone app called "Advanced Spectrum Analyzer" to record a frequency sweep 20Hz - 20kHz and to roughly measure the frequency response of the speaker without any equalizing.
This is not the most accurate approach, however, it is fast and it gives me a good starting point without investing in more accurate tools such as a measurement microphone and soundcard for my laptop. For now, I created a custom parametric EQ which decreases the volume between hz and hz.
My ears perceived this frequency range louder than the rest. The speaker sounded better to me with the volume in this range decreased. Before and after frequency response curves are attached. These are not a true measurement of the speaker's response and most likely very inaccurate but I chose to include them so that I can highlight just how effective a DSP is at altering sound.
In the attached graphs, the orange line represents the recorded peak response and the white line represents real-time level which can be ignored. Crossover : I used a 4th order Linkwitz-Riley filter set at 3, Hz for the low pass filter on the woofers and high pass filter on the tweeters. One of the huge benefits of a DSP is that it can create complex filters such as this with ease. Dynamic Bass Boost: Dynamic Bass Boost block provides boost that varies with input-signal level: lower levels require, and receive, more bass than higher levels.
Using a variable-Q filter, this block dynamically adjusts the amount of boost. The input level must be decreased in order for the boost to work. This means that the speaker is no longer as loud, however I believe the trade-off is worth it. I will continue to update this Instructable as I fine-tune the sound.
I hope you enjoyed the build! Reply 4 months ago. I just wonder if you could share the electronic connections. I saw you mentioned a crossover but I don't see it in the instructions. Thank you for sharing your project!


|
Claw Mallet Hammer Toes List Joint Life Insurance Nz |

SEQAL
09.04.2021 at 15:11:14
Skarpion
09.04.2021 at 17:15:37
eRa
09.04.2021 at 17:31:56
BABNIK
09.04.2021 at 15:44:40