Diy Bottom Mount Drawer Slides,English Garden Bench Woodworking Plans Your,Best Bandsaw Blade For Hardwood Industry,Best Price Kreg Pocket Hole Jig - Plans On 2021

Back to the drawing board I guess :. We hope you'll stop by to grab a button and link up with us again! This is a great post! I had the same thing happen to me, with a bedroom set my sister gave to me because the drawer glides were broken. I had to replace the drawer bottom panels also, but that was an easy fix.
My dad made new ones, and 20 some years later the set is still going strong. I don't know why there is no online source for these parts, so many people need these it seems like a sure seller to me. I am so glad you posted this, I was trying to find how to fix mine Brooke startathome. Fantastic tutorial, but to avoid issues in months.. Cut the ends off the wood that is off with a miter saw.
Pre-Drill "through" holes where you put the screw in. It also helps to countersink the screws to not cause a metal to metal or wood grind.
Great work! I know I am coming to this post late in the game. I have a couple dressers that have been in my parents room as long as I can remember.
They both have now passed and I do not want to throw them out. But every draw gives me a hard time, or won't open. They have a wood 'slat' on the bottom of the drawer, not metal. But with your wonderful tutorial I can figure out the 'right' configuration to git 'r done. Thanks for such detailed descriptions and pictures. Jolie Template designed by Georgia Lou Studios.
All rights reserved. Customized and tweaked with love by The Lady Gadget. Theme images by mattjeacock. Powered by Blogger. Facebook Pinterest Instagram Youtube Twitter. Friday, August 9, - building plans. I'm sure this happens to you too. You somehow come across a great dresser find it at the thrift store, curb, attic, etc.
Its solid wood and has great lines. Then you try to pull out one of the drawers. Maybe the problem isn't coming out, its trying to put them back in. Either way, you've got some messed up drawer slides.
Never fear! I inherited a great, Broyhill dresser from my brother when they were moving a few weeks ago. Actually, it came out of my sweet niece Morgan's room. And screwed to the dresser frame were plastic, t-shaped rails. Since these were the pieces that needed to be recreated, I carefully studied the size and shape, taking measurements on all sides. I 'll show you how I created 3 replacement rails. To fabricate the rails, start with a 2x6, approximately as long as your dresser is deep, and a table saw.
Take measurements of the stem. Cut a channel on either side of the stem width. Continue to move the fence in and pass the blank through until you've reached the outside edge or removed most of the material. Break off any remaining wood and clean up the cuts with a chisel and some sand paper. Your blanks should now resemble the shape of the original rail. It's usually okay if its not perfect, but close. The rails are counter-sunk on the dresser frame a bit, so you need to cut some of the stem to account for that.
Place the rail where it will be mounted to the dresser frame and mark with a pencil where frame ends. Place the rail perpendicular to the fence and adjust it so your blade lines up with your pencil mark, taking into account the blade width. It may look a little rough until you clean it up with a chisel or if you're careful, a utility knife. The little pieces clean up easily. I know I made the steps sound hard and detailed, but I promise I wasn't hard at all! If you are familiar with your table saw and have some scrap wood, you'll never buy replacement drawer slides again!
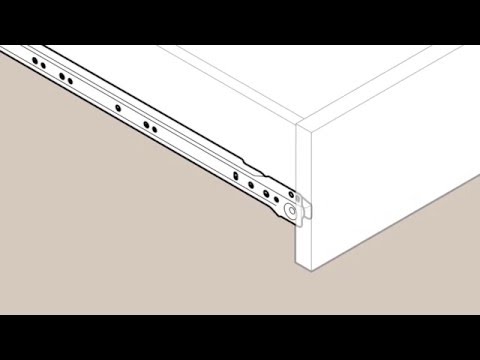
Let's be friends! Follow along, so you never miss a post. Linking at:. Common Ground. By now you may have realized the drawer height and width is also controlled by the type of drawer slide. Since there are a wide variety of drawer slides you may need to do a little more research on your slide types before finalizing measurements.
But there are a few sizing considerations for these slides:. How much space do you leave at the back of a drawer? I prefer to leave a full inch of clearance at the back of a drawer. No, a frameless cabinet does not require a rear mounting bracket as the drawer slides are instead connected to the side of the cabinet directly. Yes due to the variation in drawer slide measurements choosing the drawer slide type first is vital.
For example, an undermount drawer slide has a different rear clearance and custom drawer length. While a side mount slide is more universal there are considerations such as low profile to consider. There are three dimensions of drawer size and depending on your drawer slide they dimensions will all vary. Due to the variety of slides and mounting requirements the 1 best tip for measuriwng drawer slides is picking your slide type first. Save my name, email, and website in this browser for the next time I comment.
Terms and Conditions - Privacy Policy. The good news is measuring for drawer slides is relatively straight forward. How to Measure Drawer Slides Length. Step 1 - Understand your cabinet construction. Step 2 - Pick Your Slide Type. Meanwhile, undermounts are more advanced and are fully concealed under the drawer. Undermounts typically come one inch shorter as they require room 11 Inch Bottom Mount Drawer Slides Free in the back of the slide for a connecting mechanism.
And bottom mounts are a cross between both and are seen on the bottom side of the drawer. Step 3 - Measure Cabinet Depth.


|
Makita Cordless Joiner Engine Brad Point Wood Drill Bit Set 35 |

Anechka
04.09.2020 at 14:32:56
lya
04.09.2020 at 13:39:28