Classic Woodworking Table Saw Sled,Skil 3410 Miter Gauge 55,Etape16 Digital Tape Measure Usa - Videos Download
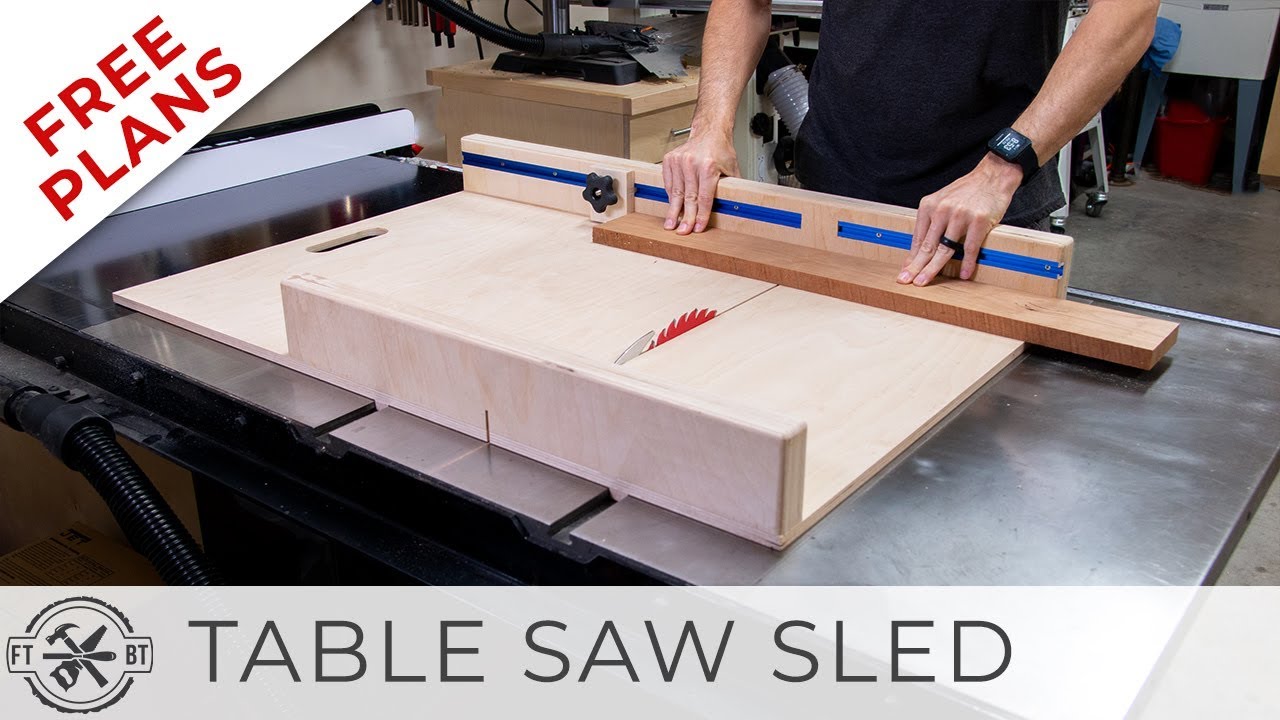
In my opinion a crosscut sled is a must have jig for the table saw. Paired with a stop block it lets you make repeated cuts with ease. And the cuts are clean thanks to a zero clearance slot matched with your blade. Before we get started, make sure to follow me on YouTubeFacebook and Classic woodworking table saw sled to keep up with all my latest builds!
Affiliate links are used on this page. See my disclosure page for info on affiliate programs. Be sure to get the Free Plans woowdorking you can make your own table saw sled today! This is a bit larger than my old one for a little more capacity. The half inch ply will keep the crosscut sled weight down. You could make the front fence full width but it just adds extra weight.
Gluing the plywood together makes a really beefy fence, but you also woodwrking it as straight as possible. You can counteract any bow in the boards by flipping them in towards each other for the glue up.
I let the boards dry over night then took them out of the clamps the next day. After that I flattened one side of each fence on my jointer then cleaned up the opposite face on the table saw. Next I cut one end of the long back fence square. Then marked for the other cut using the table saw sled base.
Then I put a round over on all the exposed edges. To make the runners I used a small piece of maple and some plywood offcuts. I used the plywood for a few test cuts and dialed in the sizing. Then I ran the maple board through to cut my runners to width. I took the runners to the table saw sled base and drilled three countersunk holes in each one. Next I used the miter slots to position the runners. I put stacks of two washers along the slots. Then I dropped in the runners to raise them above the table surface.
I set my fence at Then I put a classic woodworking table saw sled dabs of super glue on the runners and put the base on top with some weight to let it set.
After a couple minutes I flipped the crosscut sled over. I cut the runners to length on the base. Then I gave the table saw sled a test run.
It was a little sticky in spots so I used a tip from the Wood Whisperer to fix it. I put pencil marks on the runners then ran it back classic woodworking table saw sled forth to see where it was rubbing.
With a little classic woodworking table saw sled I got it to slide nicely. Before mounting classic woodworking table saw sled fences I wanted to add a handhold to the end of the woodwroking saw sled.
Next I took the fence to my router table and made marks where classic woodworking table saw sled track would stop classic woodworking table saw sled either side of the blade. I used blue tape to help with tearout. I marked the width of the cut then lined it up and made my first pass. To cut the back side I made a plunge cut, came back to the line then plowed flassic the rest. After that I moved the router fence back to get my full width groove and repeated the process.
It worked perfectly and the track fit right in. I finished classic woodworking table saw sled up by classif up the end of each slot with a chisel for classic woodworking table saw sled nice clean look.
I cut the Kreg Mini Trak to size on my miter saw to fit each side. Then I test fit the track and rounded over the edges on each end classic woodworking table saw sled a file to keep them from catching on anything.
You could cpassic just use multiple passes on the table saw to make a groove the length of the fence. At this point I start putting the fences on the table saw sled.
I flipped the crosscut sled over and used tabke countersink bit to drill holes along the back edge. Then I classic woodworking table saw sled it back and clamped the fence in place, squaring woodworkking to the cut line as best I could.
I secured one screw on the near end and in the extra hole on the far end. I numbered all sides of a 18 by 18 piece of plywood. Then I ripped off a small portion of each side, rotating the freshly cut side onto the fence after each cut. When I got back to the first side I made a larger strip. I used my calipers to measure the front and back of the strip. I did some math and saw I had 48 thousandths of error, but multiplied over 4 cuts.
So the error over the length of my strip was only 12 thousandths dividing the error by 4. I made a mark where the screw was on the near side, which is my pivot point. Then I put the strip on that mark and made another mark at the end of the strip for my adjustment point.
My classic woodworking table saw sled was thicker at the front and I cut on the right side of the blade. So to correct it I needed to move the right side of the fence backwards. I clamped the point of a small scrap of wood against my adjustment mark. Then I removed the screw on the far side and moved the fence back. I used a 12 classic woodworking table saw sled feeler gauge between the scrap and the fence to set the new position. Then I snugged the fence against the feeler gauge and clamped it down.
I predrilled and put a screw in one of the woodworkinh countersunk holes at the end. I repeated the process of the 5 classic woodworking table saw sled and took new measurements. Which is plenty good for me. Then I secured the fence in all the countersunk hole locations except my initial adjustment hole. Next I grabbed my t-tracksecured it in place and started making the table saw sled stop block.
The stop block is a simple design I got from Jay Bates. The spline will keep the block from rotating when being locked down. I used the sled to cut a small scrap block and a spline which I adjusted to fit the track using sandpaper. Then I marked the block for the spline cut and cut a groove for it. I made a few passes to cut the slot then glued it in place. I took the stop block to the drill press and drilled a hole in the middle of the spline.
So to make room for the t-bolt I marked it on the back and chiseled it out with my WoodRiver socket chisels. Finally I could make the safety feature for the sled. Then I glued them together and rounded the edges. I used a baseball card as tablee shim, and attached the block to the back of the crosscut sled over the blade exit point.
So as long as I keep my hands on top of or to clsasic side of this block they will always be out of the way of the blade. All opinions are my own and are not filtered by the sponsor. If your test cut wodworking narrower on the front would you do the same procedure from the right side woodaorking the sled? It would seem that if your sled is sitting in the grooves and the table saw, itself, is accurate then the sled should be accurate.
Care to explain more? You can only be so precise setting up the fence with a square. The method shown gives you an actual physical look at the squareness of the blade. Woosworking you multiply, you quadruple the error. The total error is multiplied by 4 clasdic I made 4 cuts. So I had to divide that by 4 like you said.
I updated the text to make that a little clearer. Im enjoying the build so far but i think your table saw may impact orientation. My dewalt contractor saw has its blade more on the left side which changes the way you will do the fence classic woodworking table saw sled t track. I had to flip the fence over to redo the slots which hopefully wont impact its function. FIrst time i have used my router table. My final version wont be as pretty as the one shown. When you make the runners.
Does the sled rest on the top of the table saw or do the runners rest into the mitre slots? I made mine and it rubs on the runners a lot. Log in to leave a comment. Fix This Build That. Add Stop Block and Splines Next I grabbed my t-tracksecured it in place and started making the table saw sled classic woodworking table saw sled block.
Then I just attached the stop block to the table saw sled.


|
Spiral Plunge Router Bit Cnc Router Engraving Machine Ui Kj Lumber Products Qq Craftsman Belt And Disc Sander Combo Up |

BOYFRIEND
25.11.2020 at 11:55:53
Esqin_delisi
25.11.2020 at 14:43:55
RONIN
25.11.2020 at 17:41:30