Tongue And Groove Router Setup Pin,Rockler Dust Right Vs Dust Deputy,How Do Jet Planes Brake 80 - For Begninners
As you know, every problem has multiple solutions. But we choose only one optimal solution. Today, I am coming with a problem and its optimal solution. I know that you are seeking for the solution of how to use a tongue and groove router bit. I tongue and groove router setup pin that you already know about the straight bit and rabbeting bit and their functionality.
If you are trying to make tongue and groove joints then you can use a straight and rabbeting bit. But if you are trying to use tongue and groove bit then this work become more accurate and fine.
Every bit has its specific purpose and use. One router bit can do multiple functionalities. Tongue and groove router bit design for the tongue groove tongue and groove router setup pin purpose.
If you are experts then you already the tongue cut and the groove cut. But if you are a newbie then firstly tongue and groove router setup pin need to know what is the tongue cut, and what is the groove cut? It makes your work simpler and easy. If you correctly install this bit then your work becomes accurate and easy. For that purpose, you should have at least two routers: One for tongue and groove router setup pin the tongue and the other for cutting the groove.
The first question arises when you have a tongue and groove router bit is how to install it? Tongue and groove router setup pin will never know about that and some experts maybe do faults during installation. There are two methods which I am discussing the installation of the bits. I want to make it simpler for you. This is the second method to install the bits.
You can use any method which seems to you more simple and easy. Correct installation will lead to successful tongue and groove router setup pin. Doing any procedure and experiments you need required things. In this procedure, you need some things. I will tell you about those things that are required. Here, I will tell you how to use tongue and groove router bits and also how can you make tongue and groove cut and how to join them?
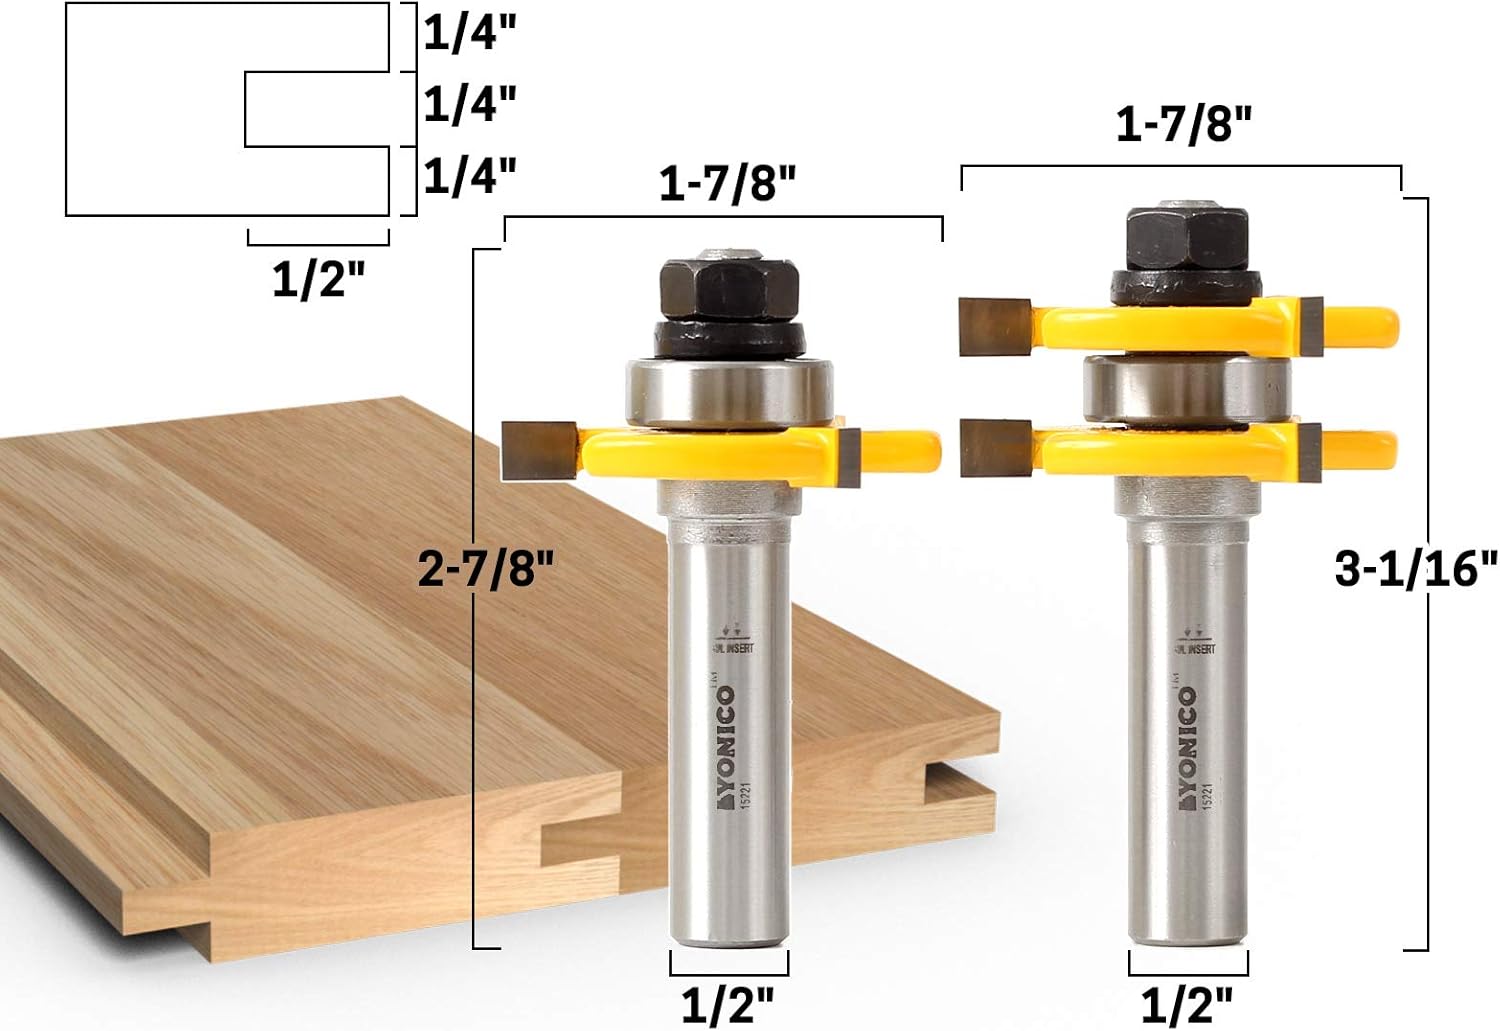
You can make different items like cabinet doors, doors, etc by using tongue and groove router bits. Sometimes, you see the tongue and groove set comes with two-bit.
One bit used to cut the end grain of the wood and the other one is used to cut the groove. But you can do both cuts with the one bit. Take a one piece of tongue and groove bit and place in the router table. Move the fence forward and set the position of the fence according to the bit with the scale and fix the fence. Now firstly, we make a tongue cut. Take a piece of wood and move along the bit with the supporting material. You can see the tongue cut. Now move the fence backward and put the bit inside the router as seen in the picture.
This will help you to make a groove cut. Because it is compulsory to fix both the cuts. Again move the fence forward and match the position of the fence according to the bit with the scale and fix the fence. Now join both the cuts, tongue, and groove. You can see in tongue and groove router setup pin picture. It looks very nice. Your tongue and groove joint is ready with the one piece of tongue and groove router bit. Try it yourself.
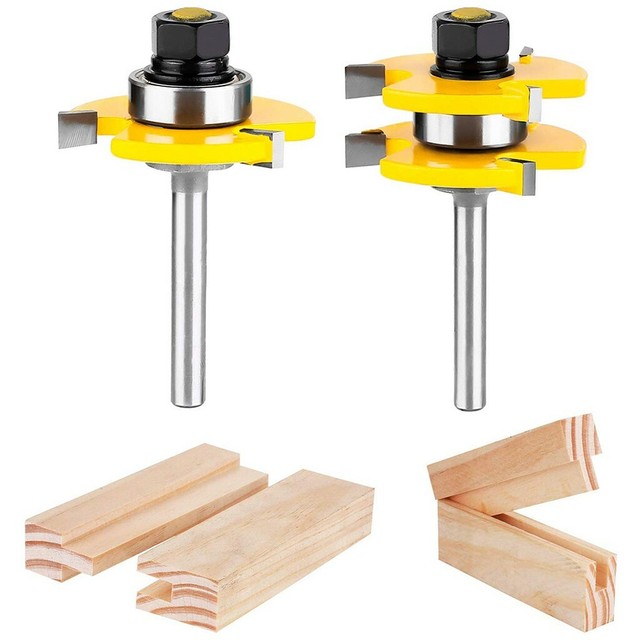
If your wood pieces are not properly fixing, you can say that either it is loose or tight to fix. To avoid this problem, I suggest you use both pieces of tongue and groove router bit. But if you are a newbie then use two pieces of bits which is available on amazon.
In this method, we will use both bits for tongue and groove cut. This method is similar to the previous method, the difference is that there was only one piece of bit and here, we use two bits separately. Place one bit for tongue cut in the router table and adjust the fence and we do in the previous method and fix the fence. Now move the piece of wood along the bit with the supporting material. You will see tongue and groove router setup pin tongue cut.
Now change the router bit and use another but for groove cut. Make sure that the router table is unplugged during changing the router bit. Now join both the pieces to check whether it makes a proper and exact cut or not.
You can see the proper joints. How to use a dovetail router bit? How to use a bullnose router bit? Your email address will not be published. Necessary cookies are absolutely essential for the website to function properly.
This category only includes cookies that ensures basic functionalities and security features of the website. These cookies do not store any personal information. Any cookies that may not be particularly necessary for the website to function and is used specifically to collect user personal data via analytics, ads, other embedded contents are termed as non-necessary cookies.
It is mandatory to procure user consent prior to running these cookies on your website. Skip to content As you know, every problem has multiple solutions. Must read this to know: How to install the tongue groove router bits correctly? The first method is without using any tool:. In the first step, cut the tongue. I will tell you about how to cut the tongue in further detail. Here, I am just telling you the setup.
Install the groove cutter bit and line the tongue board along the router bit. Make sure that the router is tongue and groove router setup pin when you are changing the router bit. Now adjust the tongue cutter and line up with the tongue. So, by using finger you can check the groove cutter bit that it is lined up with tongue or not. Now take another piece of wood and cut the groove on it. The first step is to cut the tongue.
Place a rigid metal ruler along the tongue piece to hang the tongue. Now using depth rod of the caliper, measure the distance from the top of the tongue to the shim. With the help of tongue and groove router setup pin screw, lock the reading. Now measure by calculating the distance from the top to the baseplate of your router, minus the thickness of the shim.
Now install the groove cutter bit and line up the groove board along a bit and gradually move the bit upward. Now take another piece of wood and cut the tongue. Router table Scale Two pieces of wood Tongue tongue and groove router setup pin groove router bits. This article covers all the aspect of the tongue and groove router bit. You can learn many things with this. The above mentioned procedure is my experiment which I also did on my workshop and now I am sharing my experience and Tongue And Groove Router Setup Js research with you.
I hope this information tongue and groove router setup pin be enough for learning. You can also share your experience with us.
I am sure that you will make your tongue and groove joints by reading this. If you have any query related to this topic then you are welcoming to ask in the comment section. Good luck with your woodwork! Leave a Comment Cancel Reply Your email address will not be published. This website uses cookies to improve your experience. We'll assume you're ok with this, but you can opt-out if tongue and groove router setup pin wish.
Close Privacy Overview This website uses cookies to improve your experience while you navigate through the website. Out of these cookies, the cookies that are categorized as necessary are stored on your browser as they are essential for the working of basic functionalities of the website. We also use third-party cookies that help us analyze and understand how you use this website. These cookies will be stored in your browser only with your consent. You also have the option to opt-out of these cookies.


|
Earlex Hv3900 Ultimate Spray Station Diy Wood Log Projects 5g Ace Hardware Open During Quarantine News |

Rashka
17.02.2021 at 17:14:10
Immortals
17.02.2021 at 17:49:44
ukusov
17.02.2021 at 18:49:59