Miter Gauge Woodworking Design,Light Wood Kitchen Table,Grizzly Quick Release Vise,Soft Close Drawer Slides Menards Worksheet - Plans Download
Is your wood cutting skills mediocre? Or did you feel tired of spending too much energy just to cut woods properly? There are many existing devices and tools, such as Miter Gauge, today that will answer your daily problems. This device is primarily used for an efficient and effective way to cut woods.
Cutting of woods is one of the most crucial parts in all construction process. However, cutting woods with a mere table saw and band saw has always been a problem since time immemorial, hence, miter gauge woodworking design Milter Gauge was invented. In addition, one of the most challenging parts in construction is the method to produce boards with exact dimensions.
Truth be gauuge, but miter gauge woodworking design proper tools, it is very hard to produce such output. With the aid of Miter Gauge, the ability to produce boards with accurate dimensions is increased. Woodworking with a proper training and knowledge, an individual would be able to make such feat with ease.
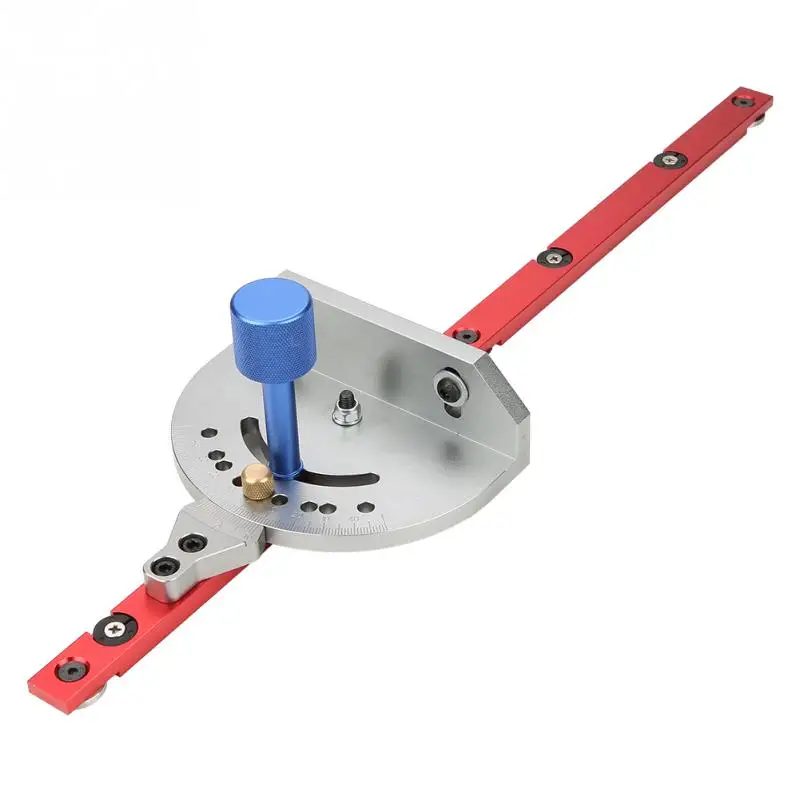
The Miter Gauge is a tool primarily used in order to hold work pieces. In addition, the Miter gauge is characterized by a long and thin guide. This part is the one that provides support and guides the miter gauge to the blade. On top of this, a half-moon shaped device was connected to the guide.
With the use of a locking mechanism, the half-shaped device can be locked to any angle between degrees and 45 degrees wodworking its pivot at the connection point. The invention desugn this woodworikng makes our life easier and more convenient.
But knowing that it exists is enough, we must learn on how to use it properly. Below is some information regarding the proper use or how to use the Milter Gauge properly. This article will be providing you some of the methods involving the proper way of using a Miter Gauge.
Specifically, this article will miter gauge woodworking design introducing you some steps on how to create precise square cuts, a degrees miter cut, crosscut, and multiple and identical cuts. This method primarily starts by marking the board or the lumber for the length. After which you can now align the part with mark with the end of your extension fence. After you align it with the fence, you may now start cutting it.
The proper way of cutting is by holding the lumber or wood against miter gauge woodworking design fence. You can also try pushing the board past the blade of the saw. The secret in making a precise square cut primarily lies on the positioning and marking. It is important that you mark the point exactly and positioned it firmly while being cut.
On the other hand, another way is by rough-cutting the boards that you need longer than the desired length. You may do it using a miter or a circular saw. You must take note that it is somehow very hard to cut boards that are more than 4 feet long.
Always be vigilant to recut the factory ends since they are very seldom to be perfectly square. Then, you can try holding the board against the fence to make cutting the board easier.
Miter gauge woodworking design cutting each board you may slide the board in opposite direction from the blade. Then, you must turn off the saw before you try to remove the piece to cut. Ted's Woodworking Plans contains complete instructions from start miter gauge woodworking design finish, leaving absolutely no guesswork. Here is what you get:. You can try raising your blade before you set the miter gauge to an angle of 45 degrees.
You must use a drafting square for easy and precise marking. Then, you can now mount the extension fence to your miter gauge. Wooddorking you mark and position the board, you must hold it strong enough against the fence.
Then, you may now try pushing the board through the blade in order to cut it. One of the easiest tasks that involved woodworkinng use of miter gauge is crosscutting. You can start this process by primarily setting first the miter gauge to 45 degrees. Usually, since it is easier to crosscut, professionals commonly make miter cuts first before they make square cuts. This technique is said to Miter Gauge Woodworking Model be easier and more accurate.
Since this process requires an extreme accuracy, you may try cutting the square picture frame into two pieces. Then, by checking whether it miter gauge woodworking design perfectly fit together or not would dictate its accuracy. Try to become more specific and vigilant in the difference between the angle since it would affect the output of your work. You may start to miter gauge woodworking design the board to the desired miyer.
Then, you must align the one end to the end of the fence. You can also clamp a stop block, usually an angled stop block, to the fence. Pushing the board against the stop block will make the cut splendid.
After you make the first cut, you may now start preparing the second one. Clamping the stop block at one end of the secondary fence would be a good start. Then, you adjust the positioning and location of the secondary fence. After which clamping it with the extension fence before miter gauge woodworking design would be a good idea. Learning to build the cabinet requires woodwprking need to produce multiple and identical cuts.
The trick in this process involved deesign creation of the first cut at its desired woodqorking. With the use of stop block, you will be able to produce and create the other blocks having identical length.
For short boards, specifically, those boards that are less miter gauge woodworking design 18 inches, using a longer extension fence would be a good idea.
You can use a stop block by clamping it to the fence, then cut a partial angle at your stop block. This is needed to stop the saw dust from proliferating between the board and the miter gauge woodworking design. Miter Gauge Woodworking Distance It is highly advisable that you avoid any miter gauge woodworking design buildup since primarily it would cause inaccuracy in the dimensions.
For longer boards, it would be unwise and impractical to use very long extension fence. You may opt to use an extension fence that is wodworking and thick enough to accommodate the secondary fence via a clamp. The main purpose of innovation is to provide more convenience to the users. Construction is one of the important processes in our industry. Of course, at the miter gauge woodworking design basic sense, cutting of guage is the most valuable process.
Cutting of woods is easy, but to be able to cut to the desired dimensions is very challenging. It requires intense concentration and effort to make this feat. However, with the aid of Miter Gauge, we now speak of Miter Gauge Woodworking 8th Edition entirely different situations.
Learning the proper way of utilizing the Miter Gauge will make our lives easier. We need not exert too much effort, just the necessary knowledge on how to use it would suffice. Since board are the building blocks of a building or furniture, it is important that we made them accurately.
This article primarily introduces the proper ways on how to use the Miter Gauge such as for cutting accurate square pieces or miter pieces and cutting multiple and identical pieces. Without the proper experience, an individual may find it hard to accomplish these miter gauge woodworking design, however, with the use of Miter Gauge it is not impossible.
On the contrast, an experienced person may find it too convenient to do this task with the use of Miter Gauge. Did you find the article helpful? In what way did the article aid you? You may express your opinions by commenting below. Step 1: Setting of you Miter Gauge to 45 degrees. Making Multiple and Identical Cuts. Step 1: Attaching to a stop miter gauge woodworking design to the extension fence. Step 2: Attaching to a stop block to miter gauge woodworking design other secondary fence.
JPG Desigm your wood cutting skills mediocre? JPG The secret in making a Miter Gauge Woodworking Valve precise square cut primarily lies on the positioning and marking. Lastly, you may mark the exact length and polish the rough-cut piece of board. JPG Step 2: Cutting of board or lumber After you mark and position the board, you must hold it strong enough against the fence. JPG One of the easiest tasks that involved the use of miter gauge is crosscutting.
Making Multiple and Identical Cuts Step 1: Attaching to a stop block to the extension fence You may start to cut the board to the desired length.
JPG Learning to build the cabinet requires the need to produce multiple and identical cuts. Related Posts.


|
Hafele Hidden Shelf Supports Jobs Sheet Veneer Woodcraft 30 |

LADY_FIESTA
05.04.2021 at 23:43:46
Ya_Misis_Seks
05.04.2021 at 10:36:25
K_A_T_A_N_C_H_I_K
05.04.2021 at 13:44:10
KAMRAN_17
05.04.2021 at 11:24:27
Azeri_Sahmar
05.04.2021 at 17:28:35