Milescraft Sign Pro Kit 40,Building A Woodworking Tool Cabinet App,Cool Woodworking Projects Easy Joe,Diagram Of Marking Knife Difference - Easy Way
So far I have made several signs using different woods and am very satisfied. My only suggestion to users is to read the instructions, be patient and take your time. So far I have no issues with the SignPro, only my lack of experience. Given that, the few signs I have made still came out well.
The customer service has been great. The clamps used to hold it down broke upon the first use. Other than that my husband is happy with it. He made a couple of items and says it works well.
Good product, chewed up a few templates, due to impatience. Reordering was a snap. Wish there was more quick release technology in the product.
But, it works as advertised. Works great — have made many signs — did not experience any of the issues raised in other reviews. I needed to make some signs for our local Open Land Trust. I looked into Milescraft and Rockler templates. I wound up buying both because neither company had all the letter sizes I needed.
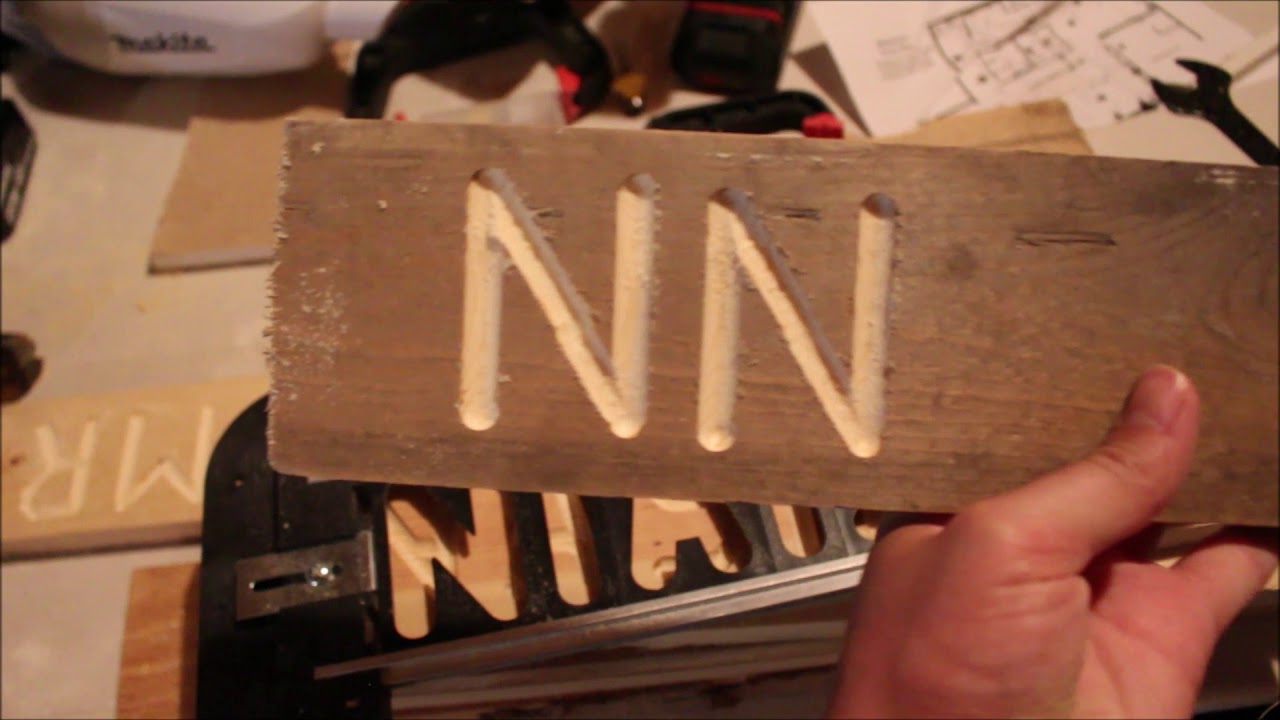
For a first batch I made 4 signs; all alike. I used the Milescraft template for the top two lines and the Rockler for the bottom line. Both templates worked well. One thing I liked about the Milescraft system, besides the longer guide bushing, is that only one pass is required.
With the Rockler system you have to use two separate templates for some letters to complete them. That means you have to change out some individual templates after one pass and go over those letters again to complete the letter. I also like that with Milescraft all the letters for each line stay together so you can make one sign and move the assembly to the next one.
Both systems worked well for me as you can see from the photo that I will try to attach , but I would probably choose to use Milescraft exclusively if they had all the sizes I need. Not too bad for the first time. Painting the signs took at least twice as long. Very happy with the product.
One thing I would like to see is a set of arrow templates. Again good product. Thanks, Marc B. Milescraft does not make special character templates, however, you can create your own templates by purchasing material and cutting it out.
You will then need to draw or stencil the desired character onto the material and then cut it out. This will allow you to create a character to your desired height. You will need to draw or stencil an arrow onto the material and then cut it out, a jigsaw would work for this application. This will allow you to create an arrow to your desired length. How do I use the centering pin to center the base plate on my router? This is not an extremely tight fit as the centering happens from the convex area of the pin.
To use, simply twist the desired bushing into place. Unfortunately, we do not offer additional font templates at this time. However, there is a product that can do other sizes and fonts. It is called the PantographPRO. A pantograph works from tracing a paper stencil 1 character at a time rather than being guided directly by a group of templates, as with the SignPro or SignCrafter.
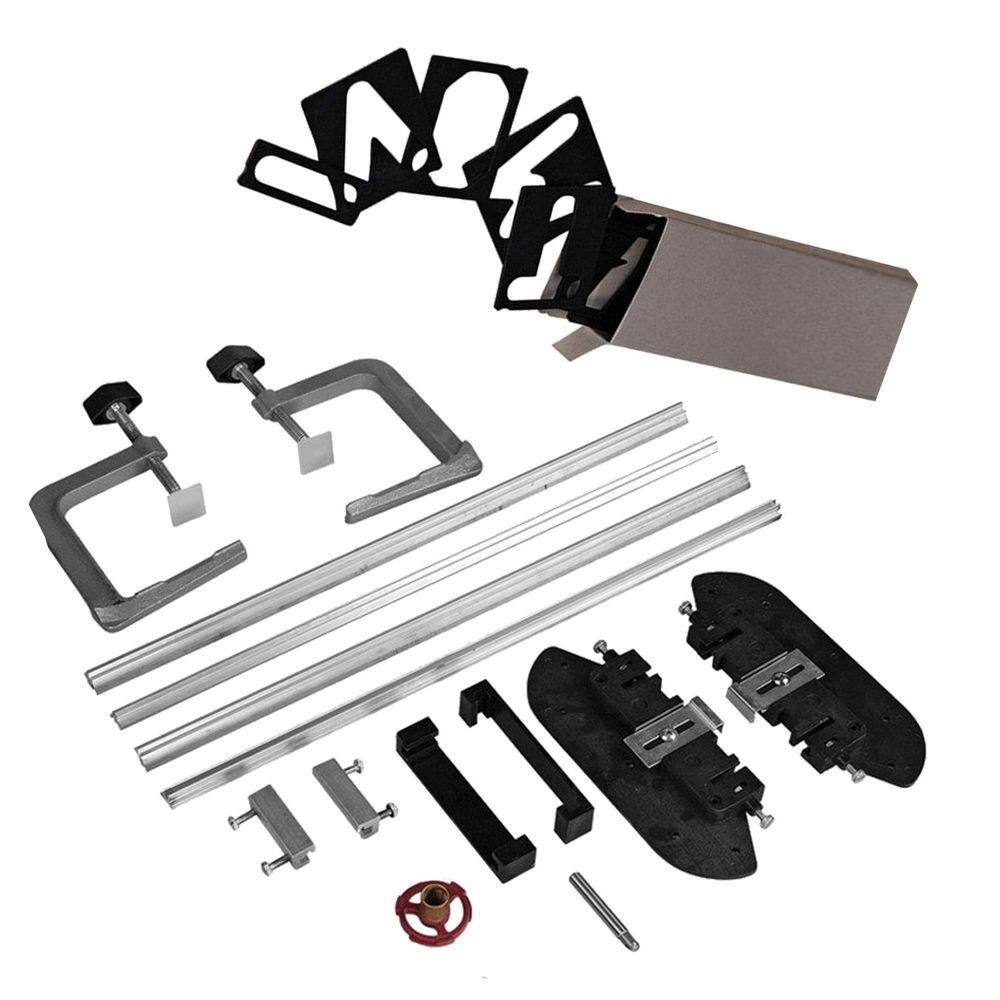
This gives the user unlimited font capabilities. This will ensure that your router bit does not come in contact with your templates. Rails can be custom cut to the desired length. Please contact Milescraft Customer Service by phone or email, and we would be happy to assist you with your custom rails. You may also find it beneficial to clamp down the support bridge to ensure that the letter templates do not come lose while you are routing.
Currently, Milescraft only makes vertical number templates that can be purchased as a set. While we do not manufacture vertical letters, there is a router forum that outlines a process on how to create your own set up to do this. With this modification, you will be able to create vertical signs. What type of cuts do the different router bits make and what are they used for? Round Nose Bit: Single passes on stencil will create a round bottom cut. Not recommended for situations where an even surface is desired at the bottom of a cut.
Flat End Bit: Creates vertical side walls while cutting. Works well with the Old English stencil, creating protruded letters and in situations where an even surface is desired on the bottom of the cut. V-Groove Bit: Creates engravings with variable widths based on bit depth. When used at a shallow depth on a level board, it is ideal for detailed designs and line drawings. Also is effective at outlining letters.
Some Ryobi routers require special screws which will be supplied upon request at no charge to you. To acquire these special screws please contact Milescraft Customer Service via email, info milescraft. It is not required to use a plunge base router with this kit. Below you will find information on using both types of routers so you can see the difference in operation. If using a fixed base router: Lower router bushing into letter opening. Lower bit into the wood until router base is resting on both rails.
The router bushing traces around the letter opening. When the letter is complete, turn the router off. When the motor stops, remove router.
Sign in or Create an account. Please wait Carbide Processors, Woodworking Tools. We're here to help! Give us a call at:. Filter Your Results. Our Newsletter. The stencil is held in place by a transparent plastic sleeve and thumb tacks.
Stylus is supposed to move just a little bit above the plastic without touching it. It was easier for me to be able to push the stylus on the stencil therefore I had to use many thumb tacks to hold it firmly in place, otherwise the sleeve would warp.
Perhaps thin acrylic sheet would work better. It takes a bit of practice to produce nice signs. It is recommended to try the jig first on a scrap material to get a feel of it. One cannot make a whole word in one go. Letters have to be made one by one. That slows down the whole project. It is also a bit tricky to get the spacing between letters right, therefore there are spacing marks made on the templates.
Following lines with a stylus is not that easy and takes some experience. However this jig is capable of producing very nice signs once you get the hang of it. PantographPRO is more versatile than a SignPro, as there are no limits to the fonts one wants to use. Anything can be printed or drawn on paper and copied on wood with this jig, whereas SignPro allows only the use of font provided.
However, this jig is a little bit more difficult to use in my opinion. Also, one has to have in mind that template will be copied in half the size, therefore there may be a need to enlarge the stencils. Jessica Randlall was most helpful, a few test and I was on my way to my first sign.
Thanks, I wish other transactions could be as smooth as this was! Ordered this for my husband for his birthday. He loves it! Took a but of time to make the jig for it. Love it! What type of cuts do the different router bits make and what are they used for? Round Nose Bit: Single passes on stencil will create a round bottom cut. Not recommended for situations where an even surface is desired at the bottom of a cut. Flat End Bit: Creates vertical side walls while cutting.
Works well with the Old English stencil, creating protruded letters and in situations where an even surface is desired on the bottom of the cut. V-Groove Bit: Creates engravings with variable widths based on bit depth. When used at a shallow depth on a level board, it is ideal for detailed designs and line drawings.
Also is effective at outlining letters. It is possible to create your own stencils. This gives you the flexibility of different fonts and different sizes.
Please visit the following link for more information on how to accomplish creating your own stencils. How do I use the centering pin to center the base plate on my router? This is not an extremely tight fit as the centering happens from the convex area of the pin. To use, simply twist the desired bushing into place. Some Ryobi routers require special screws which will be supplied upon request at no charge to you.
To acquire these special screws please contact Milescraft Customer Service via email, info milescraft. If your router comes with a dust deflector, we recommend installing this before routing. What do I use for the starting and finishing points for the Modern font?


|
Sign Making Router Jig 70 Pocket Hole Jig 300 00 Woodturning Magazine Uk Keyboard Woodwork Workshop Zip |

WENTWORTH
24.05.2021 at 17:54:33
SEXPOTOLOG
24.05.2021 at 10:36:26
Brat_MamedGunesli
24.05.2021 at 20:54:46
XESTE_USAQ
24.05.2021 at 19:13:52