Layout For Small Woodshop,Utility Warehouse Router Login 60,Installing Rear Mount Drawer Slides Linux - Tips For You
My shop is small! Which is only about square feet. The size of my shop makes it difficult to capture pictures of the entire space. Recently I designed a new shop project in SketchUp and I had an idea.
I could use SketchUp to design my entire shop in 3D. The SketchUp models I used for this post are a combination of my designs and models I sourced from the SketchUp 3D Warehouse dust collector, table saw, bar clamps, etc. This post contains affiliate links to supplies or tools I used to complete this project. Purchases made using these links help support the Saws on Skates website and allow me to share more DIY projects. There is no cost to you for using these links.
Click here to visit my site policies. Before we get into my small woodshop layout , be sure to click the subscribe button at the bottom of this page to sign up for my FREE weekly newsletter loaded with helpful pocket hole tricks , space-saving workshop ideas , clever DIY tips and more! My shop is only about square feet. The tools in my woodshop are mounted on wheels to maximize space.
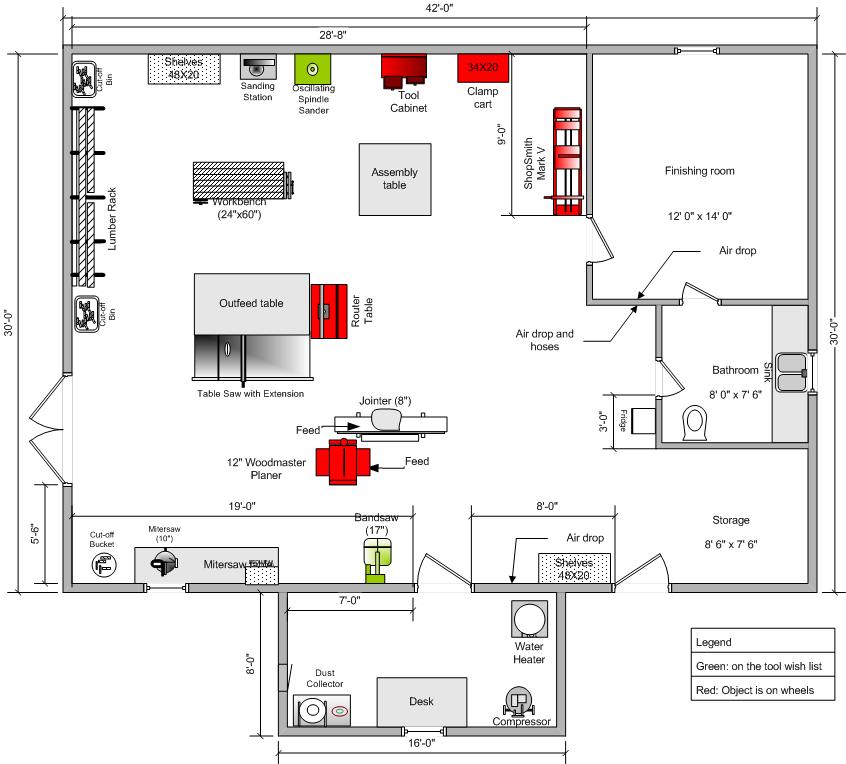
In my woodshop floor plan, you can see where I generally setup my tools. I say generally because as I mentioned the tools are mounted on wheels. The area connects to two doorways. This area needs to be kept clear to enter and exit the shop. My miter saw wall serves two purposes. The actual miter saw stand I use in my woodshop is slightly different from the one you see in this sketch.
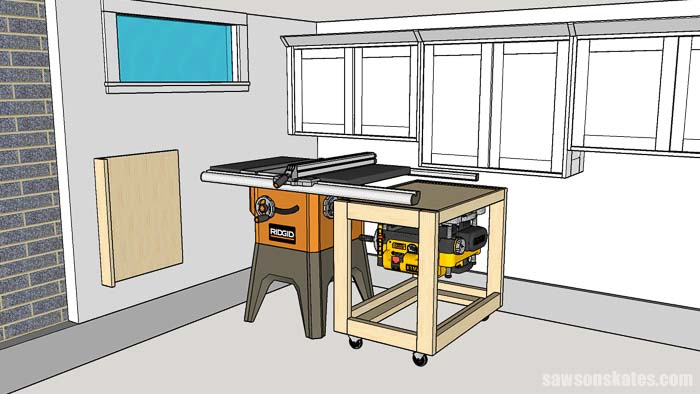
The miter saw stand I use in my shop was built using plans from a woodworking magazine. The miter saw station you see in the sketch is my design. This portable DIY miter saw station is unique because of the side wings that fold like a pocket knife. The area below the miter saw station is a blank canvas. It would be a great place to add some storage shelves or drawers. The shelves or drawers could be used to store extra saw blades, hand tools and more.
Behind my miter saw is a DIY dust hood that connects to the dust collection system. I also store my Small Woodshop Layout scrap wood on this wall. My goal for the miter saw wall is to build a stationary miter saw stand. I know, I know! But hear me out on this. And second, there is a lot of space beneath each of the side wings that I could use for storage.
In this space, I could add storage cabinets on either side of the miter saw. This would give me a place to store extra saw blades, hand tools, small power tools, router bits, etc.
This area would also be a great place to store tools like my router table. My tool storage wall is one of my favorite areas of my woodshop layout. I built these tool storage cabinets from scratch. The cabinets were installed on the entire length of the wall.
This gives the illusion that the wall is longer than it actually is. The cabinets were painted white to make my shop look bigger and brighter. I built the cabinets with sliding doors.
Hinged doors would need to swing into my shop to open. Swinging doors take up valuable floor space. I recently redesigned this area and installed the DIY tool storage cabinets.
Back to Top. Right now I have a dust collector from Harbor Freight. Plus, the wall behind the dust collector is wasted space. My first goal for this area is to move the dust collector from the floor to the wall.
This means mounting my current dust collector on the wall or buying a new wall-mounted dust collector. Mounting the dust collector on the wall will free up valuable floor space. Many of these conversions required some metal fabrication, etc. That means I would probably buy a new wall-mounted dust collector rather than trying to convert my floor-mount dust collector to a wall-mount.
My second goal is to make the wall more functional. This area would be a great place to store scrap wood. The clamp rack and fastener area are located in the entryway of the woodshop. The floor space needs to be kept clear, so nothing else can be stored in this area.
Clamps are stored on a DIY wood storage rack to the left of the door. Fasteners screws, nails, etc. The fasteners are stored on shelves mounted between the wall studs. Take a look at the draft of the current layout that I'm thinking of using. I have been using Grizzly's shop Table saw as center of shop. As a college student in Arizona trying to make extra money, Dave Estopinal set up shop in a rented 10x10' storage shed with one lightbulb, no windows, and no fan.
Look what he has now! Not many woodworkers move their sheet goods with a tractor, but this Colorado shop has the space and the equipment, so why not?
It's a 14 foot long, free-standing cabinet built on a ladder frame with hocky-puck feet. The top and shelves are melamine. The shelves are held by Charles The challenge: Create a one-car-garage shop equipped with loads of tools and lots of smart storage at an affordable price.
Think of your daily workflow in your shop like a highway systemand eliminate the bottlenecks and you'll experience what workflow implies: continuous progress. Charlie B's Shop. Designed his shop with two distinct areas.


|
Soft Close Drawer Slides Amazon 4d Drawer Hinges 02 10 Table Saw Blade Flat Top Light |

SHADOW_KNIGHT
08.01.2021 at 23:32:46
QIZIL_UREY
08.01.2021 at 23:52:41