Diy Router Table Insert Plate,Rockler Bench Cookies Uk Code,Fine Woodworking 2013 Outdoor Projects Magazine Amazon - PDF 2021
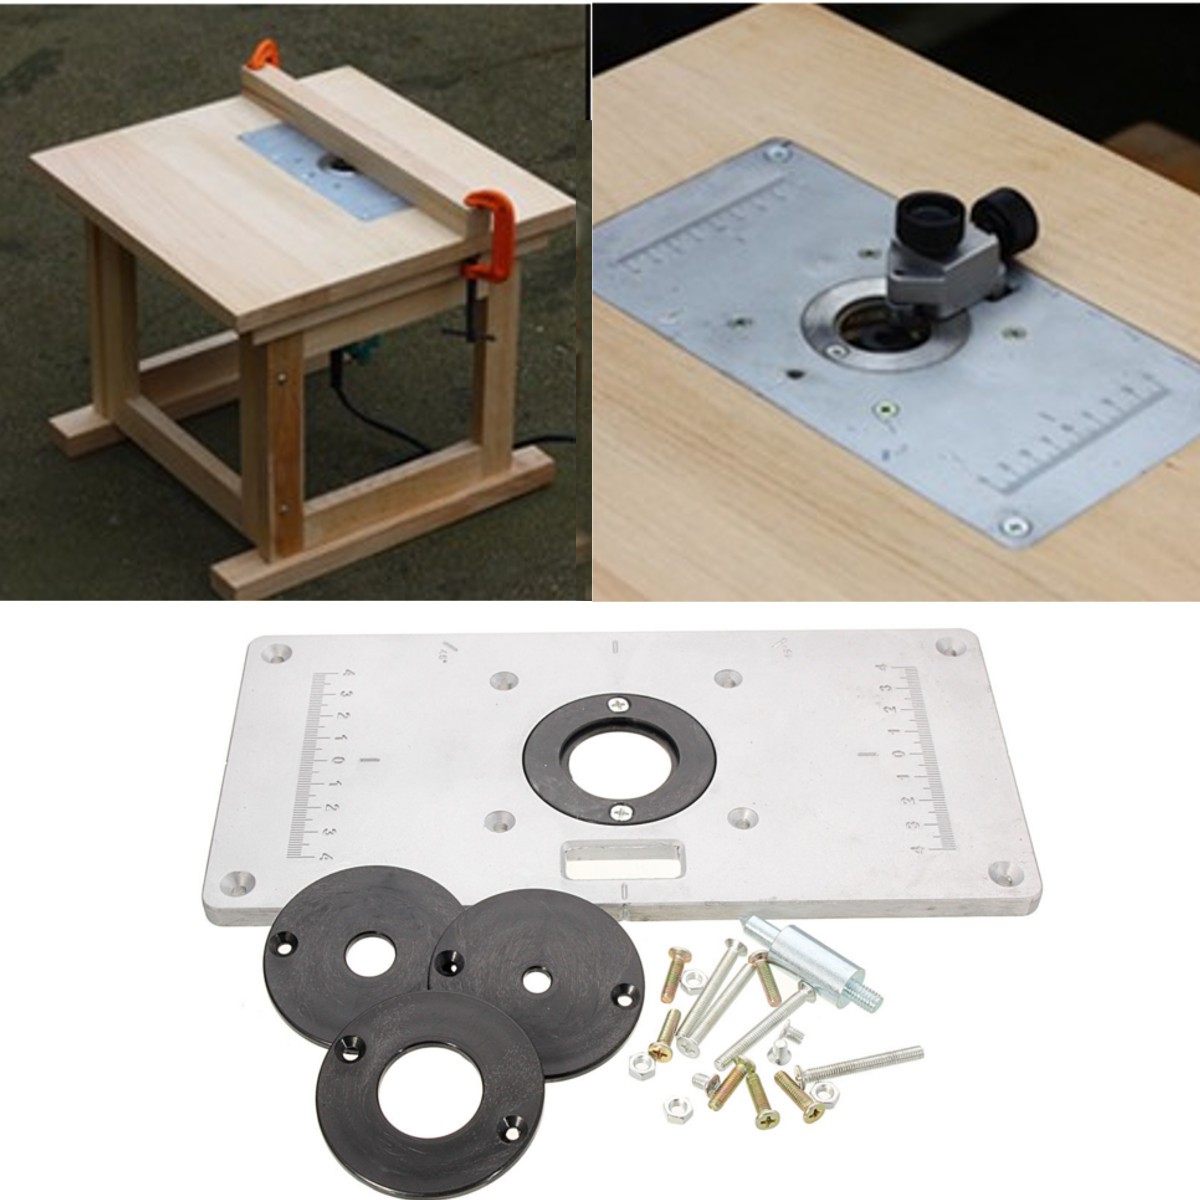
Years ago, I purchased a second hand router table thinking it would make it easier to make rabbets on long edges and faster dih make those beveled edges. I quickly however abandoned the router table tabe frustrating attempts to change the bits diy router table insert plate poor results diy router table insert plate to a router insert diy router table insert plate was diy router table insert plate flat nor perfectly flush with the table top.
I recently got my hands on the new Rockler Pro Lift router liftso I decided to make a custom router table and fence, with integrated T-tracks and dust collection. It has a button that allows you to eject the throat plate so you can easily access the bits. The other cool feature is the lift itself: one gear allows you to micro adjust the bit height, while the other allows you to fully lift nisert router so you can easily change the bit.
I started by measuring the insert plate, then roughly marking it out in order for it to sit dead eouter of the top. With the lift positioned upside jnsert on my markings, I traced out the contour. The insert plate needs to be countersunk so it will sit on a lip, so I traced out a smaller box inside the first one.
I made sure to leave some room in the corners where the inset plate will screw down to the table. I cut out the inner box using my jigsaw. I fist made relief holes with a drill to make the corners easier to cut. I made some makeshift fences that I stuck down with double sided tape right up against the contour lines.
To countersink the router lift I used a flush trim bit with a top bearing that will ride along a diy router table insert plate. I set the bit to the diy router table insert plate depth, then went around in a clockwise insdrt.
I went ahead and clamped another makeshift fence up ibsert the line, then inxert the T-track as a spacer, and clamped inserrt fence one the opposite side, making sure not to oversqueeze it, so that the track could still slide freely.
With my makeshift fences in place, I set my flush trim bit to the right depth and went to town. I used some Weldbond glue to glue down the tracks. I used some dowel to help clamp down the tracks and let it dry for 24 hours. My idea was to laminate the melamine top with plywood to make it more solid and dead imsert. I piled up both pieces and transferred the outline of the hole onto the plywood, then used my jigsaw to cut out the hole.
To finish off, I decided to add some hardwood trim around the sides of the table to protect the fragile inssrt and simply to to give the table a more polished look.
Dly marked off where the tracks hit the edges of the table and cut a dado into the trim to make sure I could still slide in my T-bolts once the trim was in place. With the eouter complete, I moved onto the fence. I spaced the track 1 inch from the top of the melamine strip, and just as before I clamped down one fence and used rojter track as a spacer to clamp down the second fence.
After a dry fit and checking that the track was below the surface, I used some Weldbond glue to secure the track. In any case, I used my dowel trick to help clamp down pkate track and let it dry for 24 hours. I just used a hole saw for this, and then finished off diy router table insert plate cut with my table saw. My main goal here is to make the front of the fence perfectly flat and square.
For that reason, I added in these little triangles, and checked for square as I went. I secured the dust port using Weldbond glue which is supposed to adhere to both plastic and wood, and so far that seems to be true. You could always make this dust port using wood, but I found this one for only a few dollars on Amazon, so I plqte diy router table insert plate step.
I added some screws from the back, careful not to hit the T-track with any screws. Alright, diy router table insert plate last step is to mount the fence onto the table. With the fence in position, I made a mark in line with the tracks so I diy router table insert plate drill the holes.
You rouer use the washer they come with along with a star knob. That completes part 1 of this build. I then screwed the plywood to the melamine from underneath using some 1 inch screws.
I finished off by squaring off the edges nice and flush using my router and a flush trim bit. Get New Projects in Your Inbox! First Name. Related posts:.
Ultimate Lumber Storage Cart. Dust Collection for Small Shop. How to sharpen an old axe. How to restore an exterior wood door. Router Cabinet.


|
Pumpkin Carving Kit Disney Tracker 10 Inch Table Saw Blade Thickness Woodturners Branding Iron 40 Interior Door Woodworking Plans 04 |

midi
28.06.2021 at 19:37:27
Student
28.06.2021 at 20:51:32