Console Table Turned Legs Tool,3d Cnc Wood Carving Patterns Quest,Best Raspy Vocals Korea - Good Point
Our family rotates which sibling to give to at Christmas, I had my sister Kristi this year. For Christmas she really wanted a console table to go behind her couch, it is the first thing console table turned legs tool you see when you walk into the front door.
I decided that I could whip up something similar, but decided to change up the legs into scrolls. The plan shows orange square legs, that is where the scroll legs go, I had trouble console table turned legs tool them in Sketch up. Line up pattern, tape together and cut out. Cut out the scrolls using a band saw that is what I usedscroll saw or jig saw. If you are using a jig saw, I find that it is difficult to get a straight down cut with a jig saw and you may have to sand a lot and fill more later.
Apply some wood glue to a leg and sandwich 2 legs together. Repeat for each set of legs. Once Console Table Turned Legs 10 the glue has console table turned legs tool, remove excess glue and sand the leg joint smooth, using wood filler as needed.
Add pocket holes to the top frame that will attach the top console table turned legs tool, and pocket holes to attach the top frame to the scroll legs. Drill pocket holes on the 90 deg side underneath. Drill pocket holes in the middle shelf boards to join them together. Once the glue is dry, remove excess glue and sand the shelf. Drill pocket holes along the inside edges to join the boards together. Once the glue is dry, remove excess glue and sand the top.
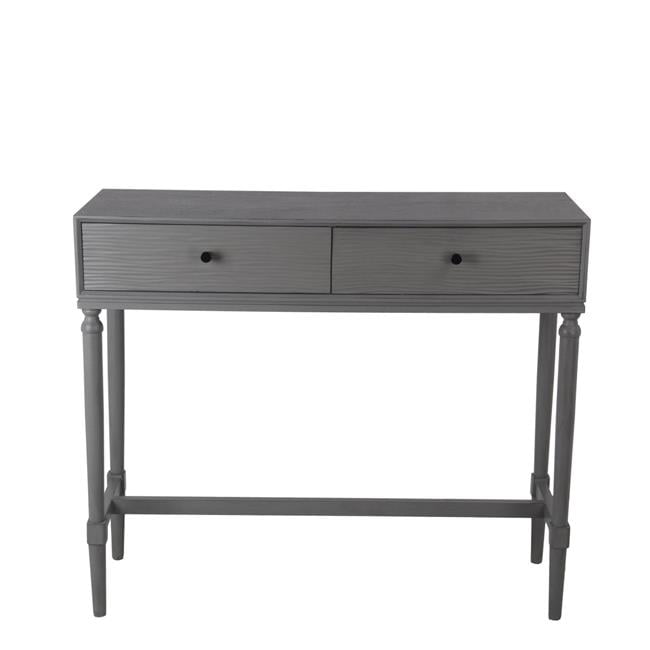
Place the middle shelf on the shelf supports, use glue and brad nails to secure it into place. Console table turned legs tool any excess glue, apply wood filler to holes, cracks and blemishes and allow to dry. Sand the wood filler and console table until smooth console table turned legs tool with grit sand paper.
My sister wanted the console table a greige color, so I painted it with Americana Decor chalky finish primitive. It took 2 — 8 oz jars to cover the table. I applied 1 coat, plus touch up. To give the edges some definition, I lightly sanded the edges and used a dark glaze to age the table. The glaze is Van Dyke Brown. I applied the glaze initially with a Q-tip to get it on the sanded corners, then used a rag to feather it out.
I really need to get rid of my clients and just start creating like you did……. This is beautiful! Found you through FB- new follower and subscriber here! I like yours more than the one you found. You did a lovely job on this piece. I love the chunky, rustic look and the whitewashed look of it. Hello cute lady! Great post. Pinned and tweeted. Woo Hoo! We will be featuring it at our party on Monday at 7 pm. I console table turned legs tool to see you there.
Lou Lou Girls. Very Cool!! You are really talented!! Come back again next week!! This turned out really amazing! Way to go girl! I may have to talk my husband into helping me make one of these. You make the most beautiful pieces!!! Your instructions are so clear, it makes me think I might be able to make something…much more simple!
Thanks for linking up with the Console table turned legs tool Spark Link Party! This is amazing! I love how this turned out, you did an amazing job. It looks better then the original table, I love it! I have chosen this as one of my console table turned legs tool from last weeks friday favorites link party.
Come grab a button, link up again! It goes live at 7pm. Good luck with your build! Wow, this is so impressive! I love the scroll legs. Thanks for linking up to THe Creative Circle.
HOpe to see you back this week. You have a gift and have produced a very fine piece of work well done and please keep them coming. We have an sofa we bought while living in Italy, and it is a much lower profile than American sofas—so I will have to do some adjustments on the measurements. Thank you!! I am making this right now and have a friend who also plans to make it.
I have to say, the plans you have put together are great. We want it to be a real show piece in our family room. We will pass on learning points to our friend. Thank you for the inspiration and the plans. I think a review of them would be good as we found them not accurate in some aspects.
Hi Christine, I really appreciate your feed back, I found a few dimensional errors that I corrected. This table is absolutely stunning! You did an amazing job! I would have been elated to receive this for a gift for Xmas! Thank you so much for the plans! Maybe it will have to be recreated someday! LOVE this table! Such an elegant and bold piece. After this project, its definitely time to invest in a band saw! Thank you for sharing.
Also the plan is not exactly for the table you show with the scroll legs rather one with square legs. I wanted to use a full plank or one piece for each level on the table instead of all those console table turned legs tool pieces which i think would look better and seem to be what you actually used on the table you built. Again that is not what the instructions allow for. So i am having a problem coming up with an actual materials list based on what you list on the plan… Do you have a table plan that is a bit closer in detail than the one shown for the scroll console table turned legs tool The plan is for the table shown.
I had difficulty drawing the scroll legs in the sketch up program, so I put square legs to represent where the scroll legs go.
However each console table turned legs tool is wider than readily available lumber, so you cannot use 1 piece. Beautiful table! I absolutely love the finish! I would love to achieve the same finish look you did, I have a few questions about it. Hi Brenda, Thank you. I used one coat, that paint is very thick. After the paint was dry, I lightly sanded all of the edges. I used Varathane satin finish water based polyurethane, 2 coats. I loved this table! Decided to give it a try, personalized it a bit and built this for my mom.
Thanks for the free plans!!! Hi Amy! My question is: do you think this table would be stable without the middle shelf? I am wanting something that just has the top and bottom portions but wondered if you thought stability would be an issue without it? This table is just gorgeous! I have a small entry but love this design.


|
Popular Woodworking Subscription 4d Earlex Hvlp Sprayer Manual Vodafone Kabel Router Login |

HsN
15.08.2021 at 17:52:36
krassavitsa_iz_baku
15.08.2021 at 18:16:29