Build A Box Out Of Wood,Easy Diy Scrap Wood Projects 50,Woodworking Plans For Beginners Pdf To - Easy Way
Speed Square This is just a simple metal triangle with some markings. Where it comes in supper duper handy is that it includes a 45 and 90 degree angle. If your trying to make accurate cuts across some wood stock, this is the fastest way to make a straight line. One edge has a lip that fits along the edge of the board, then you can use the other edges to draw either a 90 or 45 degree angle.
Even if you have a miter box, you should still have one of these. There are also techniques for marking almost any angle with this tool. I won't go over them here, but I will link to it.
Detailed how-to Tape Measure The venerable and time tested tape measure. The only thing more common than a tape measure is how often people use it wrong. One thing people consistently do wrong is to measure from the end of the tape. I know this sounds like crazy talk, but using the end of tape is somewhat inaccurate if your attempting any kind of precision. Look close at that little metal tang on the end of the tape.
It moves. There is actually a reason for this: The tip of the tape is riveted in place and slides slightly; the length of the slide is the same as the thickness of the tip, to allow the user to make accurate measurements. With a sliding tip you get the same measurement hooking the end of the tape over a piece of lumber or butting the tip into a corner. In day to day work, it's actually a pretty sloppy operation.
If your framing a wall or anything on a larger scale, it won't matter. If your making a box 6' long with tight joints, it matters a lot. I usually pull out some tape and start measuring from the 1" mark, then just subtract an inch from my final measurement.
My projects have gotten a lot more precise since I started doing this. Detailed how-to Saw There are a boggling number an styles of saws. If your building a full shop you should have several types, but for the purpose of this article we just need what is commonly refered to as a Tenon saw or Back saw.
These are the most commonly included versions when you purchase a miter box. The different types of saws require different techniques to use them properly. Popular Mechanics has a great article about some of the types and their use.
For this project, just get the one that looks like the picture below. Often you can get these as a combo with a miter box. I highly recommend a decent quality corded drill. Choosing the right one is often a matter of personal preference. There is a great video Here. You should also get a set of bits. The more the better. I tend to chew them up like bubble Things You Can Build Out Of Wood Queens gum. There are many types.
I found this handy guide. If your on a tight budget, you can just get a standard set of twist bits. There are many types, but the "quick clamp" style have proven to be the most useful as they can generally be worked one-handed. Clamped glue joints are substantially stronger than un-clamped joints.
Always clamp if you possibly can. That should do it for now.. In fact, all three of these could be done in a living room fairly easily. This is a basic method for making a small box using just a mitre box and saw.
I call it the living room method as you can usually get away with this while watching TV if you have an understanding and very attractive wife who is always right Hi honey! It does not require any extensive equipment and can be done fairly quickly. The corners will be simple lap joints , so nothing fancy just yet.
Tools and material: ruler or measuring tape Miter box and saw or table saw Glue Clamps small wood - one 4 foot 1x4 Sand paper For this project I'm using standard 1x4 pieces of Pine from the local Home Depot.
This is the way things are. The jerks. Its like when I used to be able to get a Slim Jim as big as my arm, and now they are barely the size of toothpicks. I had ripped a strip off the boards for another project. Just go with it. The listed measurements are accurate for your project. Try to make the cuts as precise as possible. One tip for this is to measure the next board only after your done cutting the previous board.
If you pre-measure all the pieces, a few of them may be shorter than anticipated due to the action of sawing. A saw does not work quite like a steak knife.
The saw actually cuts the wood by removing a thin channel of material. This is where the sawdust comes from. There is no steak dust when you cute a steak as it actually slices the meat The cutting will be easier if you clamp the piece into the miter box while you are working with it.
Trying to wrestle with the parts while your sawing them is a great way to loose a thumb. I usually measure from the 1 inch mark to make it as accurate as possible. Do NOT sand any of the edges before gluing it up. Its common for people to want to give it a fast swipe to clean off the edges and such, but what will wind up happening is that you will wreck the straight edge of the board, and you will see gaps after you glue it up.
If you have any chipped edges, just smooth it Build A Steam Box For Bending Wood 2020 off with your finger, then glue it. Check the pictures for details if something is not clear. Take one 7 inch piece and place a thin layer of wood glue on both of the long edges. Place two more of the 7 inch boards on the glued edges to make a "U" shape.
Make certain the ends line up and everything is straight. Clamp the ends loosely, just to hold everything together. Place the last 7" board at the top without glue and apply a clamp to hold it there.
This board is only there to assure that the sides are straight and that the top gap is not wider than the bottom. Don't trust your eyes on this one. Tighten all the clamps checking the boards to make sure nothing slid around. If you have a large gluing area, its not uncommon for the pieces to move a little. You should see some glue squeezing out.
If not, you either have a freakish ability to use the exact amount of glue necessary, or you didn't use enough. Let it dry. Let it dry for a good hour before touching it again.
When it looks dry, remove the clamps being careful with the piece. The joints may still be tender. Set the un-glued 7 inch board aside. Place both end caps on, being careful to line up the edges as best you can. The closer you get it, the less you have to sand. Clamp both end caps in place and let the whole thing dry overnight. While I do have longer clamps, I wanted to show you how to do this. Take two clamps and hook them together as shown in the picture.
This works great for smaller pieces where you don't need huge amounts of pressure. Remove the clamps and admire your work. Take that last 7 inch board and check the fit inside the top.. If its too close, sand the edges until it fits easily. If you have trouble getting it out again after you fit it, just screw a small screw in the center and use it like a handle to pull it out.
The hole will be covered when the rest of the top is assembled. That last 7 inch piece should fit cleanly between the lines. Clamp tightly, make sure it does not move. It will be prone to slipping around a little. When the glue dries, un-clamp and check the fit of the lid. Your Done! Sand and paint to your pleasure. What I learned: How to cut pieces accurately.
How to glue up and clamp pieces. Patience optional, but useful.. This is a method for making a small box with integrated wood hinges.
It's not as scary as it sounds. Actually, I'm terrified, but don't tell anyone. You could do this one in the living room as well, but wait till the wife is not home. The drill tends to scare the cat, and terrified cats running about the house are not the formula for marital bliss.
This will not require any extensive equipment and can be done fairly quickly. The corner joints will be simple lap joints. This time, were going to throw in a small twist. Or rotation, if you want to be technical. Tools and material: ruler or measuring tape Miter box and saw or table saw Wood Glue For this project, I recommend "gorilla glue" for the hinge parts. Clamps small wood - one 4 foot 1x4 or the remnants of the wood from the previous project One nail.
Drill, with two bits. One bit just a tiny bit larger than the screw and one just a little smaller. Sand paper One spare piece of scrap lumber. This is where we delve into the risky world of power tools. A few of the steps below will require the use of a drill on small-ish pieces of wood.
You should hold the pieces against the scrap of wood and the scrap of wood should be on a floor or table. Round one end with a sander or sandpaper. The construction on this one is a little more jigsaw-puzzle than the last one, but nothing good comes easy. Check the pictures as we go. Basic box structure : 1. Start with two of the 6 inch pieces.
Glue them together in an "L" shape, Making sure you line the edges up carefully. Check the pictures 2. Clamp and let fry for at least an hour. Un-clamp the box and glue up the two end pieces on as you see in the pictures. Clamp the ends in place, using the same two clamp technique as in the previous box build. Let dry for at least an hour. Un-clamp the piece and Glue on the last 6 inch piece, making sure to glue all the edges that touch.
Give the whole thing a hug with your clamps again, making sure nothing moves. Let dry over night. Hinge and top construction: Check the pictures to make sure you understand before you start drilling willy-nilly. I would recommend using Gorilla glue on the hinge pieces if its available. Its just stronger. Now, you should be able pass the screw through one square block, the 3 inch block and then tighten it into the last block with the smaller hole.
Its important to pre-drill these holes in this manner. The wood will split if you don't. I guarantee it. All pieces should still spin freely. As long as everything looks good, move on. If anything binds up, drill the holes out with a slightly larger bit.
Find and mark the mid-point of the back vertical piece. It should be at 3 inches. Glue the two square blocks in place. Glue ONLY the bottoms of the blocks. Place some small clamps in place and tighten. When everything is settled, gently remove the screw, 3 inch block and top piece. This is to keep any squeezed out glue from sticking parts together that don't belong stuck together. I only wish someone had performed the same procedure metaphorically with Angelina Jolie and Brad Pitt.
After the glue has set up for a while and there are no more wet spots showing, resemble the 3 inch block and top, leaving the clamps in place. Make sure the top is square on the box, and glue the 3 inch block down.
Make sure you keep the glue away from the back edge. We don't want it all squeezing out and sealing the top to the back. Let this all dry overnight. Un-clamp everything and admire. The hinge should work fairly smoothly. Its not uncommon to have a little slop in the fit.
It would be better to use two hinges, but.. If your going to sand the box, I would recommend dissembling the top from the box before you try. Any substantial lateral sideways stress on the lid will stress the hinge and possibly pop it off. What I learned: Tetris is a fun game Construction of a basic hinge 5 cats is too much for one house.
Thanks for sticking around until the end! You can use repurposed wood from previous projects, boards from broken down pallets, or you can purchase and cut new wood.
Consider what your box will be used for. For example, if you're making a jewelry box, consider thin pieces of cedar, ash or oak. Save larger pieces or boards for bigger boxes. This will also prevent you from having to do too much trimming. Gather your supplies. Keep all your basic tools in your workspace. If using power tools, make sure that you have access to power outlets.
At the very least, you'll want a ruler, hammer, nails, wood glue or putty, and of course, your boards. If using power tools, use caution and always wear eye protection. Measure and mark your boards. First, you'll need to decide on the size of your box. Specifically, you'll want to determine how long, wide, and tall to make your box. Then, mark the measurements on your boards using a ruler and pencil.
If you're building a box for a specific purpose or to hold a certain item, measure the item to ensure it will fit inside your finished box. Cut your boards, if not already to size. Use a hand or circular saw to cut the boards according to your measurements.
Remember you'll need four boards for the sides, one for the base, and one for Outdoor Wood Box Ideas For Firewood Road your lid. Power tools can make the job easier, but are not necessary. You can easily make your box using a screwdriver, carpenter's square, hand saw, and hammer. Assemble the side pieces using a butt joint. Join the sides together at a right angle using glue between the joints for durability.
At this point, it should look like a square with no base or lid attached yet. Next, hammer or drill in finishing nails, wood screws or dowels. Use a wooden dowel to pin the pieces together in an "L" shape. After the sides are pinned, cut the dowel flush with the sides. Attach the sides to the base. Make sure the sides sit evenly on the base or are snug around the base, depending on your design.
Use glue to attach the base and sides. Hammer or drill in finishing nails, wood screws, or dowels. Allow your box to dry thoroughly before sealing or using it. Attach a hinged lid to the box. Set the lid on the box so the lid and side are flush, then measure and mark where you'd like your hinges to be.
Keep the hinge knuckle facing out from the back of your box and drill or hammer to attach it to the side and then the lid. When laying out the hinges, it is important that you square them to the top and to the sides of the case.
Otherwise, the door will not close or open correctly. It's helpful to clamp the side and lid together when measuring and installing the hinges. Fill any nail holes. Use a wood putty and putty knife to fill nail holes. Let the putty dry completely before sanding the areas smooth. Filling and sanding nail holes will add a professional look to your project. Feel free to omit this step if you're not concerned with decorative aspects.
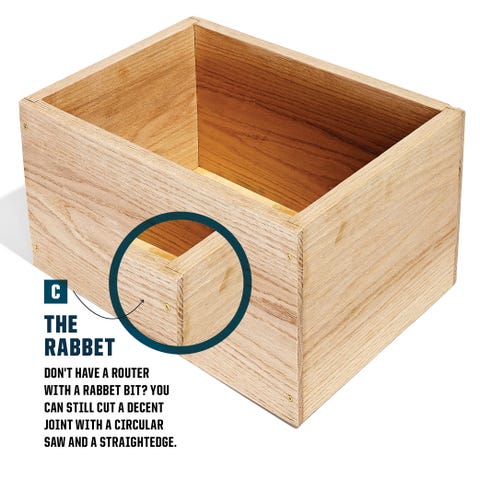
Method Things To Build Out Of Wood Easy Recipe 2 of Keep in mind you'll need to take grooves into account and the fact that your lid will need to be narrower in order to slide into them. Cut grooves into the side boards. Use a table saw or router with a guide to cut a straight horizontal groove near what will be the top and inside of the box.
Make sure to cut equal grooves into three sides of your box. Cut the front side of your box. First, take one of the sides that you've already cut a groove into and measure from the top, where the lid will be, to the bottom of the groove you cut.
Use the same distance to cut a straight horizontal line across the top of your box front. After this point, you should be able to test sliding the lid into the grooves and over the front if you clamp the sides together.
Make sure the grooves are facing inward. Secure the sides to the base. Cut the groove for the lid. If you want your lid to be flush with the sides of the box, use a saw to cut a groove along all the sides of the lid but the front. Slide the lid into the groves and over the top of the box.
For example, when using plywood, mark out the width of the wood before you attach the other side, and mark where you should put your nails, and how many depending on size. Not Helpful 0 Helpful 6. Yes, but it will take more work with the hand saw.
Also, precision cut will be very difficult. Not Helpful 3 Helpful It depends on how big you want it. The measurements I used were 9" x 8". Not Helpful 0 Helpful 5. Use the same method, but make it larger and used a hinged top. Not Helpful 2 Helpful 4. Hard plywood will last much longer and hold its shape and remain stable better than softwood. Hardwood looks cleaner than softwood but it just depends on the purpose of the box.
Not Helpful 0 Helpful 0.

|
Knobs And Pulls Home Depot 201 Jointer Plane Veritas Kit Hand Cut Off Saw For Sale France |

RICKY
20.03.2021 at 22:54:41
ANAR_Icewolf
20.03.2021 at 21:25:40
Dagestanec
20.03.2021 at 17:58:17
heboy
20.03.2021 at 14:26:53