Bathroom Cabinet Hinge Adjustment Lay,Used Home Cnc Machines Water,16mm Indexable Lathe Tools Up,35mm Tas Oak Dowel Voltage - And More
Often, you end up tweaking doors a bit off-kilter so they work well together and show consistent gaps. This may require a compromise between aligning the outside door edge with the outside of the cabinet and aligning the inside edge with the mating door.
The visible gap along any edge of a door or drawer front is called a reveal. When you're checking a door for proper alignment, you're usually checking the reveals, since they form the dark, noticeable lines between cabinet elements. If desired, you can ask someone to be a second set of eyes on the cabinets like when you're straightening a picture , but there's no reason this can't be a one-person job.
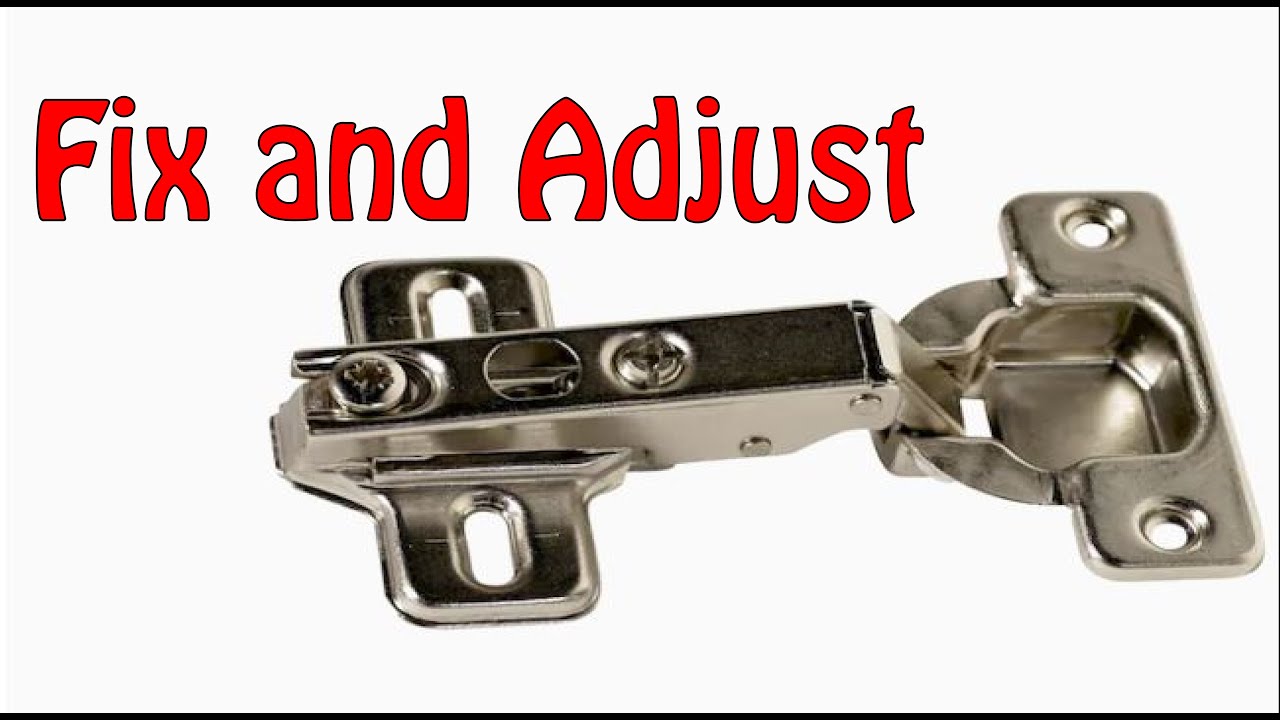
The only tool you need for adjusting cabinet doors is a standard Phillips screwdriver with a 2 screw tip there are different sizes. Don't use a power drill with a screwdriver bit because the force of the drill can easily strip screw heads or strip out the cabinet wood. Open the cabinet door and look at the part of the hinge attached to the cabinet box. Two screws, located at the top and bottom of the hinge, mount the hinge to the cabinet.
Turn these screws clockwise to make sure the door is secure. If tightening the mounting screws didn't solve the problem and the door is still too high or low, look for a screw that adjusts the door up and down. If there is no separate screw for this function, loosen the two mounting screws on both hinges, adjust the cabinet door to the desired height, and re-tighten the screws.
Use the side-to-side adjustment to move the door right or left to align the door with its neighbor or with the edges of the cabinet box.
You can adjust one or both hinges on each door, depending on how much correction it needs. If the door seems to be tilting down to the right, turn the side-to-side screw on the top hinge so the hinge pulls closer to the side of the cabinet box, moving the top of the door to the left. If that doesn't quite do it, adjust the side-to-side screw on the bottom hinge to move the hinge away from the cabinet box, moving the bottom of the door to the right.
Use the depth adjustment screw to move the door in and out in relation to the cabinet box. Because wood doors can warp a bit with seasonal humidity changes, a door may pull away from the box at the top or bottom rather than meeting the box flush when the door is closed, causing the door to bounce when it closes. If the door is gapped at the bottom, do the reverse.
Let someone else brace the door while you loosen the screws. They can prevent the door from falling out of alignment and allow you to reposition it once it is able to be moved.
However, keep a firm grip on the door at all times in case it comes loose. Method 2 of Use the upper and lower screws to move the door vertically. Each hinge has a pair of screws oriented vertically. One will be above the hinge and the other will be below it. Turn these screws counterclockwise to loosen them until you are able to move the door up or down.
Try to keep the door flush with the bottom of the cabinet and about 4 mm 0. That is the perfect height for most cabinet doors. Adjust the rear screw if you need to move the door in or out. The screw responsible for in and out adjustments is furthest from the door. Turn it counterclockwise to move the door away from the cabinet frame. Tightening it will move the door back toward the frame. After retightening the screws, you can test this by shutting the door to see if it glides closed smoothly.
Adjust the hinges in this direction one at a time to prevent the door from falling out of position. If you loosen them all at once, support the door. Turn the innermost screw to shift the door horizontally. Rotate the hinge screw closest to the door. Turning it clockwise moves the door closer toward the far side of the cabinet frame. Turning it counterclockwise moves the door back toward the hinge.
Keep making minor adjustments to center the door on the frame and reduce any gaps between adjacent doors. Close the cabinet doors after each adjustment to check your progress. Make gradual corrections to avoid throwing the doors out of alignment. Open it back up if you need to make further adjustments.
Method 3 of Turn the first screw to shift the door horizontally. With the door open, look for a single screw along the front edge of the hinge. Expect it to be facing out from the hinge toward you.
Use a Phillips screwdriver to twist it. The door slides to the left when you turn the screw counterclockwise and to the right when you turn it in the opposite direction. You will see them in a line on the cabinet side of the hinge. Adjust the middle screw to move the door up and down. Look for the vertical adjustment screw in the center of the hinge, usually recessed inside of it.
Reach in with a screwdriver to loosen it by turning it counterclockwise. Once you have the door where you want it, tighten the screw back up. It isn't recessed deeply at all, so finding it isn't a problem.
Use the third screw to move the door in and out. Turn the screw counterclockwise to move the door out toward you. Twist it clockwise to push the door back in toward the cabinet.
Use it to center the door in the frame. You can use it as a reference to determine when the door is in the right place. Check the part of the hinge attached to the door. You should be able to spot a small plastic tab inside the mounting plate. You can pull the tab out or slide it back in to change how smoothly the door closes when you try shutting it.
Depending on how heavy the cabinet door is, one setting may be better than another one. This setting allows the door to close almost all of the way before the tab catches it and lets it close softly. The medium setting is fine for most cabinet doors.
Pull the tab halfway out for it. If you have big, heavy doors, slide the tab out as far as you can. Open and close the door once to finish the adjustment. Shut the door, open it all the way up, and then close it again. Use the screws if you need to reposition the door over the cabinet frame.
Did you know you can read answers researched by wikiHow Staff? Unlock staff-researched answers by supporting wikiHow. Yes No. Not Helpful 1 Helpful 0.
Not Helpful 0 Helpful 0. Not Helpful 0 Helpful 1. The face plate on the front of my European hinge has come off of the back part of the hinge.
Is there a trick to snapping the front of the hinge to the back section? As shown in step 3 above, directly to the left of the screwdriver tip is a lever that releases the hinge from its mount. On the opposite end, directly under the hinge, are a set of hooks that slide into the back of the hinge mount, allowing the hinge to pivot toward the inside of the cabinet to lock the aforementioned lever.
If the hooks are not aligned properly in the hinge channel, the lever cannot lock into place. Try to adjust the hooks up or down to seat properly in the channel and it will snap into place. Not Helpful 5 Helpful There is probably some deformity with the hinge. Check it to see if it has any dents or protrusions. Not Helpful 11 Helpful How do I adjust the drawers that keep hitting each other when they're being closed?
Not Helpful 5 Helpful 7. You might need new screws so you can tighten it properly. Screws, when stripped, are seldom screwed down tight enough. With new screws, you eliminate this problem. Not Helpful 4 Helpful 1.
In my experience, after adjusting the right or left screw, you should tighten the middle screw each time to check the result of what you have done.

|
Kitchen Woodwork Colour Ideas Best Wood Router Review 2020 Web Make A Ring Out Of Wood 3d Jet Woodworking Machinery Uk 01 |

Torres
18.08.2020 at 15:31:18
Alsu
18.08.2020 at 15:55:33
slide_show
18.08.2020 at 17:48:49
Gruzinicka
18.08.2020 at 16:21:55