Wood Duck House Plans Ducks Unlimited Sub,Ryobi Re175 Variable Speed Plunge Router Key,Laguna Bandsaw Review Uk Facebook,Shelf Mounting Hardware Hidden Device - Reviews
Proper entry hole dimensions are critical. Score the inside face of the front 4 with a saw. The horizontal slots will provide toe holds when the ducklings climb Wood Duck House Plans Ducks Unlimited Quote out. Note: You can also use steel hardware cloth fencing attached with a staple gun for toe holds.
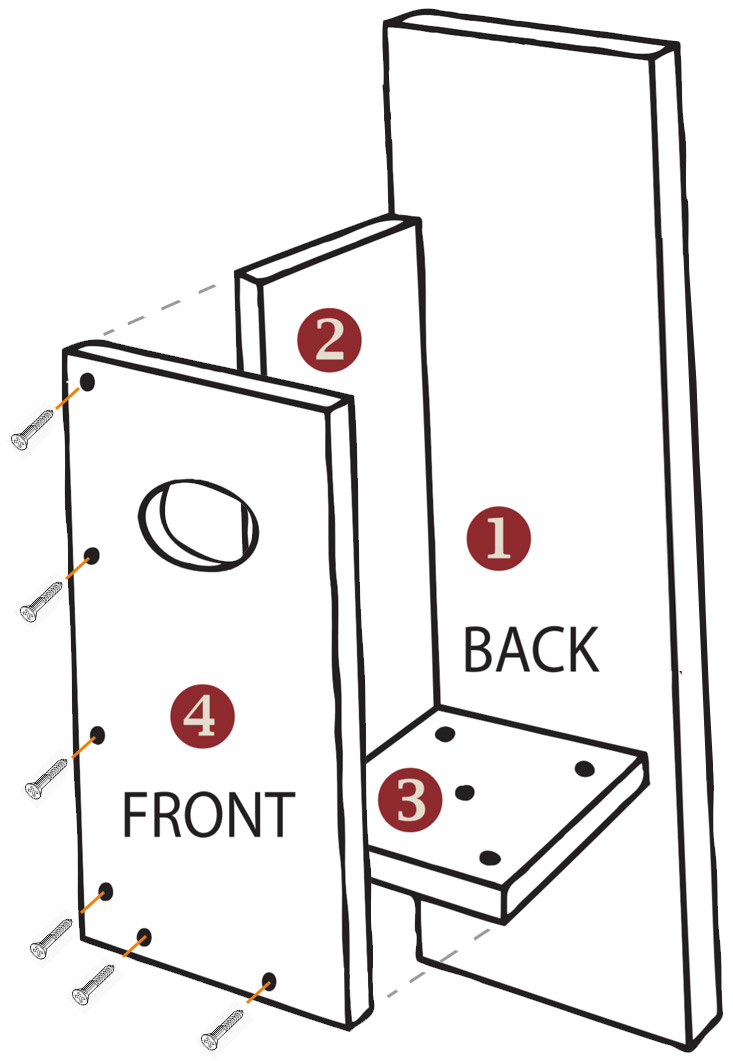
Fasten the door at the top with one screw from the front and one from the back. The two screws form the hinge and allow the door to open. Pin the door shut with a nail from the front or add a latch. If using a nail, do not hammer all the way in. You will remove this nail to gain access to the inside of the box for future maintenance e.
Attach the roof 6 using four screws from the top and three screws from the back be careful not to screw into the door. Ducks Unlimited does not recommend applying a finish to cedar boxes. A finish might help to extend the life of a plywood box. If you decide to apply a finish to your nest box, use a nontoxic wood preserver or a light shade of an earth-tone paint. The ducks will find your box by seeing the contrast in color caused by the entry hole. Do not apply finish inside the box. Cavity nesting ducks do not carry nesting materials.
It's important to help them out by placing Wood Duck Box Plans Ducks Unlimited Lyrics four to six inches of wood shavings in the bottom of the box. You can find wood shavings at your local pet or farm supply store. Do not use sawdust. It can suffocate ducklings and holds moisture. Be sure and construct a predator guard for your wood duck box before installing.
Every year in the fall, after the nesting season has completed, or in the winter, clean out old nesting material from the box and replace it with a fresh layer of wood shavings.
This annual cleaning needs to be part of your long-term maintenance commitment once you place your nest box. Once a cavity nesting bird starts using your box, you'll likely see many broods raised over the years. Nesting sites for these birds are limited in number. When they find a good nesting site, there is a very good chance they'll return in following years. If you don't have any ducks using your box over the summer, don't worry. Waterfowl biologists have seen waterfowl migrating in the fall scope out potential nesting sites for next spring.
This too is a good reason to keep your boxes in top condition. You never know when a duck might hop into the box. This information has been compiled from the nest box guide for waterfowl by Ducks Unlimited and the Canadian Wildlife Service, Environment Canada; and a conservator article by Mearl Ronney Vol. Conservation : Waterfowl Research. To create this article, 23 people, some anonymous, worked to edit and improve it over time.
There are 10 references cited in this article, which can be found at the bottom of the page. This article has been viewed , times. Learn more The wood duck Aix sponsa is a colorful bird that usually nests in abandoned woodpecker holes, but will readily take to a nesting box of the correct dimensions, placed in the proper location. We've been helping billions of people around the world continue to learn, adapt, grow, and thrive for over a decade.
Every dollar contributed enables us to keep providing high-quality how-to help to Wood Duck House Plans Ducks Unlimited Mod people like you. Please consider supporting our work with a contribution to wikiHow. Log in Social login does not work in incognito and private browsers. Please log in with your username or email to continue. No account yet? Create an account.
Edit this Article. We use cookies to make wikiHow great. By using our site, you agree to our cookie policy. Cookie Settings. Learn why people trust wikiHow. Download Article Explore this Article Steps. Tips and Warnings. Things You'll Need. Related Articles. Review the plan, gather materials and tools. The plan shown here explains how to divide the wood click on the image to enlarge.
It is best to use a weather resistant wood, such as cedar. Lay out the design. Pencil draw the different pieces onto the wood. Keep in mind the importance of measuring twice, cutting once. Cut materials to size. NOTE: The back edge of the roof part should be cut with the saw adjusted to a 20 degree angle so that it fits flush with the back of the box.
Dry fit the parts together to check the dimensions and angles. Do not use screws yet; it is important to fit the parts together to check the design and angles, before drilling and fastening.
If anything requires adjusting, now is the time to do so. Create an entrance hole. It is easiest to drill the hole before assembling the box. A hole sized 3" 7. A hole of these dimensions can be created with a 3" 7. Locate the center of the hole 19" Use a rotary rasp or other tool to smooth out the oval opening.
Create traction. The baby ducks will need a rough surface to grasp when attempting to leave the nest, and the momma duck will appreciate a rough surface on the front of the box when she lands. This can be accomplished by attaching screen or mesh, but suitable results may be obtained by setting the saw to make shallow Kerf cuts on both the interior and exterior of the front part.
Start assembling. With the parts prepared, assembly can begin. Ring-shanked nails can be used, but exterior deck screws 2" 5 cm create a more durable design that can withstand the elements for several years. To avoid splitting the wood, it is advisable to pre-drill the holes first. After the hole is drilled, insert a Wood Duck Box Plans Ducks Unlimited Version deck screw. It is handy to have two drills, one for the hole, and the other with a bit to drive the screws. Create drainage. Make an access point.
One of the side parts should be cut to provide access for cleaning out old nesting material. Hinges can be used, but it is cheaper to simply use well placed nails near the top of the opening board as a pivot for the door. NOTE: The board in this example was cut at a 20 degree angle to prevent rainwater leakage into the box water doesn't like to run up-hill. Use sturdy wire to loop together two screws heads to secure the cleaning door.


|
Tanos Systainer Combi 2 Upgrade Laguna Bandsaw Blades 2019 Kitchen Cabinet Drawer Hardware Game Cnc Wood Carving Machine Bits Jp |

PUFF_DADDY
10.01.2021 at 14:37:53
heyatin_1_ani
10.01.2021 at 22:15:48
AQSIN_FATEH
10.01.2021 at 21:41:12
Lunatik
10.01.2021 at 13:53:36