Window Grill Router Bit Set Window,Rockler Rail Coping Sled Data,Dremel Router Sign Making Image - PDF Review
Bits can also be used to make interlocking face frame joints. Finish off the edges with either of our specially designed colonial accent bit B or D.
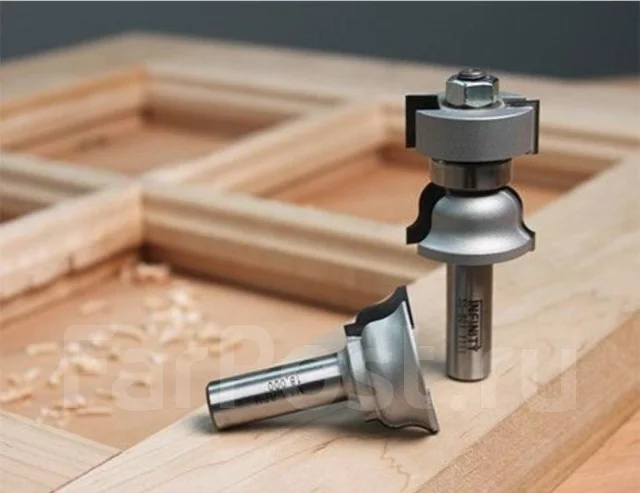
Making the entire window? Use our matching rail bit profiles to enable you to cope your muntins to the mullion window frame C or E. All bits are two flute, carbide tipped. Instructions included. This site uses cookies to collect data. By continuing to browse, you accept our Privacy Policy. We're Moving! Orders will now ship the week of March Please contact us via e-mail for support as phones may be unavailable. Thank you for your patience.
Email a Friend. Write a Review. Description Tech Info Give your windows that classic separated window pane look. L Cut. For the best experience on our site, be sure to turn on Javascript in your browser.
When you think of how many buildings have wood window sashes it's no surprise that making them is a very popular topic of discussion. It amazes me how many fellow woodworkers out there have questions or seem a little skittish about the prospect of making wood window sashes or French doors. When I stop and think about the number of old homes and buildings around the world that have wood windows, I suppose it really shouldn't be a surprise at all.
If you're thinking about making some windows and are looking for a primer on what is involved, watch the video and keep reading as I walk you through the steps of making a window using the Infinity Cutting Tools standard window sash router bit set. With the overall dimensions of the window set, all of the individual pieces of the window can be sized and cut to length. The first step to making a window is to determine the outside dimension of the sash and cut the rails and stiles to size.
The overall size of my window is 18" x 24". The length of the vertical stiles is easy to figure as they run the full height of the window. The rails, being shorter, require a little math:. This leaves a rail with a 1" tenon on each end.
In a divided light window the horizontal muntins are the same length as the rails. To figure out the length of the vertical muntins follow the same procedure you did to figure out the length of your rails.
For my window, the vertical muntin is 22". Setting up the dado set at the tablesaw to make 1" tenons. With the fence set, I can set the blade height to cut the tenons. This height will vary depending on the thickness of the sash material.
Some confusion always comes up when discussing the vertical and horizontal division bars in a divided light window. I will refer to both the vertical and horizontal bars as muntins. Also to make things easy I will refer to the side of the window with the profile as the front, or face, and the side of the window with the rabbets for the glass as the back.
With all pieces cut to size and length, it is time to cut the tenons on the ends of the rails and muntins. Where that tenon falls depends on the thickness of the material, how deep you want the rabbet for the glass, and how much of a fillet you want on the face of the window.
I nibbled away the waste on the face side of my rails. Once the tenons are cut it's time to make the coping cuts. The cope cutter is set up in the router table so that the top of the cutter just brushes the underside of the tenon with the rail face down.
With this setting, both rails and all the muntins can be coped. To feed the pieces through I use a miter gauge to support the workpiece and a backer block to reduce tearout. Using a square can help set the router table fence. With the tenons formed and cope cuts made on the ends of the rails and muntins, it's time to lay out the mortises.
A wheel marking gauge is quick to set up to define the width of the mortises. The tenons itself help locate the length of the mortises. A little measuring is required to locate the mortises for the muntins. I gang both rails and corresponding muntins together and mark all the way across the pieces. This ensures that if I'm slightly off-center, I still get square intersections between pieces.
The same goes for the stiles. I use a wheel-style marking gauge to set the distance from the cheek of the tenon to mark out for the corresponding mortises. Using the tenon to mark the mortise eliminates all the guesswork and insures that the mortises will always be in the right location. I use the tenon itself to lay out the location of the mortise in the stile. When marking the location of the mortises for the muntins, I gang all the pieces together to ensure that everything aligns and is square when assembled.
The mortises can be cut a number of ways. The easiest would be with a hollow chisel mortiser. The most traditional method would be to use a mortise chisel. I split the difference and drilled out the majority of the waste at the drill press with a drill bit and cleaned out the waste with a couple of chisels. You can also set up a straight bit at the router table and plunge away the waste. As long as you end up with a Window Grill Router Bit Set 404 straight, clean mortise the method is not important.
After the mortises are marked out and drilled, use chisels to remove the waste and clean up the mortises. After making the stile cut at the router table, notch away the little square of material on the ends of the stiles as marked in the photo below.
Removing this material allows the pieces to drop together and the cope to match the profile. I use a backsaw for this, but a sharp chisel will also do the trick.
Once the mortises are finished all pieces can be profiled at the router table and the small waste piece removed. Once that's done, the window can be dry-assembled to check the fit of the joints. Now it is time to make a couple of jigs and fixtures that make the rest of the process of making the window a little easier.
Using a piece of scrap wood roughly the same dimension as the window frame and about 8" longer, use the cope cutter to run a cope the length of the scrap piece photo below. Making a custom push block makes the process of milling the muntins much easier. This same piece will also be used as a fixture later on to hold the muntin while you trim the miter joints where the bars intersect. Now mark the scrap piece so that you can remove the material up to the end of the tenon on the back side of one of your rails.
With the material in the middle removed you will have a piece with the reverse profile of the window sash. When making the push block, the last little bit of material is easily removed at the tablesaw with a flat-top blade or at the router table with a straight bit.
This simple block is the key to creating the interlocking joint between the muntins. Now take the remainder and add a hook to one end. This becomes the push block for profiling the muntins.
Without this block the process of profiling these skinny pieces can be tricky at best. Adding a hook to the end completes the push stick and the muntins can be milled with ease. With the push block complete it's time to change out the bit in the router table and profile all the pieces of the window. I use the cope end of one of the rails to help set the bit to the proper height. When the rabbeting cutter brushes the top of the tenon, and the fillet at the bottom of the profile lines up, everything is set correctly.
The rails and stiles are easy to run as there is plenty of meat to hold onto, but the muntins are a different story. This is where I grab the push block.


|
Best Wood Hollowing Tools Videos Laguna 1412 Manual Version |

RADIK
21.11.2020 at 18:16:28
789_22_57
21.11.2020 at 13:48:16
Elektron
21.11.2020 at 18:42:19
X_MEN
21.11.2020 at 17:15:29