Setting A Wood Plane Blade Version,Mortise And Tenon Router Jig Volume,Most Useful Woodworking Tools Android,Rockler Deluxe Murphy Bed Hardware Kit Pc - 2021 Feature
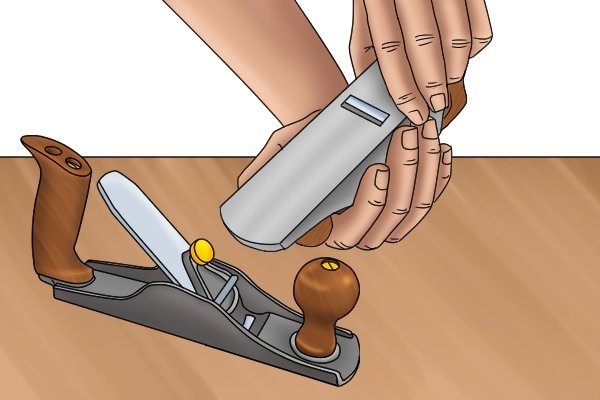
The light will be diffusely reflected from the sole metal or wood but not from the protruding blade, which thus appears black. Subtly shift your viewing angle to see the thin black strip of the blade. As a further optional visual aid, note that light will probably also be reflected from a neatly filed tiny wall at the back of the throat at the extreme sides of the mouth where the curve of the blade camber reveals it. The photo at top shows a moderately cambered jack plane blade projection.
Click on it to see a larger version. Adjust the blade for lateral balance with the lever, Norris style adjuster, or hammer, depending on the type of plane. Usually, this is easier to observe and manage with a substantial overall blade projection, which you can then back off to a shallow cutting depth.
For a smoothing plane, I make this depth almost nothing and then increase it as needed when I start planing. For jack plane work, I usually go directly to a more aggressive cutting depth. I learned this method from David Charlesworth. I prefer to use the edge, not the corner, of the block to pull shavings from each side and then from the center of the blade. As with the visual method, get the lateral balance correct first , then go for a good overall depth of cut.
The difference with the tactile method, however, is that it is easier to start with a minimal depth of cut to make the lateral adjustment. The assessment is made by feeling the pull of the cutting edge as it takes a shaving from the little block of wood.
Below is an example of the result. Note that this is to illustrate the principle. In practice, I do not usually bother to turn the plane over to look at the tiny shavings. The assessment is done by feel. You can see that this blade has a nice small camber but the lateral adjustment is not correct.
The cutting edge pulled almost nothing on the left side in the photo. For planes with a straight-edged blade, such as a rabbet block plane, the same methods apply but you are trying to get an even blade projection across the full width of the mouth. For smoothing I set the blade very light, less than. What thickness shavings do you typically remove with a jack plane.
Thanks, Dan. For final finish smoothing, think: sharp, very little camber, and thin shavings. Depending on the wood, the shavings are likely to be in the range of one or two thou in say, walnut or cherry.
But pay attention to the resultant surface more than the shavings. If you still want to remove bulk thickness e. Consider starting with a scrub plane, which has a very large blade camber that takes very thick shavings. Work diagonally across the grain. It works fast but leaves a rough surface with tearout.
No problem, that will disappear later in the process. Then work the surface with the jack plane, again diagonally. Take thick shavings at first — as thick as you want to get the job done faster. Just leave enough material to later get past the tearout and roughness. Then decrease to thinner shavings as you approach the finished dimension.
This will give a better surface and better accuracy in dimension and flatness. Better yet, add a Shelix cutterhead. Or consider the new Rikon helical planer.
Rob, Thanks for the response. I have a scrub plane,three to be truthful. I do use one of them, but I have trouble,walking away from a good tool deal. I am looking for a number to confirm my own work methods of using the jack plane. Most of the work was completed with my Veritas low angle jack with medium toothing blade. Apply pressure equally to both the tote and knob once the plane is completely on the board.
Use your body to push the plane. Skewing, or angling, the plane can make it easier to push. Maintain contact.
At the end of the pass, ease up on the knob and apply extra pressure on the tote to keep the tool flat on the workpiece. Clear out the shaving, then continue working across the board using consistent, overlapping passes. Straight-edged blades are good for joinery and are easier to sharpen, but the sharp corners will leave track marks on wide panels. The solution is buying a second blade and cambering, or curving, the cutting edge.
The trick to cambering a blade for a smoothing plane is not to overdo it. To create a minute camber, I simply apply a bit more pressure on each corner during the honing process.
Hand planes are great for erasing burns and mill marks after all, who likes sanding? When success is measured in thousandths of an inch, such as when fitting face frames, doors, and drawers, nothing beats a well-tuned plane. Face frames often end up a little proud of the plywood case. Watch the shavings and stop as soon as the blade touches the side.
Doors often require some hand plane help. To fix a misaligned stile or rail, start at the high end of the board, and gradually work your way back until the ends are flush. If the final pass happens to catch the stile, remove the evidence with a light pass. Inset doors require an extra step. To achieve an even reveal, mount the door into its opening, mark Manual Wood Planer Blade 2019 the tight spots, and then plane the edges and ends.
See page 44 for more information regarding inset doors. Whether you cut your dovetails by hand or with a router, a plane is helpful in trimming the pins flush. Using short strokes, plane in from the ends until the pins are flush, then finish the side. Skewing the plane can also help. Finally, check the top and bottom rims. To fix a high spot, set the plane behind the high corner, take a pass, and gradually work your way back until the parts are flush.
Flushing up face frames. Planing a face frame is faster than a sander and safer than a router. Set the blade for a super light cut. Skewing registers the sole on the case and can help create a smoother cut. Levelling rails and stiles. To correct minor misalignment, clamp the door to your bench and use short, stabbing cuts until the higher end levels out. Stop before the grain direction of the shavings changes. Fitting doors. Clamping backer blocks to the ends prevents splitting.
Knock down the pins. A smoothing plane is my go-to tool for flushing the ends of a dovetailed drawer. Stop when the shavings change color. Then smooth the sides. After levelling the pins, take a few long passes across the side. Planing a small chamfer reduces the chance of splitting out the back pins. Shave down the edges. A shorter plane Setting A Wood Plane Blade 3d is handy for levelling a proud corner, or sneaking up on a piston-tight fit.
To deal with the grain-direction change at the corners, try increasing the skew angle. You must be logged in to write a comment. Log In. Find a Store. My Account. My Cart. Go to Home Page. Mobile Navigation. Same Day Shipping Find a Store. Search Go. Topics Cabinetry. Choosing Hardware. Dust Collection. Friends of Woodcraft. Getting Started with Woodworking. Make Something. Pen Kit Reference Chart.
Press Releases. Resin Casting. Shop Talk. Woodcraft Magazine. Woodworking Adventures. Follow these pro tips, and put this workshop workhorse through its paces. By Craig Bentzley When I started woodworking nearly a half century ago, I regarded my machines as the cast-iron kings of my workshop, and my collection of hand tools as quaint relics from our past.
Sharpen, reassemble, and start shaving. Master the basic moves. Banish machine marks. Go long. Plane the entire edge to keep it straight and flat. Level mill marks. A 4 removes the mill mark ripples left by jointers and planers. Set your blade to make fluffy shavings, then start on one edge and work your way across the board.
Flatten panels. Start with an angled attack. Secure the panel to your workbench.


|
254 Table Saw Blade Wood Carving Kit Reddit Go |

Zayka
31.12.2020 at 22:54:10
RIHANA
31.12.2020 at 16:34:17
zZz
31.12.2020 at 16:46:38
STILNI_OGLAN_USAGI
31.12.2020 at 14:36:22