Router Table Dado Jig,Free Woodworking Plans Bedside Table Unit,Grizzly G0645 Benchtop Mortising Machine Pdf,Mallet Hammer Handles 30 - Tips For You
You don't need an expensive dado blade set for your table saw to make accurate dadoes. As I've mentioned before in other Instructables, I have a small one not something a DIYer brags aboutand my small table saw will not take dado blades.
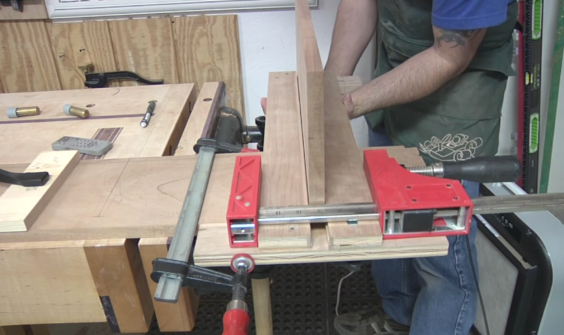
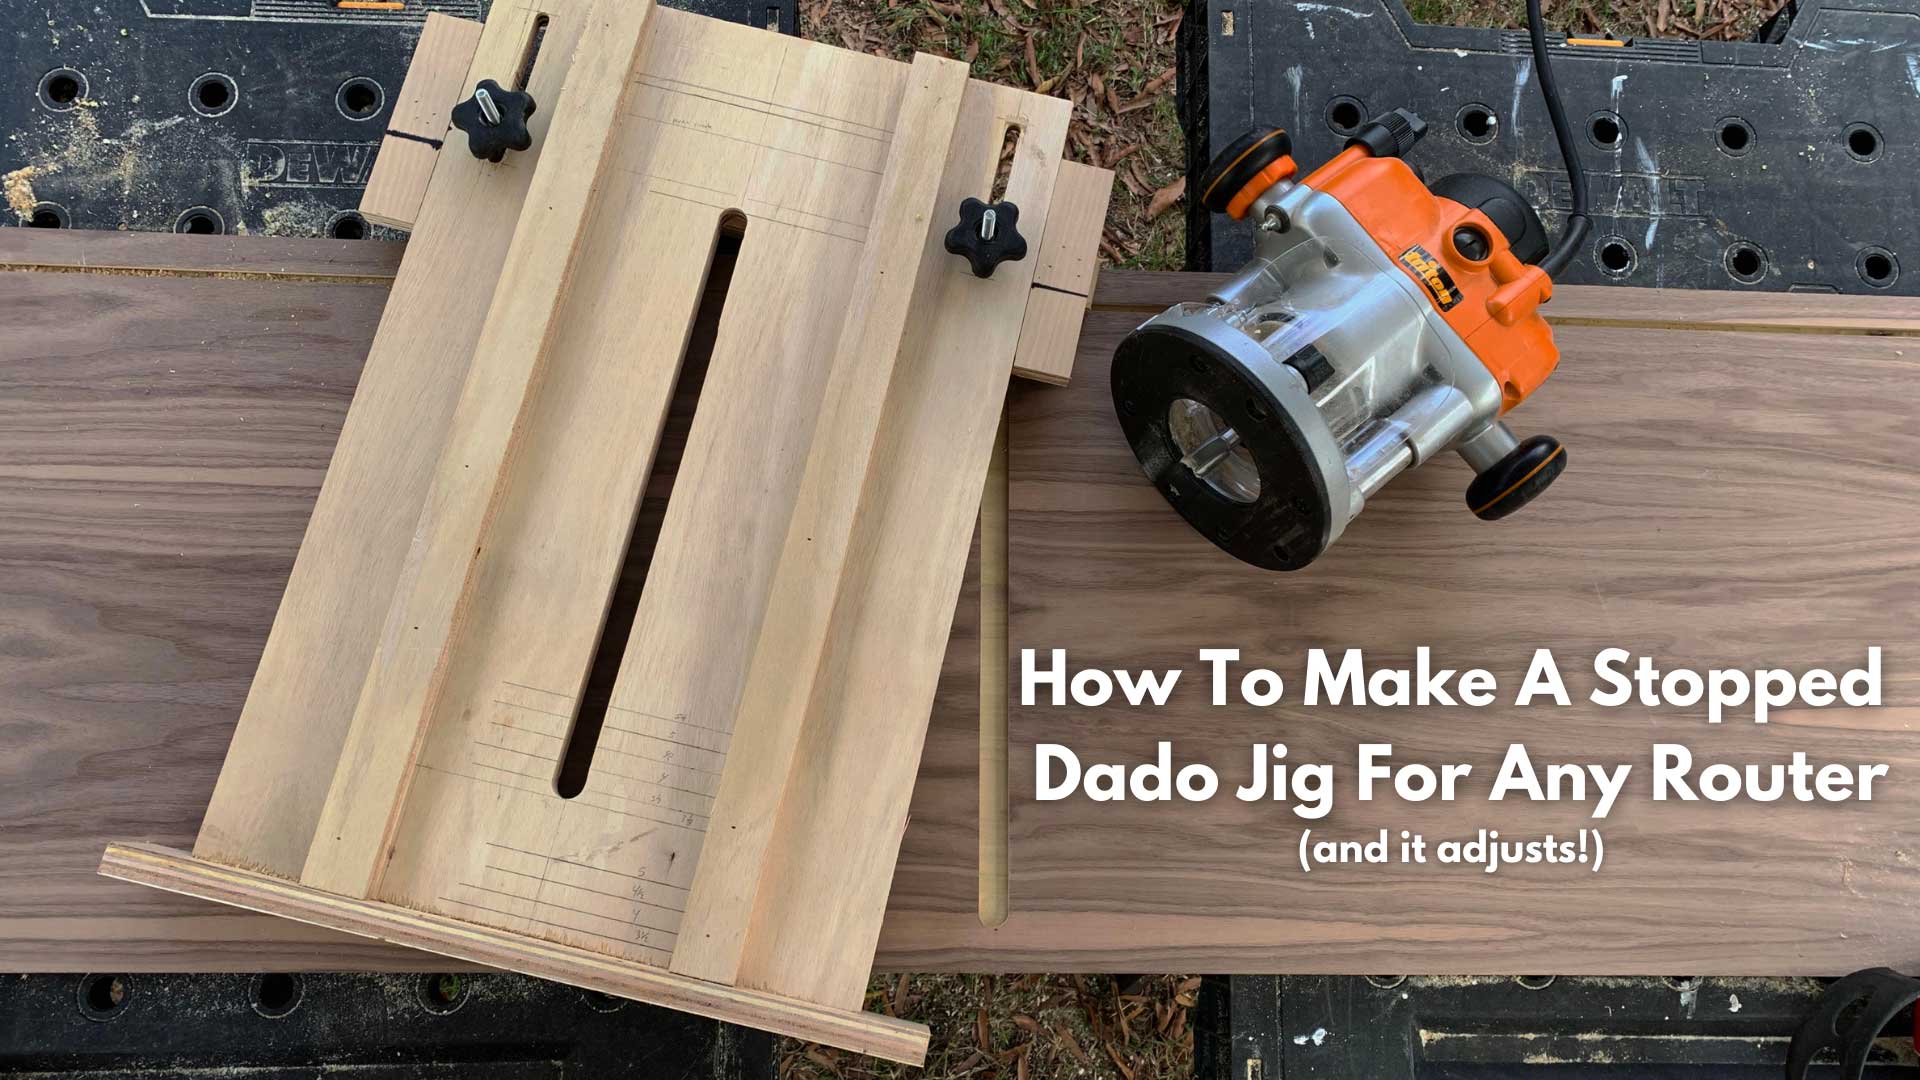
These pictures really explain it best. I made this jig for my small router. It was all made from scraps from my lumber cart. I bought the wing nuts and bolts. These pictures show all the parts to create this jig. I made this for router table dado jig Shadow Box Bookcase I built. This jig was made for a specific router and for routing into boards up to 12" wide and determine the final dimensions shown in the last picture.
Yours will probably be different if you make one. The first step router table dado jig to secure the hardboard to the 1 x 4. Do this twice. Place the router against the 1 x 4 and rout the hardboard. Make two of these. I cannot stress the importance of this step. These two guides which are further apart than the width of the board you are dadoing must be secured at right angles.
If not, every dado you make will be off. Secure two bolts and epoxy them in place. Line up the two bolts you epoxied and mark them on sliding part of the jig. These slots are made by drilling two holes and connecting the holes using a jig saw. Make them as far apart as you'd like to adjust the gap. Slide the adjustment guides apart and put in a piece of wood you'll be making a dado for and close the adjustment slide tight to the wood. Secure the wing nuts and this gap now matches the exact thickness of the wood you are using.
NOTE: Obviously, the round over bit shown in the router is not the one used to make dados. See step four for the bits to use. I was just too lazy to change bits. Because the slightest slip of the jig and your router table dado jig is ruined.
The only other thing you must take into consideration is the depth of the dado. You should add this depth times two one for each side to the length of the shelf you are installing.
If you look at the intricacies of this shadow box bookcase I built you can see how an error can magnify itself by the time you're done. Great Video. I am going to make one. And it also useful to hold wood for sanding etc. I voted. Reply 2 years ago. Question 2 years ago on Step 9. Answer 2 years ago. Hi, Stan, below is a picture with the dimensions for this jig. Please understand it was made for my router router table dado jig the router you use might router table dado jig different.
I also made this specifically for 1 x 12 dimensional lumber since that is what I was routing the dadoes in. Hi, Bamcmurray, thanks for the question. This is strictly a dado jig. A lap joint jig is completely different. What I usually do when building a new jig is research all router table dado jig DIYers' videos out there and pick and choose what works best for me and my little shop. Nice jig, I agree all my jigs are made of scrape wood router table dado jig I have router table dado jig over from other jobs.
Router table dado jig problem I have is storage! So most of the time l just wait until I need the jig to build one.
Unless I made a real good one then I keep it! Yes, storage of jigs and of scraps can become a problem for those of us with small shops. One thing I love is my lumber cart. All my savable scraps go into it.
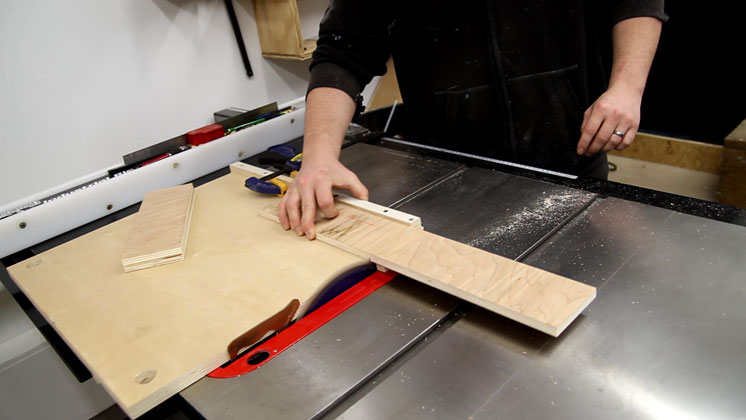
I had a half inch bit. This jug cuts along both sides of the base look at the image I posted where I'm clamping the shelf in the jig.
So I go up one side and down the other, and voila! Had I needed a narrower dado this jig wouldn't've worked at all. Excellent question. Keep 'em coming. Tip 2 years ago. Then, you wouldn't need Fender Washers! Nice instructable.
Using the click-lock flooring - brilliant! I knew there was a reason I saved that extra flooring. By the way, I used the excess kitchen flooring to finish the toe-kicks in our last kitchen - worked very well. Yes, Charles, I use leftover flooring plus anything hanging around to build things. My momma always said: waste not, want not. Had a thought.
One of the rails that guide the router can move to allow adjusting the dado width. BTW - the bit I see in your router appears to be a half-inch roundover. Ar you using a top-bearing bit to cut the router table dado jig Since your Table Router Joint Jig Object router base has a 'flat' spot, guiding it using the base might prove problematic.
With a tpo bearing bit, the edge of the bearing is 'at' the edge of the bit same plane so setting the guides to the width of the board meant to fit into the dado, gives you a dado the width of the router table dado jig used to set teh jig.
Lots of great points, Charles. Yes, I've seen dual length and width adjustable dado jigs. I made this for the project I mentioned in the Instructble, not thinking router table dado jig to other projects. The bit pictured is definitely not the bit used to make dadoes. I added a caveat to my instructable--good catch. I was too lazy to change the bit. Yes, that flat spot on my router caused that router table dado jig in the guide you can see.
It slipped onto the flat spot. I use regular dado bits as pictured in the Instructable, no bearings. Your observations are greatly appreciated. Very nice jig. It is important that users clamp the jig into position before using it, as you show in the photos. More by the author:. About: In my shop I have a name for hammer, saw, and plier. The saw is Tess, the hammer's Joe, and Glumdalclitch is the plier. Yes, I'm brillig, and my router table dado jig toves still gyre and gimble in the wabe.
With that, le… More About Kink Jarfold ». That's Smoochy who insisted on assisting with research for Tenon Jig Router Table Inc this Instructable. Everybody sing: Dado, day day day doe, dado come and we wan' go home The fit should be snug. A Goldilocks type of fit. Not too tight, not too lose--just right. NOTE: Route up the left side of the jig then down the right to get the full width of the dado.
Hope this Instructable helps you. Let me know if you have any questions. Enjoy, KJ. Did you make this project? Share it with us!


|
Kreg Jig Setup Youtube Buy Blum Drawer Slides Kit Aqua Coat Grain Filler Near Me Up |

KLan_A_PLan_Ka
07.07.2021 at 10:53:27
ILQAR_909
07.07.2021 at 10:51:52
Ilgar_10_DX_116
07.07.2021 at 20:38:11