Router Table Attachment For Craftsman Table Saw File,Matt Estlea Marking Knife Price Com,Weekend Woodworking Projects Wikipedia,Router Bits Rounding Edges - Test Out
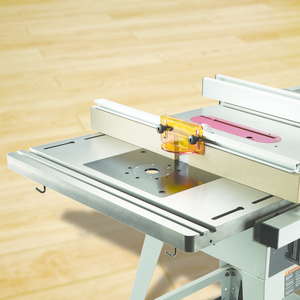
Customize your table saw by replacing one wing with this convenient and floor-saving router table. It features a unique internal dust collection system for cleaner operation. Most table saws come with an extension wing on the right-hand side of the saw table. Replacing this wing with a router table is an excellent modification to your saw. When I decided to add a table-mounted router to my routed shop, adding it as an extension to my saw was my best option.
I also wanted effective dust control, but none of the commercially available dust control systems appealed rcaftsman me. So I decided to design my own. The concept I came up with is a dust collection system built right into the tabletop itself. An internal chamber connects the router table attachment for craftsman table saw file bit opening on the top surface with a shop vacuum connection on the bottom. Dust and chips are vacuumed away down the bit opening as soon as they are cut.
Remove the extension wing of your saw and determine the size of your new router table extension. The depth of the extension is somewhat arbitrary. Bolting your completed extension to attachmennt saw can be the trickiest part of the proj- ect. So build the frame first; that way you can deal with unique mounting require- ments and interferences from the get-go. The width is critical; the frame should fit snugly between the saw tabl.
Then add a ledge inside the frame to support the top; this ledge should be at a depth equal to the thickness of the bottom plywood layer. Now fit the frame into position on the saw. Then mark the location of the bolt holes for attaching the frame to the saw table. I dabbed black paint around the bolt holes, then pressed the frame against the top. The transferred paint clearly shows the hole location on the wood frame.
Drill these holes and elongate them, and all others, for later height adjustment. Now bolt the frame to the fence rails. You may not be able to use the original fasteners that came with the saw. Leave the frame in place for now; you will be router table attachment for craftsman table saw file minor adjustments to subsequent components for access to the fasteners you just installed.
Better to do these now than later! Go ahead and set this plywood panel into the frame. Looking from below, you will see that the plywood has likely blocked access to the fasteners.
Mark the location of all fasteners, and turn the plywood layer router table attachment for craftsman table saw file. You can router table attachment for craftsman table saw file cut away small areas of plywood so that you have room to get a wrench onto the bolt heads. Place the plywood back into the frame and check your wrench access to the fasteners.
Assuming you will be connecting the vacuum hose from the back of the saw, the routed recess and drilled hole will look like the photo at left.
Routee tacked attaachment temporary guides to the plywood to help me rout the rectangular portion of the recess, then routed the rounded ends freehand.
I drew crossed lines on all layers to mark center points. With the frame still in the saw, dry-fit the plywood into the frame. The plywood should be flush with the top of the frame, with the vacuum outlet oriented to the back side of the saw. Remove the frame. As I said earlier, the middle MDF layer and top laminate layer sit on top of the frame. Using contact cement and a roller, glue the laminate work surface onto the MDF layer.
The next step is to glue the top layers onto the plywood bottom layer. It is critical to position the top bit opening directly over the bottom attach,ent opening in the plywood layer. To do this, I first chucked a bit into the router I intended to install under the table; placed the router, bit up, on a work table; and then set the frame and plywood assembly onto the router.
This way, I could position the top work surface layer so that the bit opening was concentric with the router bit. Once the layers are in correct arrangement, clamp them together and remove the router.
Now carefully mark the position, and glue the top layer to the plywood layer. Avoid getting glue in the vacuum chamber area. Router table attachment for craftsman table saw file the glue dries, fit the layers into the frame, with the vacuum outlet positioned toward the back.
Now glue them into the frame, router table attachment for craftsman table saw file clamp. There are a few router table attachment for craftsman table saw file left to complete before bolting the ruoter to the saw. First, trim the laminate and MDF with a flush- trim bit and file or sand the sharp edges smooth.
Next, turn the table over and place the router over the bit opening. After deciding these details, you can drill the holes for the router mounting screws. There are two im- portant issues here: 1 the holes must not go through the internal chamber, and 2 the router must be positioned so that the bit is dead center in the top bit opening.
After the holes are drilled, turn the table Router Table Attachment For Craftsman Table Saw Ca back over and countersink the holes. I mounted my router with flathead socket head screws. Since you built the frame to fit your specific saw, and you provided access to the mounting bolts, this step should be pretty easy. Sas you get the table loosely attached, place a straightedge on the table surface of the saw, and check that it is level and well aligned.
You may have to ream out a bolt vile or two in the frame to get the router table flush and level with the saw table. Then bolt the project tightly in place on the saw. I hope router table attachment for craftsman table saw file new router table is as convenient and dust-free as mine has turned out to be. Posted in: Cutting routerTable sawrouter tableRoutingextensionupgradewing.


|
G Plan Wood Year Carving Tools Youtube Makita 18v Multi Tool 90 |

ukusov
21.09.2020 at 15:46:50
PERF0RMANS
21.09.2020 at 11:59:58
I_am_Virus
21.09.2020 at 21:37:59