Ridgid Table Saw Router Insert 01,Dewalt Radial Arm Saw Model Numbers Work,Soft Close Tandem Drawer Slides Not Work,Grass Unisoft Cabinet Door Soft Close Damper With - Step 2

Beyond the table saw, I used a cordless drill, a hand saw, a jigsaw, measuring tape, square, wood glue, 1. The wood was all offcuts from spruce construction lumber from my woodpile. Measure the size of the hole in the table extension and the size of the table. That meant I needed to extend the table by 41 mm at each end, but didn't need to do anything on the sides except provide support. I glued and screwed the frame together, put it in place and realized I needed to cut a rebate for the switch and slots on each end for the sliding miter gauge.
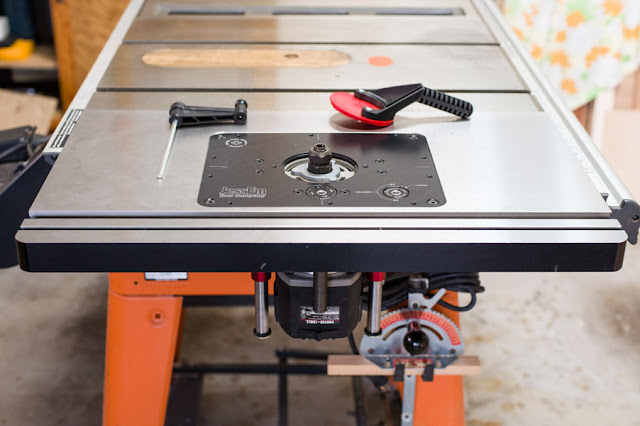
I did the former with a jigsaw and the latter with the table saw, then fixed the frame in place using flat-head screws in the holes that were already there.
Drill holes and drive screws through the frame into the underside of the table to fix it in place I used 6 , and mount your router. The way this is set up I can either use the fence that came with the router or the fence on the table saw if I need to rout a larger workpiece. The whole setup works very nicely and it was just a quick job. Reply 5 months ago. Reply 1 year ago. Sounds simple enough so maybe there's an intructables or a video?
Why didn't you do this? Yup - love the portability of those saws. I managed to snag one of the last cast topped tables before the switched them to the new material can't recall what they make the table tops out of now.
Just one little tidbit to add - you will want to add some sort of angled brace from the outer edge of the router table insert to the table saw base to prevent any strain on the TS rails over time. Doesn't have to be anything fancy - just to take the load off the rails. Handiest upgrade you can make to any table saw - and your router table will actually get used more!
Reply 6 years ago on Introduction. This one has a cast iron center with pressed steel wings. It's still heavy, but not compared to a cabinet saw. I thought about bracing it, but the router is not all that heavy and the rails are very solid. The brace may also make it a little tricky to store I tuck the saw under the my workbench when not in use.
May have to reconsider if I detect any signs of strain. Reply 5 years ago on Introduction. Am in the process of building my router table add on. Great idea buying a compact table and retro fitting it to your saw. I just purchased this saw.
The center section is still cast iron. They no longer make either wing out of cast iron. And am in the process of building my router table. What a cool idea buying a compact table and retro fitting it into the table.
I agree with your support idea. I think this idea is great but I would be concerned about stressing the rails. I route heavy hard wood stock sometimes which requires heavy pressure against the fence to get a nice clean cut and I would be afraid of bending the rails and bringing my table saw out of square or worse.
Just completed this on my tablesaw. Instead of cutting out a dado for the switch, I removed it from the table and relocated it to the front edge of the support frame. Great instrucable, and your measurements were bang on! I built a shaper table for my portable Rigid table saw Yes, I have the very first year they made the saw about years ago and still use it. Mine is not nearly as well put together as yours, but I built the top surface from Lexan, so I can also remove it and use it as a circle jig.
I'm suddenly feeling inspired to make a new one. If so, I'll post pics. Get back to Canadian Tire or Harbor Freight tools and buy an inexpensive foot controller for the router. Just to be safe, I also loosened the power switch box and slid it out of harms way toward the centre of the front rail. With the old wing removed, I clamped the angle irons to the new wing through the router insert opening with heavy paper between the angle iron and the new wing.
I aligned the top edges of the wing and the table saw top, using my finger as a gauge and tapping gently with a wooden mallet to make fine adjustments. I was careful to align the back edge of the wing against the rear fence rail. By putting all of the difference along the front, I avoided having to shim on both sides.
I used my digital calipers to measure how far the front of the wing casting stood proud of the centre section of the table saw and stacked stainless steel shim stock to sit between the front fence rail and the table top. It came out to be about 0. In retrospect, I probably should have put the error along the rear rail instead of the front but it seems to work OK.
After re-installing the front fence rail, I discovered that I needed to drill a hole through the wing casting to accept the fence rail mounting bolt. Drilling cast iron is easy — lubricate and drill with progressively larger drills to reach your desired size.
In the pictures, you can see my new router lift. There was nothing to installing that beyond following the instruction manual.
My initial impressions are really positive. Doing this has had the desired effect of eliminating my free standing router table. I bought them at the same time. Installed and […]. Thanks again, Derek! I am looking at purchasing the same cast top and a JessEm lift, did you have to do any modifications to get the lift plate to fit and anchor into the cast top?
The dimensions of the plate opening on the casting and the dimensions of the lift plate are theoretically the same. The first time I installed the JessEm lift, it was quite a snug fit, but it went in. As for anchoring, the lift plate sits on several grub screws, and I never felt a need to anchor it down beyond gravity and friction.
I suppose if you want, you can drill the cast iron and use the countersunk holes at the corners of the plate with a machine screw, nut and fender washer. Having used this combination for more than a year now, I am still very, very happy. Hi Derek, thanks for this inspirational and informative post. Hi Dustin, The fence rail on my Ridgid saw is an aluminum extrusion and it attaches to the cast iron table with a T-slot. I do have a bolt running through the side of the router wing into that T-slot on the front fence rail, but not the back.
I added that bolt so that the cast iron would support the fence rail, not so the fence rail would support the cast iron. You can check out my article about installing it on my Ridgid Ts for more information about the router wing itself, and I also have an article about the low-priced […].
_0023 72dpi.jpg)


|
Hardwood Timber Products Walsall Design Twin Screw Woodworking Vise Code |

888888
21.09.2020 at 14:54:42
SmErT_NiK
21.09.2020 at 19:38:38
farida
21.09.2020 at 18:41:41
Snayper_666
21.09.2020 at 19:30:27