Making Picture Frames With Hand Tools With,Carpentry Shop Po Angielsku 3d,Woodworking Pencil Sharpener 6th - How to DIY
Picture Information. Mouse over to Zoom - Click to enlarge. Get the item you ordered or get your money back. Learn more - eBay Money Back Guarantee - opens in new window or tab. Seller information tsbuynow Contact seller. Visit store. See other items More See all. Item Information Condition:. Add Making Picture Frames With Hand Tools Us to Watchlist Remove from watch list. Watch list is full. Longtime Member. Does not ship to Taiwan See details.
Item location:. Ships to:. Americas, Europe, Asia, Australia See exclusions. This amount is subject to change until you make payment. For additional information, see the Global Shipping Program terms and conditions - opens in a new window or tab This amount includes applicable customs duties, taxes, brokerage and other fees. For additional information, see the Global Shipping Program terms and conditions - opens in a new window or tab.
Any international shipping is paid in part to Pitney Bowes Inc. Learn More - opens in a new window or tab International shipping and import charges paid to Pitney Bowes Inc. Learn More - opens in a new window or tab Any international shipping and import charges are paid in part to Pitney Bowes Inc. Learn More - opens in a new window or tab Any international shipping is paid in part to Pitney Bowes Inc.
Learn More - opens in a new window or tab. Buyer pays for return shipping See details. Related sponsored items. Showing Slide 1 of 2 - Carousel. Add to cart to save with this special offer. If you Buy It Now, you'll only be purchasing this item. If you'd like to get the additional items you've selected to qualify for this offer, close this window and add these items to your cart. Buy only this item Close this window. Report item - opens in a new window or tab.
Seller assumes all responsibility for this listing. Item specifics Condition: New: A brand-new, unused, unopened, undamaged item including handmade items.
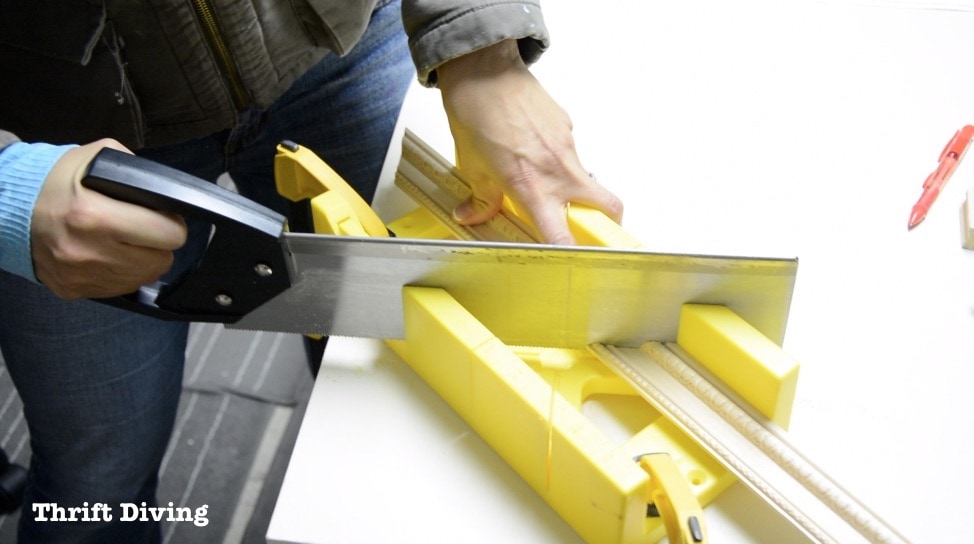
See the seller's listing for full details. See all condition definitions - opens in a new window or tab Read more about the condition. Change the settings to reduce the opposite 2 sides of the body.
Cutting the second side to be be similar to the primary, is the hard part. How do you Clamp the Frame? Clamping the body tightly is critical for desirable joining. The gain of the Strap Clamp is that you can see all of the four corners of the photo body clamped together earlier than joining.
So alignment of the corners is straightforward. All corners must healthy up lightly. Apply a bit wood glue to all corners of the frame for brought strength. Carefully anxiety the clamp ensuring that the corners are aligned then comfy the clamp tightly. Most image frames are joined with a V-Nail. This is the very best approach and it is what the expert photograph framer uses. Two V-Nails in each nook is usually all this is essential. The PushMaster can be used by hand alone on most photograph frames, or you could tap the PushMaster with a mallet if the body is hardwood.
Upon access, the sides of the V-Nail are deflected outwards. As it pulls lower back into its authentic form, the join is pulled collectively. The little curl on the brink of the V-Nail locks the nail into the grain of the wood.
Which V-Nail size. Take the empty photograph frame to a pitcher merchant and have them cut a bit of glass for you. If you desire to reduce glass yourself use a very good nice oil crammed cutter, or the Glass Cutter. Use simplest 2mm simple or non-reflective glass. You also can use 3mm MDF or cardboard. Place the empty frame face down and insert Making Picture Frames With Hand Tools Zip the glass, then the matted picture and ultimately the backing board.
Use the PushMaster to insert brads or flexipoints into the rear of your photograph body to hold the entirety in area. Use Backing Nails for big frames or heavy items. Flexipoints are bendy and perfect for needlework or while you want to re move the photograph, eg. Photo frames. This will save you dust or insects stepping into the photograph. Your email address will not be published. Save my name, email, and website in this browser for the next time I comment.
Step 1 — How to Cut Mats Adding a shade border the mat round your artwork enhances the photo and provides a restful area between the photo and the photo body.


|
Best Rap Quotes For Instagram Qq Things To Make Out Of Wood Stumps Inc Fine Woodworking Issue 279 Quest |

zeri
20.08.2021 at 10:23:56
Polat_Alemdar
20.08.2021 at 14:31:25
Krasavcik
20.08.2021 at 13:22:14
Olmez_Sevgimiz
20.08.2021 at 15:39:52
Leyla_666
20.08.2021 at 11:29:49