Make A Frame Animation In Photoshop Uv,Building Small Projects Fine Woodworking Path,Under Counter Garbage Drawer Zoom,Under Cabinet Knife Drawer 00 - Plans On 2021

Note: You can select and change the position of multiple frames. However, if you drag multiple discontiguous frames, the frames are placed contiguously in the new position. Note: The frames you want to reverse do not have to be contiguous; you can reverse any selected frames. To delete selected frames, choose Delete Frame from the Timeline panel menu or click the Delete icon , then click Yes to confirm the deletion. You can also drag the selected frame onto the Delete icon.
The unify buttons Unify Layer Position, Unify Layer Visibility, and Unify Layer Style in the Layers panel determine how the changes you make to attributes in the active animation frame apply to the other frames in the same layer.
When a unify button is selected, that attribute is changed in all the frames in the active layer; when that button is deselected, changes apply to only the active frame. The Propagate Frame 1 option in the Layers panel also determines how the changes you make to attributes in the first frame will apply to the other frames in the same layer. When it is selected, you can change an attribute in the first frame, and all subsequent frames in the active layer will change in relation to the first frame and preserve the animation you have already created.
Note: You can also propagate frames by Shift-selecting any consecutive group of frames in the layer and changing an attribute in any of the selected frames. To understand what happens when you copy and paste a frame, think of a frame as a duplicate version of an image with a given layer configuration. When you copy a frame, you copy the configurations of layers including each layer's visibility setting, position, and other properties.
When you paste a frame, you apply that layer configuration to the destination frame. Replaces the selected frames with the copied frames. No new layers are added. The properties of each existing layer in the destination frames are replaced by those of each copied layer. When you paste frames between images, new layers are added to the image; however, only the pasted layers are visible in the destination frames the existing layers are hidden. Adds the contents of the pasted frames as new layers in the image.
When you paste frames into the same image, using this option doubles the number of layers in the image. In the destination frames, the newly pasted layers are visible, and the original layers are hidden. In the non-destination frames, the newly pasted layers are hidden. Adds the copied frames before or after the destination frame. When you paste frames between images, new layers are added to the image; however, only the pasted layers are visible in the new frames the existing layers are hidden.
This option works only when pasting frames into another document. Select it when you plan to reposition the pasted layers as a unit. The term tweening is derived from "in betweening," the traditional animation term used to describe this process.
Tweening also called interpolating significantly reduces the time required to create animation effects such as fading in or fading out, or moving an element across a frame. You can edit tweened frames individually after you create them.
You use the Tween command to automatically add or modify a series of frames between two existing frames—varying the layer properties position, opacity, or effect parameters evenly between the new frames to create the appearance of movement.
When you tween between the two frames, the opacity of the layer is reduced evenly across the new frames. If you select a single frame, you choose whether to tween the frame with the previous frame or the next frame.
If you select more than two frames, existing frames between the first and last selected frames are altered by the tweening operation. If you select the first and last frames in an animation, these frames are treated as contiguous, and tweened frames are added after the last frame.
This tweening method is useful when the animation is set to loop multiple times. Click the Tweens button in the Timeline panel. Varies the position of the layer's content in the new frames evenly between the beginning and ending frames. Varies the opacity of the new frames evenly between the beginning and ending frames. Varies the parameter settings of layer effects evenly between the beginning and ending frames. Adds frames between the selected frame and the following frame.
This option is not available when you select the last frame in the Timeline panel. Adds frames between the last frame and first frame. This option is available only if you select the last frame in the Timeline panel. Adds frames between the selected frame and the preceding frame.
This option is not available when you select the first frame in the Timeline panel. Adds frames between the first frame and last frame. This option is available only if you select the first frame in the Timeline panel.
This option saves time when you are creating an animation that requires you to add a new visual element to each frame. To hide a layer in a specific frame, select the frame, and then hide the desired layer in the Layers panel. You can specify a delay —the time that a frame is displayed—for single frames or for multiple frames in an animation. Delay time is displayed in seconds. Fractions of a second are displayed as decimal values.
For example, one-quarter of a second is specified as. If you set a delay on the current frame, every frame you create after that will remember and apply that delay value. If you selected multiple frames, specifying a delay value for one frame applies the value to all frames. The frame disposal method specifies whether to discard the current frame before displaying the next frame.
You select a disposal method for animations that include background transparency to specify whether the current frame will be visible through the transparent areas of the next frame. No icon appears when Disposal Method is set to Automatic. Determines a disposal method for the current frame automatically, discarding the current frame if the next frame contains layer transparency.
For most animations, the Automatic option default yields the desired results. Note: To preserve frames that include transparency, select the Automatic disposal option when you are using the Redundant Pixel Removal optimization option. Preserves the current frame as the next frame is added to the display.
The current frame and preceding frames may show through transparent areas of the next frame. Use a browser to see an accurate preview of an animation using the Do Not Dispose option. Discards the current frame from the display before the next frame is displayed.
Only a single frame is displayed at any time and the current frame does not appear through the transparent areas of the next frame. You select a looping option to specify how many times the animation sequence repeats when played.
Note: Looping options can also be set in the Save for Web dialog box. Legal Notices Online Privacy Policy. Buy now. Create frame animations Search. Color mode and bit depth. Video layers can contain files in the following color modes and bits per channel bpc :.
Animation panel overview. Animation panel frame mode. Animation panel timeline mode. Frame mode controls. In frame mode, the Animation panel includes the following controls:. Looping Options. Frame Delay Time. Tween Animation Frames. Duplicate Selected Frames. Convert To Timeline Animation. Converts a frame animation to timeline animation using keyframes to animate layer properties. Timeline mode controls. In timeline mode, the Animation panel includes the following features and controls:.
Cached frames indicator. Displays a green bar to indicate the frames that are cached for playback. Comments track. Convert To Frame Animation. Converts a timeline animation using keyframes to frame animation. Current-time indicator. Global Lighting track. Keyframe navigator. Layer duration bar. Altered Video track. Time ruler. Time-Vary stopwatch. Animation panel menu. Work area indicators. Change thumbnail size. Choose Panel Options from the Animation panel menu.
Do one of the following:. Select a size option. In timeline mode, select None to display only layer names. Switch timeline units. You can display the Animation panel timeline in either frame number or timecode units. To toggle between units, Alt-click Windows or Option-click Mac OS the current-time display in the upper-left corner of the timeline.
Show or hide layer properties in the timeline. To show or hide layer properties, click the triangle to the left of the layer name. Show or hide layers in the timeline. To specify which layers are displayed, choose Show from the Animation panel menu, then select All Layers or Favorite Layers. Navigate the timeline. With the Animation panel in timeline mode, do any of the following:.
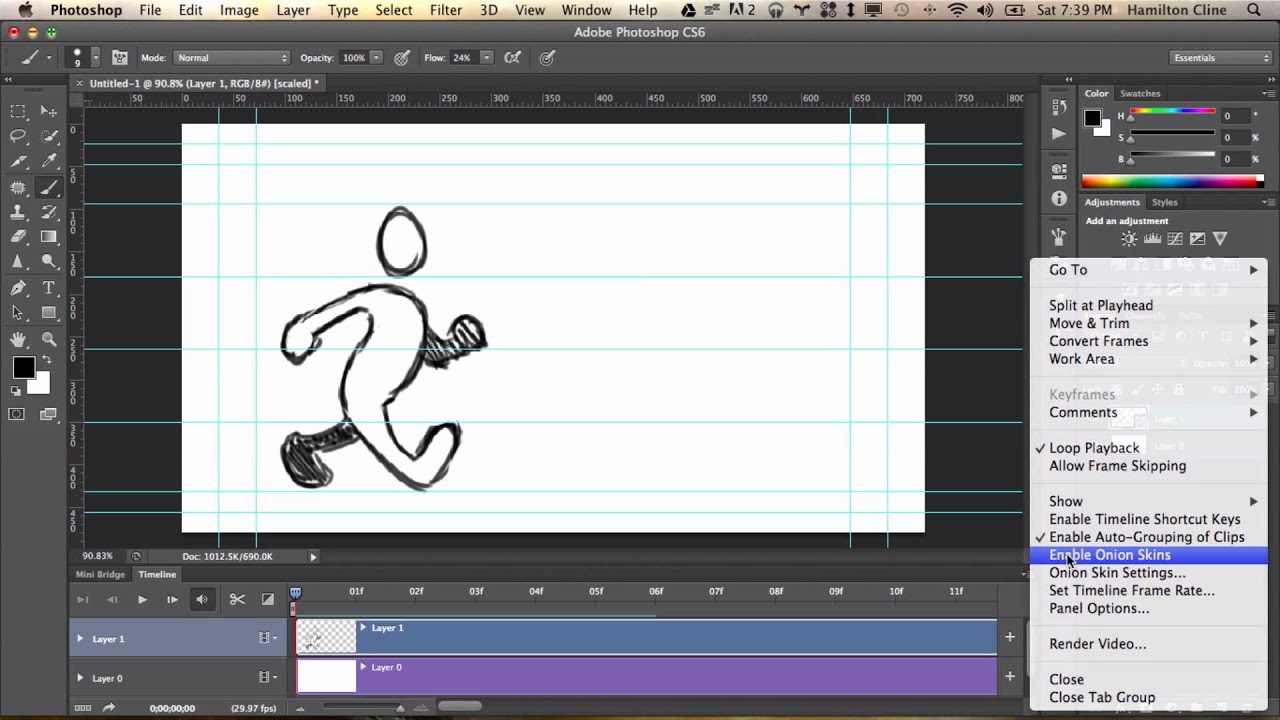
Drag the current-time indicator. Click a number or location in the time ruler where you want to position the current-time indicator. Drag the current-time display in the upper-left corner of the timeline. Double-click the current-time display and enter a frame number or time in the Set Current Time dialog box. The unicycle image is on its own layer; the position of the layer changes in each frame of the animation. To create frame-based animations in Photoshop, use the following general workflow.
Open a new document. Add a layer or convert the background layer. Add content to your animation. Add a frame to the Timeline panel.
Select a frame. Edit the layers for the selected frame. Do any of the following:. Turn visibility on and off for different layers. Change the position of objects or layers to make layer content move. Change layer opacity to make content fade in or out.
Change the blending mode of layers. Add a style to layers. Add more frames and edit layers as needed. Set frame delay and looping options. Preview the animation. Optimize the animation for efficient download. Save the animation. There are different options for saving your frame animation:.
Save in Photoshop PSD format so you can do more work on the animation later. Add frames to an animation. Select animation frames. Select one animation frame. Do one of the following in the Timeline panel:. Click a frame. Select multiple animation frames. In the Timeline panel, do one of the following:. Edit animation frames. In the Timeline panel, select one or more frames. To edit the content of objects in animation frames, use the Layers panel to modify the layers in the image that affect that frame.
To change the position of an object in an animation frame, select the layer containing the object in the Layers panel and drag it to a new position. To reverse the order of animation frames, choose Reverse Frames from the panel menu. Unify layer properties in animation frames. Unify layer properties. In the Timeline panel, change the attribute to one frame. Propagate Frame 1.
In the Layers panel, select the Propagate Frame 1 option. In the Timeline panel, change the attribute for the first frame. The changed attribute is applied in relation to all subsequent frames in a layer. Show or hide unify layers buttons.
Choose Animation Options from the Layers panel menu, and then choose one of the following:. Displays the unify layers buttons when the Timeline panel is open.
Always Show. Displays the unify layers buttons whether the Timeline panel is open or closed. Always Hide. Hides the unify layers buttons whether the Timeline panel is open or closed. Copy frames with layer properties. Select one or more frames you want to copy in the Timeline panel.
Choose Copy Frame s from the panel menu. Select a destination frame or frames in the current animation or another animation. Choose Paste Frame s from the panel menu. Select a Paste method:.
Replace Frames. Paste Over Selection. Click OK. Create frames using tweening. Using tweening to animate text position. To apply tweening to a specific layer, select it in the Layers panel.
Select a single frame or multiple contiguous frames. If you select two contiguous frames, new frames are added between the frames. Do one of the following:. Choose Tween from the panel menu. Specify the layer or layers to be varied in the added frames:.
All Layers. Varies all layers in the selected frame or frames. Selected Layer. Varies only the currently selected layer in the selected frame or frames. Specify layer properties to be varied:.
|
Drawer Glide Hardware Yoga Woodworking Plans Rotating Bookshelf Quote Diy Pocket Hole Jig Youtube Jp Under Desk Drawer Adhesive Image |

Torres
15.08.2021 at 14:47:24
xixixixi
15.08.2021 at 20:46:41
xan001
15.08.2021 at 23:48:58
ToXuNuLmAz0077
15.08.2021 at 23:37:31
Anechka
15.08.2021 at 19:29:41