Homemade Wooden Go Kart Plans With Pedals,Good Combination Square For Woodworking,Jet 6 Inch Jointer For Sale Oxford - 2021 Feature
The most basic style of go-kart is a gravity racer. These are commonly known as Soap Box Derby carts- they lack motors and gain momentum speeding down hills. A recreational go kart is frequently powered by electric motors or four-stroke engines.
High-performance racing typically employ two or four-stroke engines. Generally, go karts are single-seaters and are rarely built to handle passengers. Are you interested in kart racing? Then you can try to build a powerful and easy to control go- kart using this plan.
However, the builder warns that this is not a novice-friendly plan and some of the fabrication technique he uses might be dangerous for someone with little experience. As for the tools, you require just the basics — a drill, a chop saw, and a sander.
If you love go-karts, you might like our DIY electric skateboard plans! The motor might need a small push to start, and the builder warns that you should never attempt to start it under load. If your child loves kart racing, then he will fall in love with this retro go-kart that looks just like a small vintage car. The kart is made of wood even though it looks metal, and it has all the necessary features to delight both children and adults.
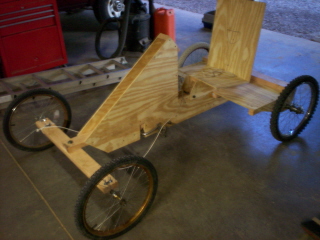
This simple go-kart is perfect for those that want something functionally but cheap. You just have to find four wooden boards, four wheels, nails, and bolts. You can pick whatever wheels you want and get nails and bolts to match them.
A gravity-powered go-kart is perfect for those that want their children to have fun and learn some basic driving skills at the same time. However, this instructable is more useful to those that have an idea for a go-kart in their minds and are looking for inspiration.
This electric go-kart is an excellent choice for those of you that want something that could be useful even off the racing tracks. This model has three wheels, in contrast to other designs, an electric motor, and a seat for a passenger. There are detailed instructions how to build this go-kart from the frame to the motor. However, this is not an easy construction, and it requires skills and knowledge that might be beyond the abilities of a novice.
It features brakes, bumpers, adjustable chain, a chain guard, and a mower engine. Decide how long and how wide you want your kart frame to be and then draw the design on a big sheet of paper. The builder recommends that you build a jig first so that it will be easier to construct the frame.
You also need a horizontal bandsaw to cut the steel and experience in welding and soldering. Do you want a simple but fully functional go-kart?
Then you can try this amazing design which features a plastic chair as a seat. As for the tools, you require a wood cutter, a plastic cutter, and a drill. You can build this beauty for several days, and it will cost you almost nothing if you have some spare parts lying around. The engine is also homemade, and the whole project might take more than three months to complete.
Unfortunately, there are no detailed instructions to help you build this awesome go-kart, but there is a video you can watch for more information. Also, keep in mind that this is not a cheap homemade go-kart and it might be less expensive if you buy a new one. If you purchase an old bike, you can try this plan to turn it into a fantastic race go-kart. You must have an angle grinder, MIG welder , some basic tools, and enough space in your garage.
He recommends a Suzuki Katana AY The plan will help you turn your old riding mower into a go-kart with the aid of a go-kart frame and some basic tools.
The most challenging and time-consuming part of the project will be disassembling the riding mower so be careful and follow the provided instructions. This race kart is perfect for those that are looking for something inexpensive and suitable both for children and adults.
The builder recommends a model with a lot of space between the ground and the bottom frame for those going up the mountain. Then this plan might come in handy. However, the good thing is that there are some videos you can watch that show the building process. This mix between a scooter and a go-kart is built with minimal skills. For the rear, the builder recommends Yamaha BWS scooter because it will provide everything you need for your go-kart -brakes, tank, wheels, cables, etc.
However, there are no detailed instructions provided, but the builder does provide some pictures to help you along. You can make this simple off road go-kart with the help of four wagon wheels, zip ties, one plastic chair, rope, two threaded rods able to support up to lbs, and some wood.
The good this about this design is that the builder provides you with well-written instructions how to build this go-kart.
However, you should have experience in welding and machine work. The builder offers some excellent options that you must look at and then draw out how you imagine your kart would look. As for the material, the builder recommends metal over wood and gives you some tips where to find a cheap one. It features a cc bike engine, four gears, front and seat suspension, a racing kart seat, and 1.
However, the builder provides you with only a brief video explaining the process and recommends that you buy a book that teaches you how to build your own buggy.
This cool go-kart is made out of two used bicycles. Make sure you plan the go-kart accurately and using specific measurements, in order to fit the correct materials into the kart. There are three sizes of karts, measured from the center of the King Pin to the middle of the rear axle: Baby kart: Ages , Frame size: to mm Cadet kart: Ages , Frame size: mm to mm Full size kart: Ages 12 and up, Frame size mm.
Gather your materials. If you're short on cash, visit a scrap yard and see if you can pick up any low-cost parts. Or, you may be able to salvage parts from an old riding lawnmower or a junk go kart found at a yard sale. Ask lawn mower repair services for spare parts or junked out riding lawnmowers and used 4 cycle engines in the 10 to 15 horsepower range, with horizontal shaft and a drive clutch assembly. Here's what you'll need: For the chassis: 30 feet 9.
Obtain a welder. If you've got no experience welding , you will have to hire a welder for this project. The most essential part of the go-kart is a solid chassis that'll hold you onto it while driving and house the engine.
If you don't have experience welding, don't start by putting together a go-kart. Start with other smaller projects if you want to learn. Consider buying a go-kart kit. If you're not interested in welding and designing your own go-kart, purchase a no-weld kit that you can put together with simple tools, featuring detailed instructions and schematics to make the job a snap.
Part 2 of Cut the metal tubing. Cut your lengths of tubing to the appropriate lengths, given your design or Free Simple Outdoor Wooden Bench Plans With schematics. For most designs, the front end will feature a camber angle, narrower than the rear, which will allow the wheels room to turn, allowing the chassis to twist slightly.
To do this, mount a King Pin at the front corners where the wheels will be, to allow for easy twist. For an easy eye-guide, consider marking up the floor of the garage or the area you're working with sidewalk chalk of the appropriate measurement, to keep you from having to remeasure repeatedly. You could even draw out the whole design on the ground and start laying it on top.
Make a jig for your kart optional. A Wooden Storage Bench Plans Free Game jig is a flat piece of metal with slots for clamps to hold down the tubes. This will help you weld the tubes in the right place! Weld the frame together according to your design. Use concrete blocks to keep the frame elevated while you work, making sure all your connection points are solid and the chassis is secure.
It needs to be strong enough to hold your weight and the weight of the engine, so it's not the time for a shoddy weld job. For more strength, use gussets at all corners.
Assemble the front stub axles. Build your axle with a straight piece of 0. Use washers and cotter pins drilled through the axle to keep the assembly in position.
Install the front stubs that'll allow you to turn easily before messing with the steering column and attach your King Pin, to the steering arm. You'll need to have at least degrees of angle on the front wheels, so Simple Wooden Box Plans Zip plan accordingly. Install your rear axle and wheel assembly. You'll likely need to assemble an axle carrier with a bearing bracket for the rear axle, meaning that the axle itself can be welded to the frame while also spinning freely and snugly.
Rather than making your own, you can also purchase these assemblies, sometimes called "Pillar Bearing Units. Build your seat out of plywood and bolt it to the frame. Drill holes in the plywood and install T nuts within the holes to provide support when bolting the seat to the frame. Cover the plywood with 2" high density foam, then cover the foam with marine vinyl.
Secure the vinyl to the seat by stapling it to the underside or back portion of the plywood. Alternatively, you can try to salvage an old go-kart seat or an appropriately-sized car seat from the junk yard to save money. Leave enough room for the steering, engine, and other controls. Part 3 of Install the engine mount. Place the engine on the plate, and mark the holes for the mounting bolts so that the engine pulley lines up with the drive pulley on your axle.
Attach the drive pulley on the axle prior to mounting the axle in the bushings. You can either use a set screw to hold it in position, or weld it directly to the axle, but it should be aligned with the pulley on your engine. Assemble your steering linkage. Use the 0. To make the degree bends in the 0. Provide adjustable links for aligning steering, because it is very important to have the proper caster and camber: front-wheel vertical and steering tilt.
Install the wheels and brakes. Get some small racing wheels to give your kart the optimum acceleration and control. Fix them onto the axles with hubs and start working on the brakes, so the go-kart will be safe. For the brakes, fix a disc onto the rear axle and a caliper assembly onto the chassis for the most professional system possible. Often, you can acquire these assemblies in relatively good shape from junked motorbikes. They're the appropriate size and will be easy to work with.
Install a brake pedal to operate with your foot, regardless of what kind of acceleration you have. Don't leave too much to do with your hands other than steering. Attach the throttle cable to the hand throttle. Depending upon your experience and the kind of engine you're working with, you may be able to put together a foot pedal, or you may just need to make it easy and throttle-up like you would a lawnmower.
Double check your brakes and suspension system before test-driving. Even if you're going at relatively slow speeds, it's important to make sure you're not going to slip an axle on your first go-around. Double check your welds, your brakes, and the engine's mounting. Then take 'er for a spin!
It is a perfect parent-child project for pre-teens and teens. Not Helpful 8 Helpful Is it possible to construct a go-kart which can run both by fuel as well as by charging a battery? Unless you are a professional, it could be very difficult. An electric engine requires a battery, which would add a lot of weight, and a smaller battery would die too quickly.
One way you could kind of have an engine that uses both gas and electricity would be an electric start. Not Helpful 17 Helpful If I can't buy or make the parts you suggest, how can I make another cool go kart with a few parts and an engine? Probably the easiest way to have a working kart for cheap is to buy a kart from offerup or craigslist. It will be easier and cheaper to refurbish a kart instead of build one I'm talking from experience.
Not Helpful 7 Helpful Caleb Tincher. If you want to have better acceleration or traction, consider buying a live axle. This puts power to both wheels. If this isn't enough, find a turbocharger or supercharger to put on it, and you could also put a motorcycle transmission on it.
Not Helpful 13 Helpful If you are asking in relation to what is the main means of moving the kart around, not necessarily.
The go kart instructions here are for a gas powered engine kart. A kart could be powered by a battery and electric motor. If you are just asking in general if they have batteries, then it would depend on the setup: A battery might be added for lighting or for an electric motor to start the gas powered engine.
Not Helpful 9 Helpful You could ask your local go-kart club, as they'll have all the experience and knowledge you need. Not Helpful 10 Helpful 8. Not Helpful 8 Helpful 6. What is a lightweight way to add power to headlights if I want to add them to my go kart? The batteries should go as close as possible to the headlights so you would need fewer wires. Not Helpful 9 Helpful 6.

|
Health Ometer Digital Tape Measure Of Woodwork Tools For Sale South Africa Small Box Hinge Mortise Jig Narex Marking Knife Review 75 |

QAQAS_KAYIFDA
28.11.2020 at 12:15:36
ABD_MALIK
28.11.2020 at 17:33:13