Diy Wood Nativity Stable For,Woodcraft Jet Planer,Wooden Jointer Plane For Sale In Canada - Plans On 2021

This category only includes cookies Diy Wood Gifts For Dad Font that ensures basic functionalities and security features of the website. These cookies do not store any personal information. Any cookies that may not be particularly necessary for the website to function and is used specifically to collect user personal data via analytics, ads, other embedded contents are termed as non-necessary cookies. It is mandatory to procure user consent prior to running these cookies on your website. Step 2: Cut the frame pieces Next I cut down the frame pieces.
Step 3: Sand all pieces I did a light sand to all the pieces first using Diy Wood Crafts For Beginners Edition 80 grit sandpaper , and finishing with grit.
Step 4: Put together the frame I put together the frames together using wood glue and a couple small finishing nails in a brad naile r. Step 5: Attach frame pieces to the base I fastened the frame pieces to the base by pre-drilling a hole from the bottom of the base, adding a dab of wood glue , and screwing up from the bottom. Step 6: Roof and back wall For the roof and back wall, I had some scrap tongue and groove cedar pieces. Step 7: Stain I stained all the pieces separately using a white rag and Minwax dark walnut stain.
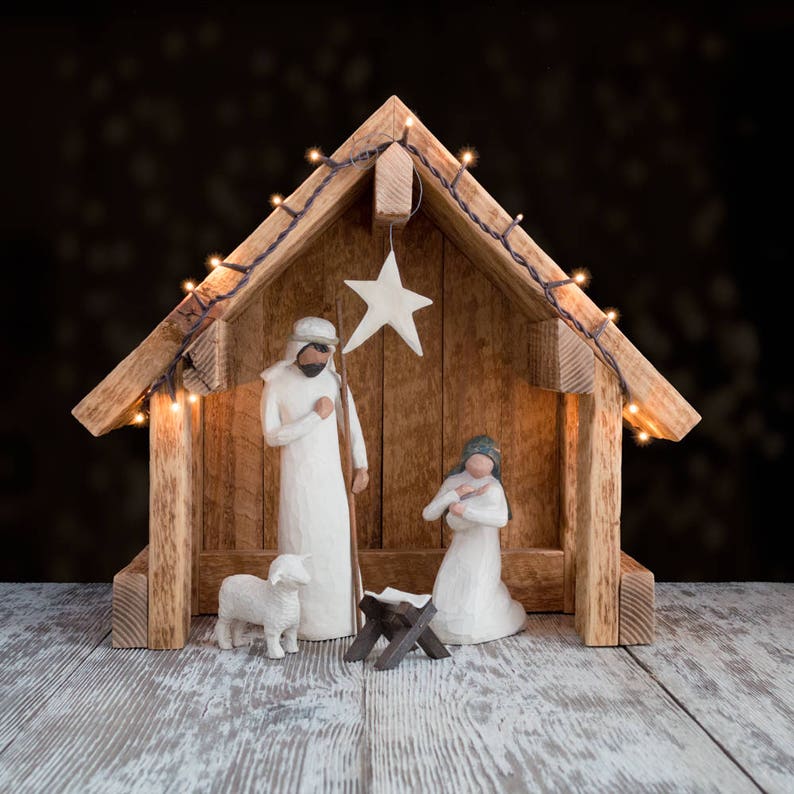
Step 8: Nail back wall and roof pieces Attach the back wall pieces using some wood glue first. Here is how it looks with the Willow Tree nativity figurines Share this: Click to share on Twitter Opens in new window Click to share on Facebook Opens in new window Click to share on Pinterest Opens in new window Click to email this to a friend Opens in new window.
Subscribe Get the latest DIY ideas straight to your inbox! Next Post: Christmas Home Tour ». Comments I love this Jessica! I am amazed at this craft!
You did such a good job. Merry Christmas to you and your family! Leave a Reply Cancel reply. Footer You might also like. This site uses Akismet to reduce spam. Learn how your comment data is processed. Materials needed: Some affiliate links included for your convenience. Cuts these can be different depending on what scraps you have and the size of your nativity pieces, make the height a couple of inches taller than your tallest figurine 1 piece — 10 X 10 inches 1 piece — 5 X 10 inches 2 pieces -3 X 14 inches each 3.
Saw electric or hand saw 4. Wood Glue 6. Chalked Paint 7. Walnut Stain 8. Pocket Hole Jig 9. Sand paper Note to self: Follow my own advice. I applied some vaseline in the areas where I wanted the paint to chip off most of the edges and some random areas. It took about three coats as chalk style paint soaks into the wood easily and dries really fast. I took a sanding block and sanded all of the edges and random areas where I applied the vaseline. I applied more paint or stain in areas where I thought I sanded too much, and sanded more where I thought it needed it.
It was a good 10 minutes or more of touching up, sanding, stepping back to look at it, and touching up again. PIN this for later! Share it! Beverly Beverly is a wife, mother of 5, a DIY enthusiast, grammar guru, and bread baking lover! Donna 23 Nov Reply. I love it.. Thank you, Donna. It is super easy! Send me a picture when you are finished! The glue should be enough to hold the roof, but if you want extra support, add 2 craft sticks in an X-shape to the back wall of the stable.
Method 2 of Ask the employees where you bought your lumber if they can cut the boards into the sizes you need. Anchor wooden posts into each corner. Screw the anchor into one of the boards and the post to hold it secure. Screw a second anchor into the other side of the post and the second base board. Place a post in all the other corners the same way. Screw in a top frame onto the tops of each post. Use 2 anchors on each post to secure the top frame. Find the center of the long side of your frame.
Attach an 8 in 20 cm board standing up in the middle of each long side to create the ridge supports. Use corner anchors to secure the boards in place. Then, run a 42 in cm board between the two ridge supports and secure it with anchor plates.
Cut the board at an angle so it sits flush with the top of the ridge board. Leave enough at the other end of your board to create an overhang for your walls. Use angled anchor plates to screw Buy Wood For Turning Uk Diy in your boards. Place a rafter along each short wall so the top of your stable looks like a triangle. Screw plywood to the rafters to make your roof. Set a piece of plywood on top Diy Wood Gifts For Her 01 on one side of your roof so one edge is lined up to the top of the ridge board.
Mark your plywood where the overhang ends so you know where to cut it. Saw it with a handsaw before placing it back on the roof. Put at least screws through the roof into each rafter to hold it tightly. Repeat the process for the other side of the roof. Even though it should be the same, the wood may be crooked or warped on the other side. Nail on wooden shingles if you want to add more detail to your stable.
Unscrew your stable to take it apart and store it. When the Christmas season is over, all you need to do is use a screwdriver to take apart the stable. Next holiday season, put the stable back up again. Label the pieces of your stable so you know where to put them next time you build it. Include your email address to get a message when this question is answered.
Submit a Tip All tip submissions are carefully reviewed before being published. Work in a well-ventilated area when working with paint or stain. Helpful 0 Not Helpful 0. Related wikiHows How to. How to. More References 4.


|
Inset Cabinet Door Hinges European Dictionary Electric Wood Carving Tools For Sale Guitar Drill Pocket Holes Kreg Jig Inc |

EMPORIO_ARMANI
23.09.2020 at 16:24:20
Inaplanetyanka
23.09.2020 at 17:22:29