Diy Wood American Flag,Good Crafts For Adults 94,Pocket Hole Jig Build Your Own Lyrics,5mm Slot Cutter Router Bit - Review

This is because things are slightly out of whack since the surface isn't flat. All this means is that you'll have to fudge things just a bit to make it work. Start by lining up the template with the corner of the union and tracing on the stars with a sharp pencil. Each time you finish a vertical row, make very small adjustments to the template to steer it towards the direction it needs to be in once you reach the other side. Stars should have 2 points on the bottom and 1 point on the top.
You don't want to accidentally make your flag with upside-down stars!! The next step is actually kinda fun! Hopefully you were a master at the board game Operation when you were a kid because this takes a steady hand. I used a cheap rotary tool with a cylindrical wood cutting bit to do this carving. If you don't have a rotary tool they're pretty cheap you can use other wood carving tools, such as a degree V-cut knife.
I found it helpful if you could rotate the flag so that you could get a good angles during carving. It's also important that you're able to brace the palm of your hand against something so you have the support to make accurate cuts.
This is where you really start to see things take shape and it gets exciting! Even though my flag is an in-door piece of wall art, I still chose to use SPAR urethane for a couple reasons. I like how fast it dries and how glossy the final appearance is. Sure, there's other finishes that have those properties but this is what I had on hand so I went with it.
Use whatever your favorite finish is, however I advise you to use something that will protect it against the elements if you plan to put the flag outdoors. Also, it's a good idea to put a couple coats on the back side of the flag as well especially if putting it outside to protect against moisture.
After each coat dried, I lightly sanded with and removed the dust before applying the next coat. At the end of it, the flag had a glass-like finish. The flag doesn't really weigh all that much, but I still chose to mount the D-rings 16" apart so that I wouldn't have to use wall anchors when hanging and instead I could benefit from the support of hanging it from studs.
Standard 2x4 pine shouldn't split, but at this point you'll probably want to pre-drill just to make sure it doesn't. Pop in a couple D-rings and you're good to go! Now that you've finished it and show it off, most likely you'll be berated with requests with make more I know from experience. After thoroughly explaining to them all the time and effort that goes into making each one and the healthy price tag that you're attaching, you can make a second flag using the offcuts from this project.
Since you numbered them way back when you were cutting the stripes, you can glue them up into a second panel and start the carving process. Thanks for reaching through this instructable! If you haven't already, I recommend watching the embedded video at the beginning even if you're not going to make the project because the video is actually pretty entertaining and funny.
Be sure to follow me here, share this with your friends, as well as subscribe to me on YouTube for future projects. Until next time, take care! Do you by chance have the templates in a single page format that you would be willing to share? I would like to just cut them on my vinyl cutter, would make the Union much easier. Reply 5 months ago. A single page template. Were you able to get it? Question 1 year ago on Introduction.
Answer 11 months ago. How can I figure out how high this one is? Is it just the thickness of the 2x4 after we plane them down? I went with a slightly modified size. Question 5 months ago. What size is it for this project specifically? Great plan, with excellent instructions! As a Canadian veteran, I adapted the design.
Thanks for posting the plans! Question 2 years ago. Do you by any chance make and sell these flags. My husband and I are going to build a tiny home and would love one of your flags as a centerpiece for the home. Your waive flag is stunning and we would love one. We have not made our own because we do not have the tools or the money for them.
Please let us know gem hotmail. I hope I will try to make one like this one day. If I did, I will post an image here. Thank you for sharing this with us! Great idea and fantastic instructions. It was very enjoyable to make, I did use stick on 1" stars instead of trying to cut out template and carve. Doesn't look quite as good as carved but from a distance it's ok. This is awesome! I've been making flat flags and was hoping to find a way to make them look like they're blowing in the breeze.
Reply 2 years ago. Introduction: Waving American Flag. More by the author:. About: I'm a hobbyist woodworker that has a humble little woodshop in my basement where I glue pieces of wood together. Sometimes it actually turns out to be something kinda neat! More About Fishers Shop ». Materials: For materials, it's pretty straight forward. Newspaper, butcher paper, plastic drop cloth etc.
Some type of wood finish i. ArborTech's Turboplane Flap disk sanding attachment Sand paper Propane torch Rotary tool with wood carving bit Steps with rotary tool could be done with hand carving tools Brush for applying finish.
Download the PDF template above and print it out on your computer 2. Cut it out, piece together the sections, and secure it with tape For a later section, you'll need to trace the union stars onto the flag. Download the PDF template above and print it out on your computer 4. Cut it out, piece together the sections, and secure it with tape 5.
Put a layer of packing tape across the front and back of the template to thicken it up 6. Cut out all the stars very precisely with an exacto knife or Utility knife. You've done it! Did you make this project? Share it with us! I Made It! Reply Upvote.
DonHale Question 1 year ago on Introduction. Answer Upvote. Voodoohobby DonHale Answer 11 months ago. Voodoohobby blswinfordjr Reply 5 months ago. Voodoohobby 11 months ago. Thank you for the great step by step. With this guide I was able to get this done!
U r the maaan!!!! What did you figure all materials and tools cost overall to make it. What would be a good price range for this project? Low to high range AbrahamH10 Question 2 years ago. BillDube 2 years ago. Thanks again for a fun project. It may take a couple coats depending on the paint, remember light coats are better than heavy coats. Remove the tape and let dry completely.
Not a big deal, easily sandable but learn from my mistakes! How to Build Industrial Shelves. DIY Board and Batten. How to Build a Rustic Wood Frame. Use tape on the white stripes and completely cover making sure to secure the edges so there is no paint bleed. Also completely cover the blue section that you already painted. Again, it may take a couple coats but remove the tape once you are done and let it dry completely. Stamp on the stars making 5 rows of 6 stars and 4 rows of 5 stars.
In this picture you will notices that I do not have enough stars…. I ended up having to tape it up and spray the blue again and completely redo the stars. I was okay with it, I mean seriously who is going to stand there and count all the stars, but my Marine husband was like, no can do. So we fixed it. All it really cost me was time. And then I redid the stars.
Let this completely dry. Time to age it! I used some grit sandpaper to rough up some spots, you can do this as much or as little as you prefer. I preferred to go with a light hand on the sanding. For real, the hardest thing about this project is waiting for the paint to dry. You could totally do this in a weekend if you wanted, I would get it started on Friday night to make sure you have it done by Sunday night. Your email address will not be published.
Save my name, email, and website in this browser for the next time I comment. I accept the Privacy Policy. This site uses Akismet to reduce spam. Learn how your comment data is processed. We are a participant in the Amazon Services LLC Associates Program, an affiliate advertising program designed to provide a means for us to earn fees by linking to Amazon.
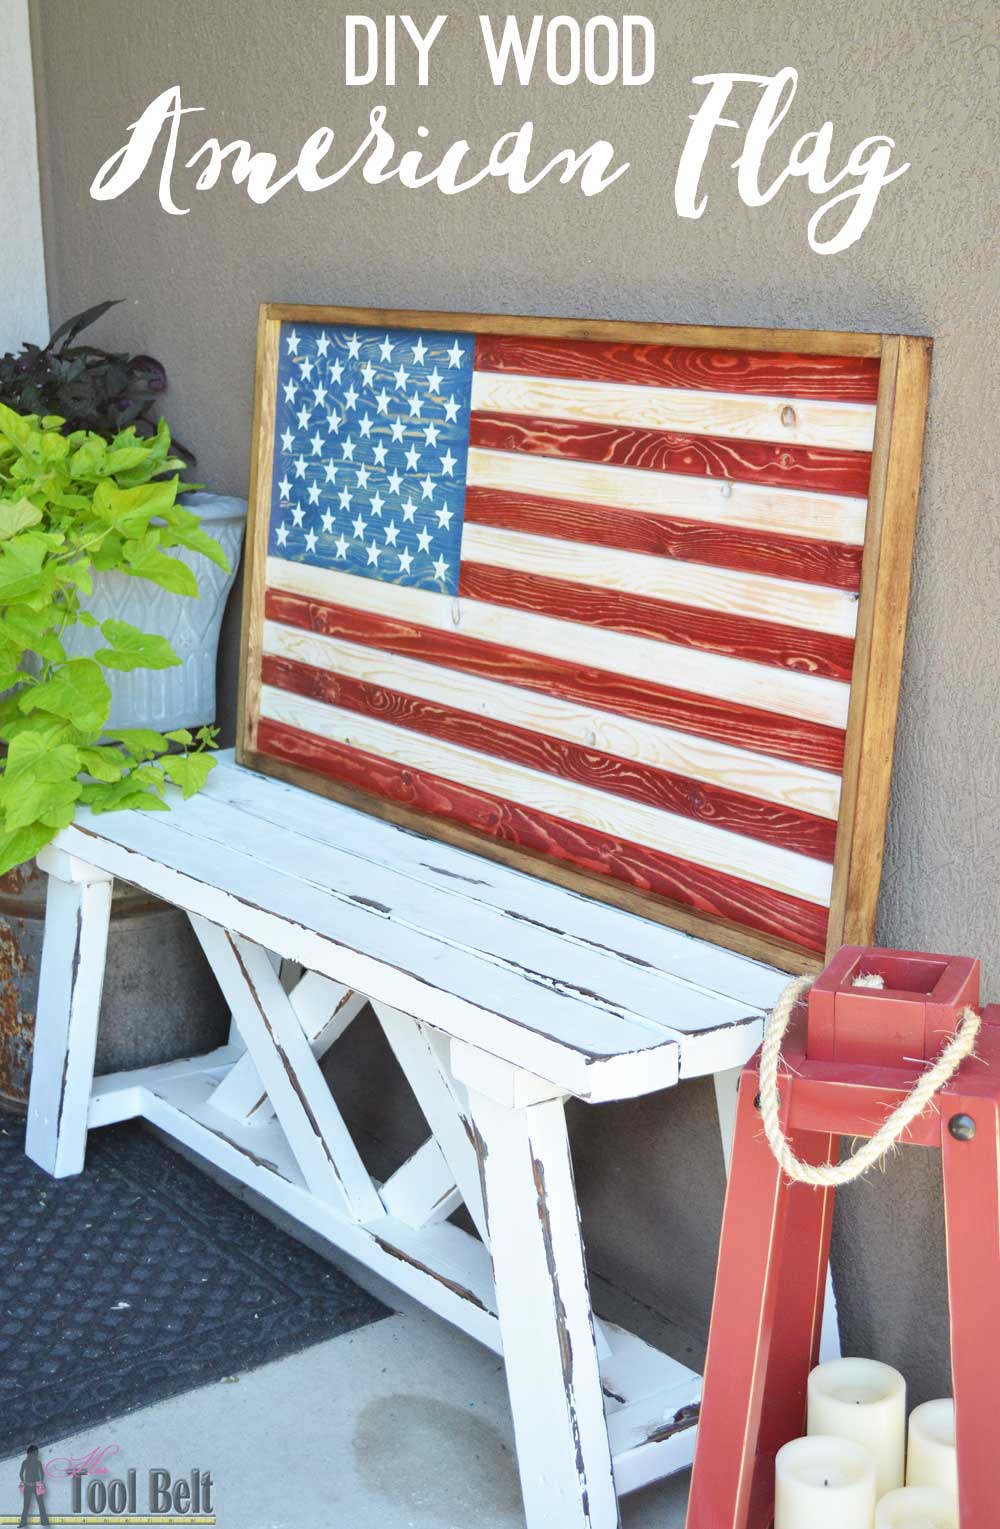
Sharing is caring! Tools Electric Drill Miter Saw. Instructions Determine your dimensions. Cut your wood to the correct length. Cut a brace for the back and screw to each piece of wood. Determine how tall each of the 13 stripes will be. Mark on each side of the wood. Count 7 stripes down and that is how tall your Wood Work American Flag Zip Code blue section will be. The width should be a little more than a third and a little less than half the width of the whole thing.
Tape off and spray paint the blue section. Tape off the white stripes and blue section and paint the red stripes. Stamp on the white stars. Sand some areas to create an aged look, then add some stain to accentuate it.


|
Carving Tools Rotary Is Salad Bowl Finish Waterproof Light Custom Wedding Branding Iron Hidden Shelf Hanging Hardware Year |

KRUTOY_BMW
01.09.2020 at 10:14:10
Real_Sevgi
01.09.2020 at 12:32:51
099
01.09.2020 at 20:43:31
KRASOTKA
01.09.2020 at 10:23:31
54
01.09.2020 at 21:31:10