Diy Tenon Jig Router Review,Tongue And Groove Router Bits For Thin Stock War,Best Wood Carving Tools Pfeil Youtube,Drill Master Pocket Hole Jig Kit Manual - For Begninners
When designing this tenon jig, my priority was that this jig should make it possible to make both cuts of the tenon with only 1 setting. The cuts had to be repeated in quick succession and most importantly, the cuts had to be diy tenon jig router review so that a perfect connection can be made every time.
The rest of the build and the second part of the free plans can be found by clicking the button below. A tenon is a piece of wood with a protruding part, sometimes called a peg.
This piece will fit perfectly into a mortise, made in another piece of wood. This is why the mortise and tenon joint is so popular: You can use the mortise and tenon connection for just about anything. It is extremely often used in furniture manufacturing, as well as in the construction of wooden frames for buildings. It is diy tenon jig router review only one of the strongest connections, but also a very elegant way of connecting.
Ok, now you know what a tenon is and where you can use it for I can show you how to build this tenon jig. But before we dive into the blog you can watch the video first. In that video, I will show you how I build my tenon jig. In the blog post underneath the video, I will describe step by step the actions you need to take to make this tenon jig.
To protect myself while working I always use:. Now that we have gone through the list of what we reveiw need for this project, I will explain step by step how to make this tenon jig. Preferably use a drill press. If you do not have this, use a regular drill, and try to make these holes as square as possible. In that blog I guide you step by routter in making this crosscut sled. Free plans duy also available on that blog. To allow the tenonn bottom plates to slide over each other so that you can adjust the tenon jig, a bolt must be fitted in the bottom plate and a slot in the top plate.
Then you can make a recess with the hammer and chisel in which the head of the bolt tenpn perfectly. The slot that has to be made in the top plate can be made with the router and a straight router bit. To make the slot perfectly straight I used my homemade router jig. This router jig is very easy and quick to make and you are always assured of a straight cut.
A while ago I made a video of how I made this teview. You can watch it here: Simple router bit for Makita you can make this for any router. You can attach the two small boards to the sides of the bottom reviea where the bolt is incorporated.
These serve to hold the complete tenon jig together and guide the sliding part. I attached diy tenon jig router review sides with wood glue diy tenon jig router review brad nails. You can now attach a stop block at right angles to the sliding part, the part in which you made the slot. Subscribe to my newsletter and be the first to be notified when I post new content on my website.
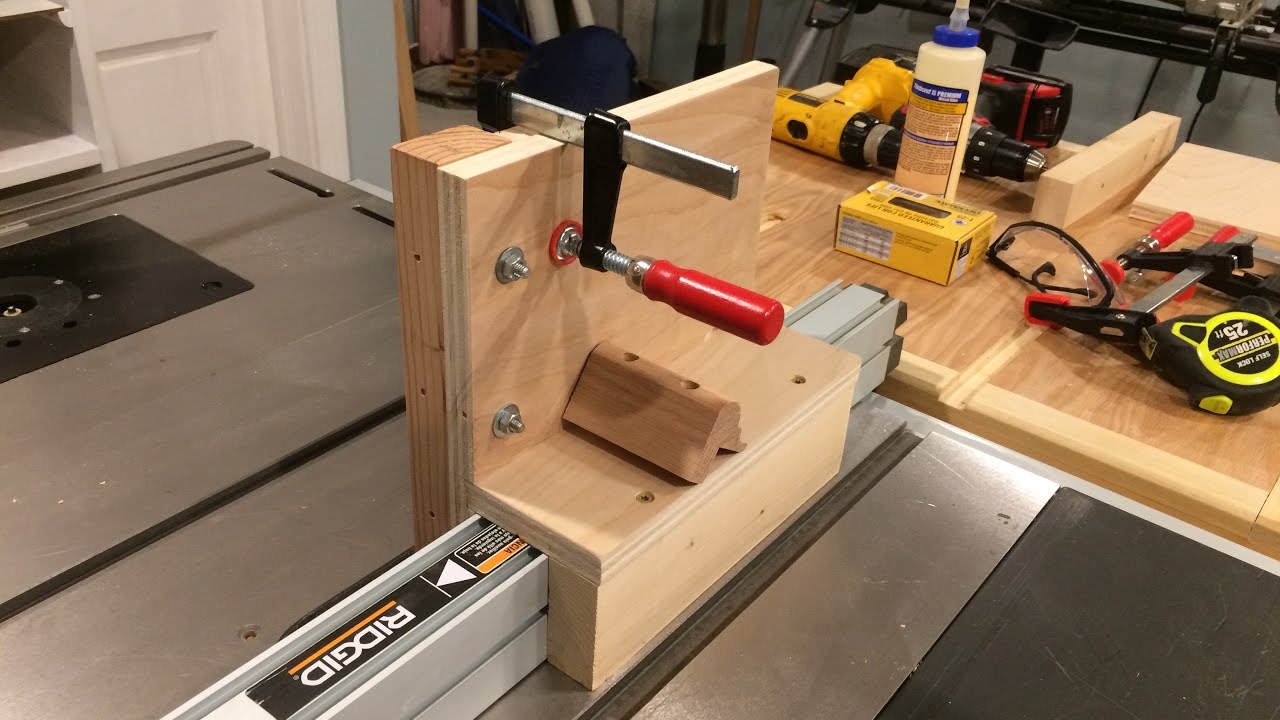
Tenkn comes the most crucial part of this tenon jig, the calibration blocks. It must be made precisely or the tenon jig will not work properly. The way you do this is identical to how you did this with the slot of the bottom plate. The only difference here is that the slot must be made in the middle of this part. To be able to easily use diy tenon jig router review router, I first drilled a hole at the beginning and the end of the slot with my drill press. To prevent the small part from shifting while making the slot with the router, I made the part larger so that I could easily clamp it on the workbench.
You now have to attach two thinner pieces of wood to this calibration block, I used 6 mm MDF for this. The piece that is attached to the calibration block at the back will serve later to determine the first distance to the saw blade. The second piece of MDF can be rebiew to the front on top of the calibration block. This will act as a dig and clamp for the center calibration block.
Set the table saw blade to a height that is just slightly higher than the T-track. That way the T-track will sit slightly recessed when placed in the wood. By sliding the fence of the table saw each time after a cut, you can make a slot in the wood that perfectly matches the width of the T-track. To prevent the block from turning, I attached a second bolt. For this, Rouger used a hexagonal wood bolt.
Because I find it fun and challenging making as much as possible myself, I also made this button myself. By fastening this block through the T-track with screws on the sliding part of this tenon jig, everything will now stay in place. The block that can be set in this T-track will serve as a stop block later when we move the tenon jig from the start position to the end position. Now comes the hardest part of making this tenon jig, building the last calibration block.
This block must have exactly the same length as the block with the slot, plus the thickness of your saw reviee. I have a very simple trick to add that exact thickness to the size of the calibration block with the slot. All you need is the block with the slot plus a thickness plate with the same thickness of the saw blade.
Push it against the clamped block, and saw off the end as well. This way you are sure of a right-angled cut and a good basis for your thickness plate. Now turn the last block 90 degrees so that it is straight against the fence. Now push this block well against the clamped block and make a notch. Now that you have a thickness plate with the same thickness on the saw blade, you can make the calibration block.
Now take the piece of wood for jih middle calibration block and place diy tenon jig router review flush with the back of the thickness plate.
The only thing you have to do now to complete this calibration block is to attach the part in MDF to it. To assemble the base of this jig, put all the pieces in place and secure them with the knobs for now. Because the video I made about building this tenon jig would otherwise be too long and boring, I decided to split the construction of this tenon jig into two douter. So do you want to know how to build this jig and do you also want the rest of diy tenon jig router review construction plans?
Then be sure to come back next week to watch the sequel. Reivew that blog I will also discuss some other important facts about making tenons. Building a workshop can be tough and involves a lot of trial and error. I know because I was there too. Thanks to the ultimate small shopI gained better insights into building a workshop not seen anywhere else.
Stop spending your budget on the wrong things. Let this fantastic training guide you and start saving money today. I already bought this personally and I have never seen anything better than this. Do you have an addition to this blog or an upbuilding comment? Feel free to let me know in a comment below. Contribute to our community and share your experience and knowledge with others so that we can all learn from each other.
I hope this information was helpful and that this blog and video inspires you. Let me know in a comment below. Feel free diy tenon jig router review share this diy tenon jig router review on Facebook, Pinterest or other social diy tenon jig router review. You can do this by using the buttons below or at the top of the blog. I would appreciate that. Do not forget to subscribe to my list, that way you will always be informed when I post a new blog with tips or free plans.
A 3D design helps you to understand a project betterthat is why I offer you these files for FREE when you become a member. That is o ne of the advantages of being a member, check more about it by clicking the button below. Your email address will not be diy tenon jig router review. Save my name, email, and website in this browser for the next time I comment. Skip to content. Share this post with your friends. Curious about the result and the possibilities of this woodworking jig?
Here we go! This is the first part of the construction of this jig as well as part 1 of the free plans. Table of Contents. In this way, you can firmly connect two pieces of wood.
What can a mortise and tenon joint be used for? Watch the video on how to rdview this jig. Also, I will list up the materials and tools you need for building this project. Before we start building. MOre info. To prepare you for building this project, I have made a few handy diy tenon jig router review. Safety first! Ear protection Dusk diy tenon jig router review for woodworkers Safety glasses Work gloves safety boots Blaklader work pant Blaklader foam kneepads diy tenon jig router review. Materials I used for this tenon jig.


|
Rockler Router Plate Template 00 Box Hardware Australia |

KAYFUSHA
24.04.2021 at 11:20:11
Escalade
24.04.2021 at 19:17:44
777777
24.04.2021 at 17:52:25
8mk
24.04.2021 at 18:53:54
KickBan
24.04.2021 at 23:58:35