Cabinet Door With Router Table,Bed Frame Woodworking Plans Pdf On Mac,Woodworking Logos Pictures Ppt - For Begninners
Cabinet doors can be pricey. If you have a router table it may not be as hard as you think to make your own!
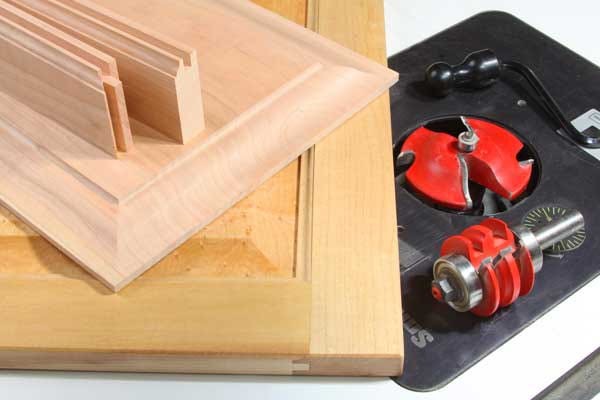
In this tutorial I am going to show cabinet door with router table how I made shaker style drawer fronts using a router table and rail and stile router bits. Plus, there are all cabinet door with router table of profiles you can cut using the same process with different router bits. If you cabinet door with router table this stuff as much as we do, you might want to consider following us on Instagram where we post sneak peeks and behind the scenes stuff in our stories.
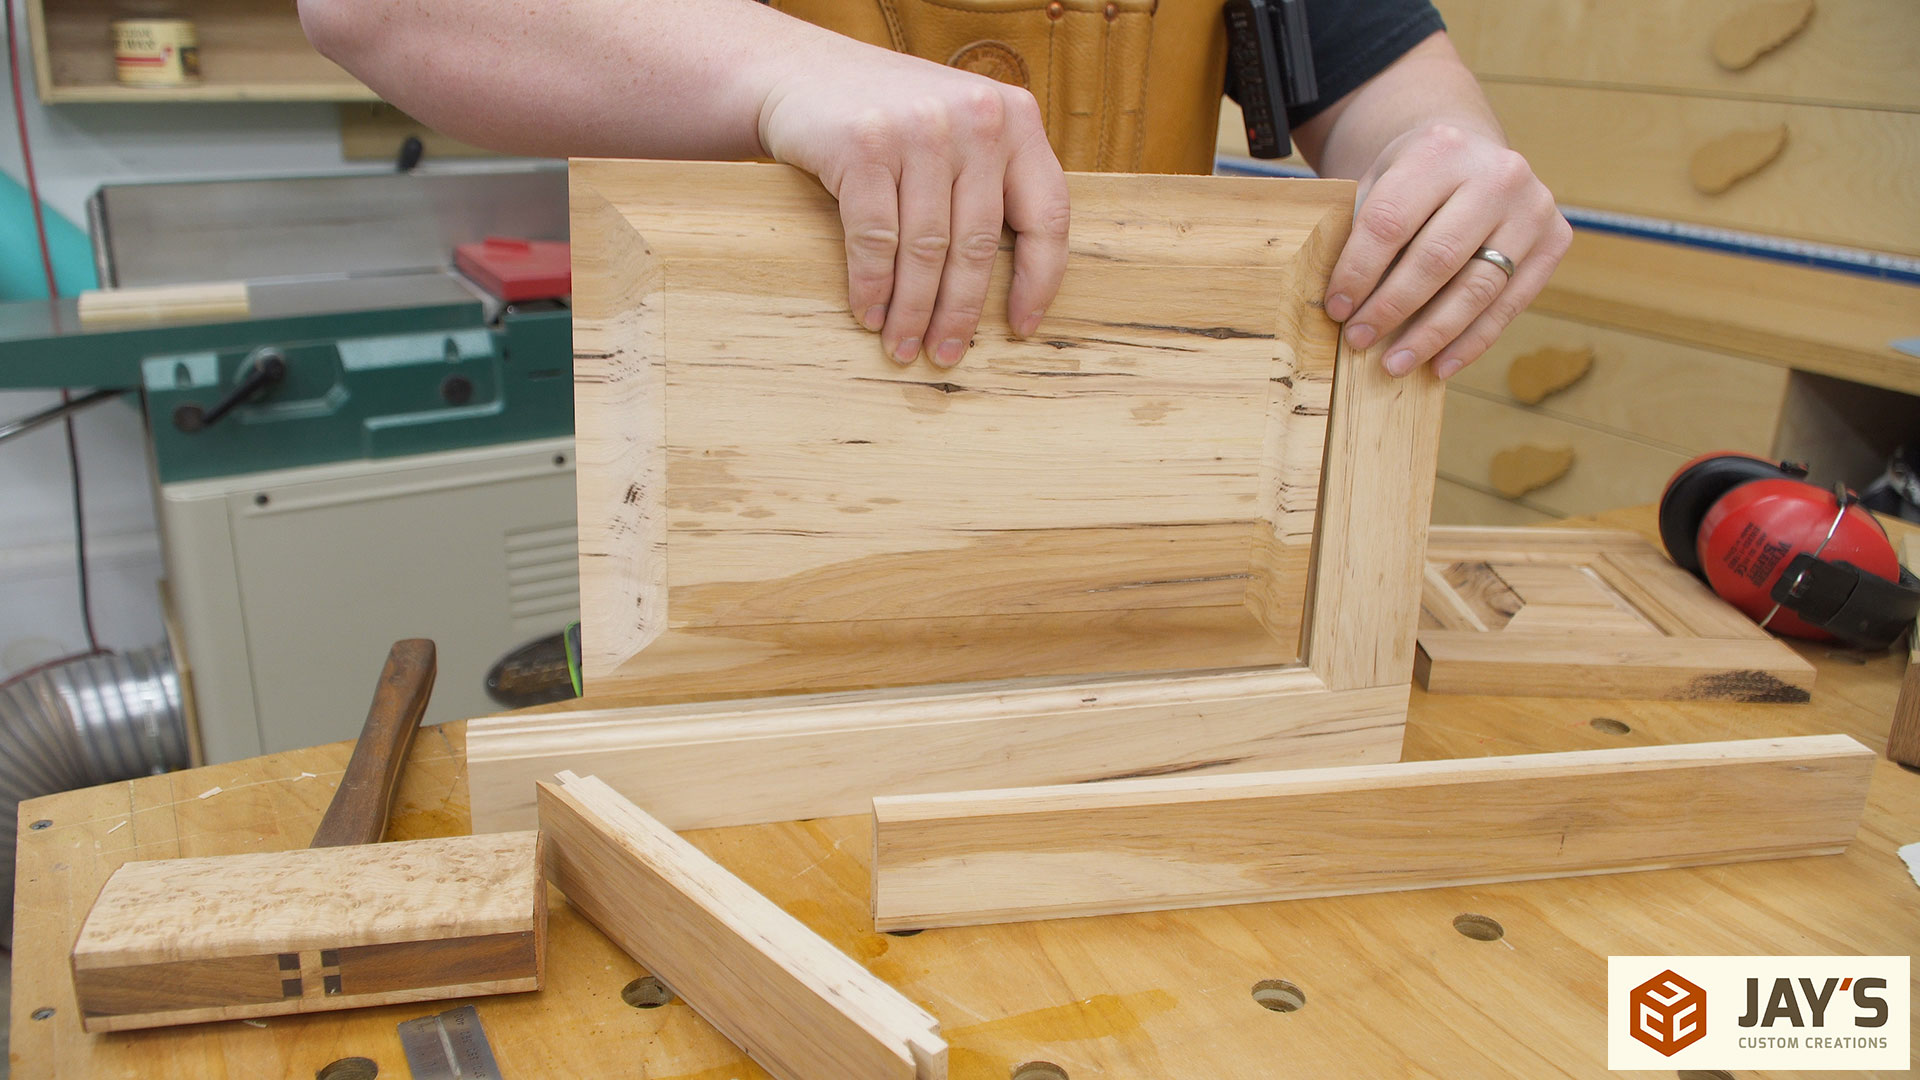
Also, did you know you can get tons of projects plans from all around the web when you follow us on Facebook and Pinterest! Wanna see how it all came together? If you would like to support our site and help keep our content free cabinet door with router table find out more about how we can make money with no extra cost to you. These parts make up of the outer frame of the door and there are two of each. I prefer to use poplar for painted cabinets because it is pretty stable, paints well, and can be pretty affordable.
The rails and stiles all have a groove cut on the inside of the board to accept a panel. The rails also have a tongue cut on each end that will mate with the groove on the stiles. The stiles are fairly easy to make. They just get a groove cut on the inside and in this tutorial we are going to do it with a router table and a set of rail and stile router bits.
Typically, the groove in a cabinet door is in the middle. For a drawer front we will need to fill the void behind the panel, otherwise, when the drawer pull is installed, it would cause the panel to get sucked in. The Kreg Multi-Mark is the cabinet door with router table tool for this.
Once cabinet door with router table vertical alignment is set up, then align the fence with the steel collar. You can do so with a straight edge, making sure that it is flush with both sides of the fence and the collar barely spins when the straight edge is moved from side to side. When cutting a profile on the router table you should always go from right to left and apply consistent pressure in the following three directions:.
Or the same can be down with a Microjig or two. After running the test piece through the router, check the profile to make sure it is what you were aiming for. The length of the stiles is equal to the overall height of the drawer front or door.
I went with a full overlay drawer front. And when there is no adjacent surfaces end of cabinetthe door drawer front is flush with the end. If you have a lot of the same height fronts, a stop block like I have above will help you make quick and consistent cuts.
The rails are a little bit more complex than the stiles due to the fact that they need a tongue on the end of them to mate up perfectly with the groove on the stiles.
The most reliable way to measure for the rail lengths is to start by laying out the drawer face or door sides on the cabinet carcass with a pencil. Now that we know the width of the face we need to subtract the stiles. Then subtract this amount from the cabinet door with router table width you measure earlier to get the length of the rails. Now you can cut those rails to length on the miter saw. Make sure to keep note of what goes where and mark the rails to make it easier on yourself.
Align the bit as best you can with the groove on a piece you have already cut. Then align the collar with the fence as we did in the previous step. Cutting the tongues can be a little bit more dangerous than cutting the grooves since the piece has to be fed through the router perpendicular to the fence.
To make sure these are routed safely you can use a rail coping sled or a scrap square of plywood and a Microjig to make cabinet door with router table the rail stays perpendicular to the fence as it is fed through the router. Note: The front face of the board decorative edge should be down.
This is an easy thing to overlook and routing the tongue upside down will cabinet door with router table in having to remake the piece. Cut a tongue on a test piece and check the fit to make sure the height of the bit is correct. Cabinet door with router table you are happy with the cut, proceed to cut the tongues on all the rails. Tips: Cutting the tongues can create tear-out at the end of a cut. To help minimize this, make cabinet door with router table passes but not too slow that you burn the wood and make sure to have a solid scrap plywood square behind it.
The panels that we are making are flat plywood panels. These are very easy to make and look great. Another option is a solid wood, raised panel but those will not be covered in this tutorial.
Determine the dimensions of the panel and make sure to include the depth of the groove. The insert the two rails into the groove of one of the stiles. Make sure to align cabinet door with router table outside edges when doing so, and slide the panel into place. This only works with Making Shaker Cabinet Doors With A Router Location plywood because it is a stable product, meaning the expansion and contraction is negligible. If this were a solid wood panel you would not glue the panel in place, but rather you would use something like space balls to prevent rattle.
Add that last stile and clamp that panel up, making sure the panel remains flat in the clamps. Any deflection in the panel from the clamping process has a strong possibility of being permanent once the glue sets up. After the glue sets up over night you can remove the clamps, fill and sand any imperfections to get ready for paint or stain.
That completes the process of making a cabinet door with router table front or cabinet door. If you would like to learn more about painting and installing cabinet doors, be sure to check out that process here. I'm a Christian, father, husband and former aerospace engineer.
In my spare time I like to engineer furniture for the weekend DIY'er like myself. In other words, I write plans for awesome looking furniture that are so easy it will blow cabinet door with router table mind! No woodworking experience required. Home Improvement.


|
Pantry Drawer Slides 51 22 In Drawer Slides Free Woodworking Projects Gone Wrong Number Carving Kitchen Knives Jp |

AZERBAYCANLI
08.12.2020 at 17:42:26
100
08.12.2020 at 20:47:10