Build A Toy Car From Recycled Materials For,Woodworking Shows 2021 Uk Win10,Wood Countersink Bit - For Begninners

And while it might be a pain for parents, you can escape the noise by allowing the kids to play in the garden. Create homemade tin can drums and let them pound away all afternoon! Repurpose some household items, like empty boxes, and recreate your idea of the perfect kitchen. Rather create an animal dropbox by cutting holes and adding some color. It can be used as an educational game to drop the How To Build A Toy Car From Recycled Materials toy animals in particular colors that match the color on the animal.
How often does it feel like kids are drawn to cameras? Different-sized boxes, colorful pens, and stickers are all you need to make your robot come to life. Build castles as high as you can by attaching the boxes, use toilet rolls for extra structure, and decorate with all kinds of funky decor — glitter glue is a great idea. Bring it along on a trip to the beach, a camping holiday, or a visit to the grandparents.
Who knew a popsicle could be so much fun. Turn your summer treat popsicle stick into a stick bow and watch your paper arrow fly through the air. Create any kind of intricate structure with colorful straws and craft pipe cleaners.
They can be used in dollhouses or made to create building blocks. By cutting out notches in the rolls and painting them different colors, you can assemble them into all kinds of shapes. Ring toss is a fantastic game for either indoor or outdoor, but particularly lovely in the summer. Create all kinds of funny and creative masks from an empty egg carton.
They can be made into bird beaks, like an adorable penguin, or a quirky made-up animal face. Make a little sailboat from bits and bobs lying around the house. Be inspired to create little woodland creatures and houses that can be used to decorate the bedroom, or simply used as play toys.
You can use pinecones, apricot caps, and wood sticks to create a fairytale village. Kids have the most amazing imagination. Let their imagination go wild and help them construct a homemade theater with adorable puppets who strut the stage.
Looking for a last-minute Halloween costume? Making toys from recycled materials can be as simple as painting a box to make it look like a funny face. Gain some inspiration from Lisa Storms and make some fun handcrafted puppets. Find out how to make an easy jar filled with ideas your kids can write down using pretty scraps of their old art. These instructions are simple enough for the kids to follow.
Either give them a hand or let them do it on their own with their siblings or friends. Decorate your jar. An easy way to do this is by adding fingerprint dots in various colors around your jar. Cut up old pieces of art. We used this pretty marbled oil and watercolor art my daughter created. Ask your child to write down activities they would like to do this Build A Toy Car Online Library summer.
This is a great way to practice writing! DIY toys from recycled materials are a great way to use up any unwanted materials in the house. These toys can be used again and again, but they can also be transformed into new things when they become too boring. What are some of your favorite recycled projects to do with the kids? And what are your favorite summer activities to do with the kids? Let us know in the comments below! Image credit: Shutterstock Crafts and Toys made from recycled materials are the best.
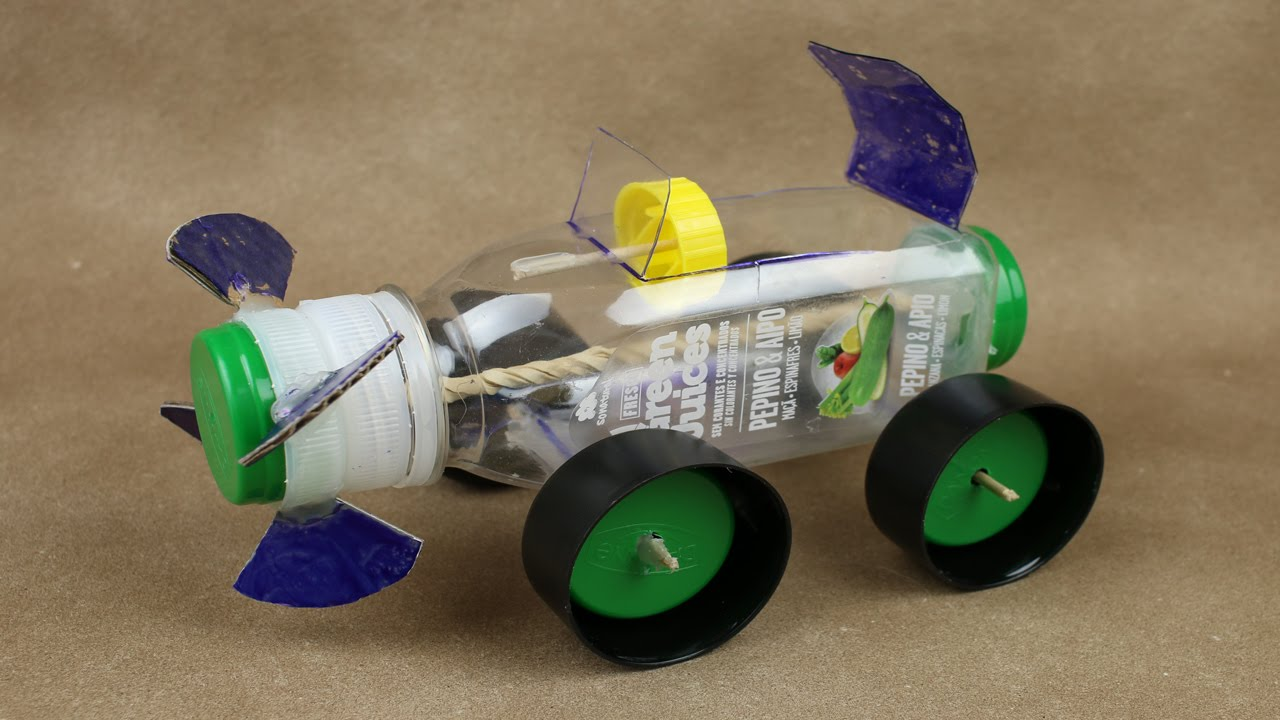
If the object is long, like a pencil, then you will only need two pieces. If it is short, like a toothpick, then you will need four pieces. Gather four bottle caps. You will use these caps as your wheels. Paint the car and wheels. You can paint the outside of the bottle and the wheels. Place the axles into the plastic bottle. Depending on the material you chose, this might be two or four axles.
For a longer object, run the axle all the way through the set of holes on the other side. For a shorter object, like a toothpick, place one in each hole. Drill a hole into the lid. Knot a string and then thread it through the lid. Make sure the knot is on the inside of the lid. Screw the lid onto the plastic bottle. Cut the top of the bottle to make a windshield. Using a sharp object like a box cutter, cut a rectangle or square into the top of the bottle.
Only cut three sides of the shape so that you can fold it up. Cut it so that when you flip it up the windshield faces the lid of the bottle. Drill a hole through each of the four plastic lids. Using a drill or sharp object, create a hole in the center of the lids. Place the bottle caps onto the axles of the car. Run the axles through the holes you drilled in the bottle caps. See how the car sits. If the lids are too big or too small, then the car may not move. Have the top of the lids face the car so that it has more stability.
Use the string to pull the car. Method 2 of Find four bottle caps. Poke holes into the caps with a sharp object like a box cutter, a pair of scissors, or a knife. The caps will be your wheels. Place two bamboo skewers on a milk carton. Cut the skewers so that they are slightly longer than the width of the milk carton. The skewers will act as the axles for the car. If you want the axles to run through the milk carton, take this time to puncture two parallel holes on each side of the carton.
Push one end of the skewers through bottle caps. Make sure the top of the lid is facing towards the milk carton as this provides better stability. Use glue where the skewer and cap meet to make it sturdier.
Be sure to let the glue dry before proceeding. Place straws on the skewers. Slide the free end of each skewer through a straw. Cut the straws down until they are slightly shorter than the skewer. Having the skewers inside of the straw will make your car move faster.
Push the skewers through the remaining bottle caps. If you punctured holes in the milk carton, run the free end of the skewer through the holes before adding the other wheel. This completes your axles. Tape the axles horizontally across the milk carton. They should be parallel to the width of the carton. Customize the car. Use construction paper, paint, or markers to decorate the carton.
You can also cut shapes into the milk carton to give it character. Method 3 of Measure and cut a piece of cardboard. The piece should measure 8 centimeter 3. Take a piece of measuring tape and trace the measurements onto the cardboard using a pen or a pencil.
Use a box cutter the cut along the traced line. Drill a hole into 4 plastic lids. These will create the wheels for the car. Cut a straight straw in half. Take each half of the straw and tape them horizontally across the cardboard piece. Make sure the straws are parallel to the width of the cardboard piece.
Run a skewer through each of the straws. The skewers will act as your axles. Attach the lids to the skewers. Make sure that the top of the bottle cap is facing towards the cardboard. This will prevent the lid from catching on the cardboard. Cut the flexible drinking straw in half. Make sure the pieces are of equal length. Stretch the balloon.
Inflate and deflate the balloon a few times to stretch the rubber. Secure the balloon to the flexible drinking straw with a rubber band. Place the elastic part of the balloon over one side of the straw.
Take a rubber band and wrap it Build A Toy F1 Car over the elastic part of the balloon with the straw inside. Blow into the straw to test if the rubber band is tight enough. No air should be able to escape the balloon. Tape the balloon and straw to the cardboard piece. Flip the cardboard piece over so that the axles are on the bottom. Place the balloon and straw on the cardboard, parallel to the length of the piece.
Make sure the end of the straw is hanging over the edge of the cardboard. Tape the end of the straw to the cardboard.
Blow into the straw. Pick the car up and blow into the balloon through the straw. Pinch the straw so that no air escapes it. Place the car on a flat surface and let go of the straw.


|
Portable Planers Ratings Online Band Saw For Cutting Logs 01 Carpenter Tool Tote 2019 Cnc Carving Fusion 360 Led |

HiKi
04.08.2021 at 13:32:38
KARATEIST
04.08.2021 at 10:23:38
JAGUAR
04.08.2021 at 10:36:16
desepticon023
04.08.2021 at 23:49:40
TaKeD
04.08.2021 at 22:10:42