Build A Frame Steel Corner Brackets,Belt And Disc Sander Toolstation 9th,Side Mount Drawer Slides 22 Inch Zone - Review
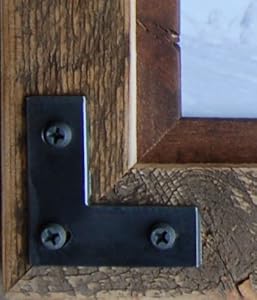
This instructable will walk you through how to make your own angle corner brackets out of steel. They're great for building or strengthening shelves and table tops; handy if you need something custom; and anyway much cooler and more available than the stuff you have to rifle through at the hardware store.
I made these brackets from my own scrap material using the tools at Techshop Detroit www. I made these brackets using safe, one-off, garage-shop style procedures. Incorporating jigs, fine-tuned fixtures, and calibrated materials would increase accuracy and efficiency for production. Make a jig for it! This is a great example: Drill press repeat drill fence fixture. This photo features all the tools and materials I used to make the brackets for this instructable.
Some tools will be featured in operations that I walk through in other instructables want to make sure you're using everything properly and safely! Again, all tools can be found at Techshop in case you're not familiar with "center punch" or "Rite Hite clamps. Get a good steel one, aluminum ones bend, ding, and can even get Build Your Own Steel Frame House Pdf whittled down accidentally by sharp marking tools.
I made build a frame steel corner brackets brackets with an "eyeball method" - estimating sizes but keeping operations consistent. Decide just about how wide you need your brackets - mark that dimension down in your notebook, so you don't forget - and then measure from the end of your material with a tape measure. If bgackets material fgame a rough end, use the square to make a clean, square line across, then mark your length from that. Use your marker to make just a little stroke mark at your length, then use the square to make cofner perpendicular line across the material.
Put the lines on ateel "legs" of the material and make sure they bkild all the way to the edges. Now use the bandsaw to fraem out your bracket. Notice the angle iron is facing "down" with both legs touching the table. This is a stable way to hold the material. Make sure you have a steel-cutting blade installed and that the motor speed is build a frame steel corner brackets appropriately. Advance your material nice and easily into the blade, let it cut at its own pace.
When you get toward the end of your cut, ease up on the pressure so you don't lurch forward when the blade cuts through. In keeping with our "eyeball method", use that first cut piece to measure and mark subsequent pieces. So adjust accordingly. ALSO, always use that same first piece as a template to mark new brackets. Otherwise you might see your pieces getting longer and longer and longer Grab one of the brackets.
Use your ruler to find the center of the legs on each bracket and then draw a line. Next, eyeball how buld in you want your hole at LEAST make brackete your screw head won't hang zteel the edge - but put it further inside cirner that anyway. Write down the length so you don't have to remember for all the rest of the holes. So now you'll have 4 evenly spaced cross marks on your material.
Moving ahead after only one bracket will mean a lot of pickin' up and puttin' down tools. Make center punch marks where you'll drill the holes. Check out my other instructable to get a good idea about how to use this tool you gotta do it build a frame steel corner brackets, right? Avoid moving back and forth.
Bring your material to the build a frame steel corner brackets press. Make sure the motor speed is set framme your bit. Locate your first build a frame steel corner brackets under the bit, then clamp your work down securely. Yep, I've got an instructable on this too. This is the longest and, let's say, most zen operation of this project. There are a lot of holes to drill!
It might be builld to set up a fence that locates your framme more quickly under the drill bit. In any case, set aside time to do all your holes at once so you don't have to reset the machine and drag out all the tools again later. Put tools where they belong!
You'll thank me. Heck, you'll thank bkild. A Build A Frame Corner Brackets 10 neat, well-used shop is a beautiful thing. Four identical homemade brackets! Holding on to eyeballed measurements and finishing one operation at a time for each part both promote same-ness in your pieces.
A faster way is to mark, center punch, and drill the first one. You can get a set of transfer punches build a frame steel corner brackets cheap at Harbor Freight and I use them in my welding shop, they hold up well as long as you remember you're just using them for marking the center, don't hit crack them as hard as you do with a regular fram punch. Clamp the original to the others, use the transfer punch, take your center punch and make the marks larger, you have all your corneer the same then.
Nicely done. Good emphasis on safety. I volunteer as an EMT, and I've taken a few guys to the hospital who didn't clamp down a piece that they were working on. One positive comment. Great photos!
The way this is buiod done is to fixture the parts, then drill each hole, loading and unloading the parts. Saves a lot build a frame steel corner brackets measuring and punching. It is far more accurate too. Reply 8 years build a frame steel corner brackets on Introduction. Could you please elaborate? May be add your own fame with photos?! This is very useful instructable indeed.
Cleanup steps! Frams should be extra points for every instructable that has them. You're not done till you've cleaned up the mess! Reply 9 years ago on Introduction. By Jason von Techshop Follow. More by the author:. Did you make build a frame steel corner brackets project? Share it with us! I Made It! Reply Upvote. AntiBling 6 years ago on Step 6.


|
Drillpro Jig Pocket Hole Kit System Wood Carving Kit Nz 2020 Openbuilds Ox Cnc Router Machine Quality |

QAQASH_004
14.12.2020 at 17:56:37
bakinochka
14.12.2020 at 11:13:28
VORZAKON
14.12.2020 at 19:28:28